
Mini Office in a Chest How-To - Martha Stewart Home & Garden. Furniture Painting Tutorial and Tips! « The Cerniks. Over that past year, I have tackled several painting projects.
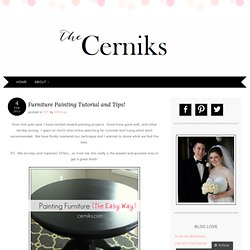
Some have gone well…and other terribly wrong. I spent so much time online searching for tutorials and trying what each recommended. We have finally mastered our technique and I wanted to share what we find the best. P.S. We are lazy and impatient DIYers….so trust me, this really is the easiest and quickest way to get a great finish! As newlyweds and new home owners, we have an empty house that needs A LOT of furniture. 4 steps and you are done! Step 1. Every piece of furniture must be prepped. We needed to get rid of the pre-loving on our tabletop, so I sanded it with our orbital sander. For pieces with deep ruts or dents, I suggest Elmers wood filler with a little sanding after it dries.
If you have a piece that doesn’t require sanding (or if you just don’t want to), give the furniture a good cleaning with a TSP product. Step 2. Priming is very important…don’t skip it! 5 Minute DIY- Color Code Your Keys. A Bubbly Life is on Facebook, Twitter and Pinterest, would LOVE for you to join me there!

On Leap Day, I announced A Bubbly Life's Pinterest Project- One Pin At A Time I chose one I desperately needed- coding my keys so I can identify them! I do not know if this will prevent the discussion- Where are My Freaking Keys?! Between my husband & I, but the keys are now looking prettier! My Pinspiration was a post from the lovely blog Happiness is...To Each Their Own. who did a glitter key- But I did not have glitter or glue and did not want to buy any, so I decided to use my new Spring colors set of nail polish I had!
Happy-Go-Lucky: Easy Candle Upcycle. How many of you have candles that look like this?

I have an entire shelf of them hidden behind picture frames! So in an effort to declutter and get a little things organized before we decorate for the holidays I decided to take these ugly things and make brand new layered candles. This was such an easy project to do. I can’t believe I never did this before. All I needed to get were these wicks from Michael’s and one new glass container. Step 1: Melt your first candle down completely. Step 2: Place the new candle wick in your clean jar. Step 3: Pour melted wax into new jar. Step 4: Once the first layer of wax was completely hard, I melted the next candle down on the stove and poured it over the first layer. Step 5: Cut the wick. I tried to combined scents that complimented each other.
Now I’m off to steal I mean collect old candles from my neighbors so I can make more!! Did I mention how nice your house will smell from melting the wax on the stove?