
Glowing Outdoor Orbs. O.K.
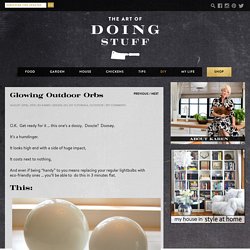
Get ready for it … this one’s a doozy. Doozie? Doosey. It’s a humdinger. It looks high end with a side of huge impact, It costs next to nothing, And even if being “handy” to you means replacing your regular lightbulbs with eco-friendly ones … you’ll be able to do this in 3 minutes flat. Opaque glass shades found at second hand store … Mini Lights from Christmas … Glowing orbs for your garden Want more STUFF like this? Get my posts emailed to you daily.
Total Cost: $3 In my attempt to make my backyard a teensy bit more contemporary than my 170 year old house I ran into a few problems. It isn’t gonna be for lighting if I can help it. So while perusing the local second hand store I came across some truly unfortunate stains on the carpet AND these ubiquitous opaque glass shades. Because as you can see, all you have to do is shove some old mini lights in em to create an outdoor light that even a magazine Editor in Chief will comment on. And here’s the best part! At night during the day p.s. T-shirt remix. Embroidery + Metal? Here's something I've been noodling around with lately - embroidered metal discs!

Wait - what? I bought a bag of these perforated beading discs a while back, intending to make some beaded pieces a la Miriam Haskell. Only I never quite got around to those, and eventually a different light bulb went on over my head. I could use the holes as embroidery guides! The resulting discs are so cute and easy to make, and lend themselves beautifully to lots of crafts. Like this simple cuff bracelet! The stitchery part is dead simple. Just leave a few inches of thread hanging from the back when you start stitching. Then you just follow the holes, making stitches in different colors and patterns. At the end of the strand, tie the ends of the floss into a double knot. The only thing to watch out for as you stitch is the fact that, for some reason, the outermost row of holes in the disc is not in a symmetrical pattern. Here, I glued a row of them to a paint-chip card.
Cute, eh? Snow-Globe Soap. Dec19 by Brenda Ponnay Stuff their stockings with something they can wash their hands with!

By Brenda Ponnay What’s cuter than a button, small enough to fit in a stocking, won’t rot your teeth and leaves you squeaky clean? A mini snow-globe soap, of course! This is technically just “melt and pour” soap so it might be considered cheating to some hard-core soap enthusiasts but I’m not about to mess with lye or distilling vodka when I’ve got a small child acting as my personal assistant. First you’ll cut up the glycerine into 1-inch chunks. Don’t be fooled by the picture above. After you’ve poured the glycerine, let it cool just enough to form a thin skin on the top. After all your toys are arranged, you can add your snow. Next you’ll pop it in the freezer for about twenty minutes or until the cubes are cool to touch from the underside of the ice cube tray (be sure to check the middle).
If you found us through Stumble Upon!