
Scrolling Spiral Wire Ring. [ Close Privacy Policy ] Privacy Policy / Your California Privacy Rights Revised and posted as of July 28, 2014.

Prime Publishing, LLC ("Company," "we" or "us") reserves the right to revise this Privacy Policy at any time simply by posting such revision, so we encourage you to review it periodically. In order to track any changes to this Privacy Policy, we will include a historical reference at the top of this document. This Privacy Policy will tell you, among other things: Your California privacy rights.
ACKNOWLEDGEMENT/YOUR AGREEMENT Company websites are not intended for use by individuals under the age of 18 or those who are not legal residents of the United States. HOW DO WE COLLECT INFORMATION AND WHAT INFORMATION DO WE COLLECT? Distribution Partners Website operators that license our ad serving technology pass information to us so that we may serve advertisements to you. Website Registration Forms We collect information about you when you register on one of our websites. How to make this Sterling Silver Hook and Eye Wire Wrapped Bracelet. Learn Beading · Princess Wire-wrapped Ring. This ring is just too pretty to be so fast and easy!
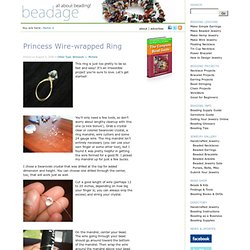
It’s an irresistible project you’re sure to love. Let’s get started! You’ll only need a few tools, so don’t worry about lengthy cleanup with this one (a nice bonus!). Grab a crystal clear or colored Swarovski crystal, a ring mandrel, wire cutters and some 24 gauge wire. The ring mandrel isn’t entirely necessary (you can use your own finger or some other tool), but I found it was pretty helpful in getting the wire formed for a good fit. I chose a Swarovski crystal that was drilled at the top for added dimension and height. Cut a good length of wire (perhaps 12 to 20 inches, depending on how big your finger is; you can always snip the excess) and string your crystal.
On the mandrel, center your bead. Pull the formed wire off the mandrel and bring one end of the wire around the base of the bead (to secure it), then bring that piece of wire back around until it’s pointing outward. Beads and Crystals Ring. This delicate beaded ring is made using the same stitch as the peyote rings, bracelets, and beads that we’ve posted before.

This project is all about how changing up the beads used can make a huge impact on the look of the finished ring. Supplies: - 3mm fire polished Czech crystals - 8/0 seed beads - 11/0 seed beads - 11/0 cylinder beads - beading needle - beading thread (I used Nymo 00) You can make this ring as tall as you want, but I found 7 crystals to be a nice size. If you use 7 crystals like I did you’ll need 14 each of the 8/0 and 11/0 seed beads, then a couple grams of the 11/0 cylinders.
You could replace the 11/0 cylinders with 15/0 seed beads if you prefer. From this point on, I’ll refer to the 3mm crystals as “crystals,” the 8/0 seed beads as “large,”, the 11/0 seed beads as “medium,” and the 11/0 cylinders as “small.” Want more information about seed bead sizes, shapes and finishes? Go through all of the beads twice, then through the first 2 beads again.
RubysAnklet. * I like to use a heavier thread for ankle braclets since they get more stressed than a bracelet.
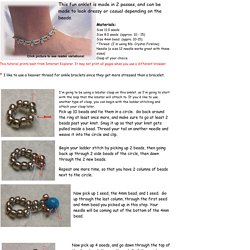
I'm going to be using a lobster clasp on this anklet, so I'm going to start with the loop that the lobster will attach to. If you'd like to use another type of clasp, you can begin with the ladder stitching and attach your clasp later. Pick up 10 beads and tie them in a circle. Go back around the ring at least once more, and make sure to go at least 2 beads past your knot.
Snug it up so that your knot gets pulled inside a bead. Begin your ladder stitch by picking up 2 beads, then going back up through 2 side beads of the circle, then down through the 2 new beads. Repeat one more time, so that you have 2 columns of beads next to the circle. Now pick up 1 seed, the 4mm bead, and 1 seed. This fun anklet is made in 2 passes, and can be made to look dressy or casual depending on the beads. Now pick up 4 seeds, and go down through the top of the 4mm bead, then up through 3 of the seeds. Chic Beaded Ring Tutorial.