
Gwenny Penny: Side-Tie Pillow Tutorial with Ameroonie Designs. Hi there Gwenny Penny readers!
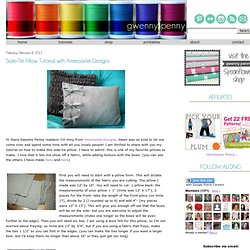
I'm Amy from Ameroonie Designs. Gwen was so kind to let me come over and spend some time with all you lovely people! I am thrilled to share with you my tutorial on how to make this side-tie pillow. I have to admit- this is one of my favorite pillows to make. I love that it lets me show off a fabric, while adding texture with the bows. First you will need to start with a pillow form. Take your ties and fold them in half. Take your two front pieces. Lay the back panel of the pillow on a flat surface. Take the front panel that will be on top of the pillow and fold it in half along the hemmed side. Decide how far apart you want your ties to be- remembering that you will be sewing around the perimeter with a 1/2" seam allowance to finish the pillow. Now we're going to place the ties. We're almost done! Here it is all ready to be sewn. Clip all the corners and turn the pillow right side out.
Some more shots of the pillows. Xoxo, Amy Isn't this pillow gorgeous?!?
Clothing. Quilts and Blankets. Patterns and Tutorials. Beginner's Tips. Wee Little Stitches. Is there a better Rogue's Gallery than Batman's?

Since his earliest days Batman has always been confronted by a vast array of dastardly, colourful foes. Returning time and again to spar with the World's Greatest Detective, it seems one or other (or sometimes all) of his Enemies are just as stubborn and iconic and the Batman himself. Featuring the Penguin, Poison Ivy, Two-Face, The Joker, Harley Quinn, Bane, and the Riddler, this stitch is the perfect compliment to our Batman & Friends pattern. Fabric: 14 countGrid Size: 98W x 70HDesign Area: 6.57" x 2.93" (92 x 41 stitches) This listing is for a PDF file of the pattern, not the finished product. . © 2012 Christopher Gable Patterns are for personal use only. French Desk Set: Basket Liners. I adore being organized.
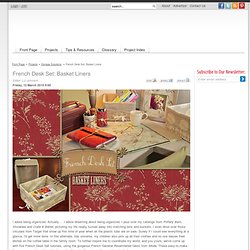
Actually ... I adore dreaming about being organized. I pour over my catalogs from Pottery Barn, Storables and Crate & Barrel, picturing my life neatly tucked away into matching bins and buckets. I even drool over those circulars from Target that show up this time of year when all the plastic tubs are on sale. Surely if I could see everything at a glance, I'd get more done. Take note that this project uses a ¼" seam allowance rather than our site standard ½". Any Sewing Machine (we recommend the Janome 2160DC) Measure your basket Measure the width of the front (the back will be the same measurement). Measure the base. Optional handle opening Measure the opening width and height. Final measurements Now that you have all your basic measurements, you need to account for your ¼" seam allowances all around.
Here's an EXAMPLE of the measuring formula described above, using our large basket as the model: Height: 6¾" = 12¼" (formula described above) Cut out your pieces. How to make your own dress form. When starting on the wonderful and exciting journey of making your own clothes or altering old ones there is one thing you will definitely need to make your job easier...that is a dress form.
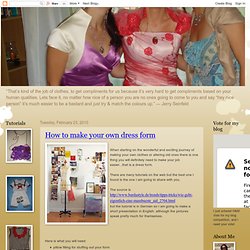
There are many tutorials on the web but the best one I found is the one I am going to share with you. The source is but the tutorial is in German so I am going to make a short presentation in English, although the pictures speak pretty much for themselves. Here is what you will need: pillow filling for stuffing out your formscissorsmetal base2-3 rolls of tapecardboardan old hip-length T-shirtfoil (for the neck) take on the T-shirt and wrap your neck in foil to protect it then take the following steps one by one in wrapping the tape. And the end result is pretty good! Now you have your dress form and can start working on your most exciting sewing projects!