Untitled. NCASE M1 User Build Gallery. NCASE M1 User Build Gallery. NCASE M1: a crowdfunded Mini-ITX case (updates in first post) - Page 803. Dropping by after a long time.

My system has been used mostly for gaming on an eyefinity set-up since it arrived (V1). At the time there were some people discussing about running the 290x on 450 watts. I will share my experience. I have ran the reference 290x on the Silverstone SST-ST45SF (450W non-gold) with an 4670k at 4.6 Ghz at 1.34V for the last few weeks. To achieve that I used the Noctua NH-U9B SE2 and delidded the CPU and used sandpaper to make the Noctua and CPU extremely flat (mirror finish). Before that I used that same setup but without the overclock. I never had any trouble. Some pics of my extremely wired up system: If any1 wants more pics or info let me know. Bmyton's Just NCase. Loop Discussion I think I'm going to work on the custom loop in two parts.

First a temporary loop that will use my existing equipment until I can get over the shock of a $200 computer case. Second I will build in an upgraded pump (probably) and incorporate a quick disconnecting external loop to supliment the EK 240 PE that's going to be inside the case. The Temporary Loop (Click to show) I could build this loop from the parts I already own just to get the PC up and running. Oliver's Blog. A build with the ncase M1; my first mini-ITX build without many compromises.

Flickr set. Ncase Cryorig. HEXXEH's FastMod2. Aerial@ to komp do grania,dopracowany i wydajny,co koncepcji to Krystian wybrał co mu odpowiada,ja nie decyduję.

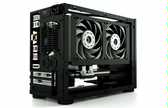
Będzie jak podałem wyżej black mod grafy i kilka detali ale to zupełnie inna koncepcja od tej u Irka. Modyfikacje. Ramka podtrzymująca zasilacz dotyka topu,trzeba odciąć 4mm alu aby szyba zamontowana na top nie kolidowała z ramką PSU. To prosty temat...Proxxon+pilnik i kilka minut zabawy. Izaka's Ncase M1 V2. MrJerico's - 240 Rad x2 Ncase M1. Hey guys, sorry for another Ncase M1 build... seemed like there was some interest in seeing the M1 with two 240 rads in it though.

Ill do the generic "what's in there" list then, pictures! Computer: - 4790K OC at 4.8GHz - EVGA GTX 780 SC - 16GB Trident X 2800MHz - 256 GB 840 pro SSD - Silverstone SX600-G - Asus Impact VI Cooling Loop: - 2X Alphacool ST30 240mm rad - Swiftech Apogee Drive 2 - EK FC780GTX water block (Copper) - FrozenQ Ncase M1 reservoir - 2X Scythe GT AP-15 - 2X Scythe Slipstream slim 1600RPM Before I start, sorry for the potato quality I took them on my Iphone.
Everything fits in, it was a tight though, the two extra tubes for the second rad was definitely noticeable. Probably the hardest water cooling loops to set up ever. This is probably the most interesting part. NCASE's: Ncase M1 User Build Gallery. DotGif's M1 'Mini-ITX' build. Domp's 'Project Eiswasser' L3p's 'Ncase M1' Specifications Dimensions: 240 * 160 * 328mm, 12.6L (250 * 160 * 338mm overall)Motherboard support: Mini-ITX, Mini-DTXLiquid cooling support: Single 120mm or 240mm slim radiatorPSU: SFX, ATX (limited)Drives: 3 x 3.5″ mounts:

Malik's 'NCASE M1' MikeTheTiger's 'Tiny Little' I decided to jump the gun, and post my build log.

I won't have time to start on it until the coming weekend, but I thought I would post a little tease. I'm using the parts that I transplanted from my old prodigy build, as well as the newly arrived liquid cooling parts: Swiftech H220 Swiftech Hydrx PM 2 coolant Monsoon 90° Rotary LightPort fittings (x2) matte black Monsoon 3/8" x 5/8" compression fittings (x2) matte black Monsoon Red LED Plugs (x2) Monsoon Silver Bullet G1/4 plug (x1) Primochill PrimoFlex Advanced LRT Tubing in Bloodshed Red I already have an EK GTX 770 water block and backplate waiting to be installed. OverRated's 'M1 Build' Printermeow's 'Pump + res combo' WiSK's description of the process is essentially correct, but I'll add a bit more detail.

Through hole parts are attached after the pick and place and reflow processes for SMT components are complete. Depending on whether it's a single or double sided board, and manufacturer preference, they're then either hand soldered or wave soldered. Most likely hand soldered in this case, since I think there are SMT components on the back of the board. Also it is possible for solder to end up on the connector side of the via. If you're hand soldering and use way too much and/or the through hole component isn't completely flush with the board, some solder will get wicked through the hole and end up topside. My professional opinion on the grainy photo provided is that those are the female header pins in the socket. Live OR Die's 'NCASE M1 Liquid cooled Build' WiSK's 'Moneypenny' PcPer 'NCASE M1 review' Building the System: Storage Options Storage Drives The case floor provides mounting options for 2.5” and 3.5” drives, but only one at a time.

Here we see a 3.5" drive on the bottom, and it's mounted on rubber washers to reduce vibration: Looking elsewhere there are actually mounts for an additional 2.5" drive on the inside of the case front. There is a small tray that can be removed to allow proper installation Why would this drive need to be mounted on a bracket? Storage options change considerably if the build is made without a double-width radiator. And this attaches securely to the frame, still allowing a 120mm fan or AIO cooler to be mounted next to the drive cage. The storage options with the M1 are impressive for the enclosure's size, but are dependent on the other choices made.
Optical Drives There is support for a standard slot-load notebook optical drive via a bracket on the front of the case. SPCR 'NCASE M1 review' Viewing page 1 of 6 pages. 1 2 3 4 5 6 Next April 9, 2014 by Lawrence Lee At the end of every case review we usually discuss its strengths, weaknesses, and make suggestions for improvements in future revisions.

More often than not our comments and advice go unheeded. It's frustrating sometimes, seeing product after product land at our door with the same old flaws and annoyances. Some of the better manufacturers take steps to correct such issues but most just continue churning out enclosures of the same mold. In 2012, a pioneering group of enthusiasts on [H]ard|Forum decided to actually do it. We managed to acquire one of these units, and we have to say, it's an absolute beauty. The M1 ships with an ATX power supply frame (ATX units are limited to 140 mm) as the stock frame is for SFX units, a set of four fan grills and filters, brackets to stack 2.5 inch drives in pairs, screws and grommets, and an internal PC speaker.
NCASE M1 picture and build general log. Waiting for case, but proposed build, currently living in a Cardboard Case, Version 2.1 Design GoalsFunction - This computer will be used as my primary rig - 95% of its operation will be on OSX as my browsing, emails, work computer - 5% of its use will be as a gaming machine, thus GPU performance is a priority in this situation. Key Design Goals - Compact - Achieved naturally by the NCase's design and dimensions (this is why we are here in the first place) - Silent at idle, Quiet at load - This is a high priority in my build, and money and effort will be spent in this regard. Practically I know it doesn't make a big difference, but it helps me to enjoy my audio setup at lower listening levels. Secondary Design Goals - Efficient thermal design, which lends itself to silence. - Portability - Ability to take this rig anywhere, and be convenient enough to simply plug and play.
i5 4570 - Plenty for my gaming needs, and thats about it. Photatoes Photos from version one through to version 2.2... Led color tip ;)