
Button Statment Rings « It’s September and that means it’s time to add another statement piece to your collection…. obviously!

I heart almost every piece Nicole Richie designs for House Of Harlow 1960, especially her oversized rings. As amazing as these rings are they’re also an easy DIY. My friend Jenni, from I Spy DIY, did a project a few months back where she transformed buttons into earrings. #SuperFab This got me thing…let’s transform buttons into statement rings! Buttons, buttons everywhere!! Materials: Buttons, Clippers, Glue, Rings With Flat Tops (available at the jewelry supply store) Use your clippers to remove the shank from the back of the button. Once you’ve made the back of the button flat, use an ample amount of glue to secure the ring to the back of the button. Here’s another hint: If you can’t find a flat ring base, Ring Pops are a fun alternative. Once the base has dried, glue on the button.
I now thing I have enough new statement rings to get me through the month. P.S.- I made this... DIY Gallery Video Behind the scenes Book About Press Apr 01 Accessories Fashion Jewelry Lifestyle about 5 hours ago "I've always wanted to read a magazine with my fingers"- my Mom as she looks at @ NETAPORTER on my iPad about 5 hours ago Ohhhh @ AJSlavin is queen of leotards RT @ OscarPRGirl : i need more leotards about 6 hours ago Cats & Dogs cc: @ jfisherjewelry. Rope Bracelet Tutorial. (for personal use only – all patterns/tutorials are copyright protected) Check out my new printable shop!

{here} Everything is 99 cents! Rosette Bracelet Tutorial! (for personal use only – all patterns/tutorials are copyright protected) Wow!

Can you believe that I finally posted it? As I said before, May really kicked my tushie! Happy to report that I am officially back into the crafting-swing-of-things! Tutorial That’s all folks… now go rock that bracelet! DIY Braided Bead Bracelet. It’s been awhile since our last bracelet DIY.

I don’t know about you, but our wrists have been begging for another colorful addition for months now. So after playing with some materials that were already on hand, we’ve created a tutorial for a braided bead bracelet, which is a not so distant cousin of the hex nut and wrap bracelet. Because honestly, you can never have too many . . . You’ll need: Cut the waxed linen cord into a 26″ and 19″ piece. Tie a knot about half an inch down from the loops. Start braiding the strands. Push the bead against the base of the braid, and cross the left strand over the middle.
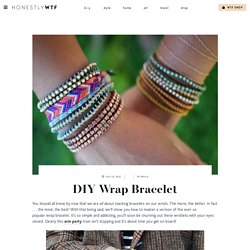
Keep a finger at the base of the braid, holding the beads in their place and keeping the braid tight. Finish the bracelet with another inch of braided cord, measuring it against the wrist. Thread on a two hole button – two strands through one hole and one strand through another. DIY Wrap Bracelet. You should all know by now that we are all about stacking bracelets on our wrists.

The more, the better. In fact . . . the most, the best! With that being said, we’ll show you how to master a version of the ever so popular wrap bracelet. It’s so simple and addicting, you’ll soon be churning out these wristlets with your eyes closed. Clearly this arm party train isn’t stopping and it’s about time you get on board! You’ll need (for a double wrapped bracelet) :* Lengths will vary depending on the size of your wrist (see comments for suggestions). Fold the length of leather cording in half to form a loop. Place the ball chain along the leather cording with the end of the chain meeting the end of the wrap.
Continue wrapping while checking it for fit around the wrist. When you have reached the end of the ball chain wrap the linen cording around the leather strands 2-3 more times. Thread the hex nut through the strands and tie a second knot. Trim with scissors and your wrap bracelet is finished!!