
The sloppy slip knot: how to work in the round with no hole If you're new here, you may want to subscribe to my RSS feed.

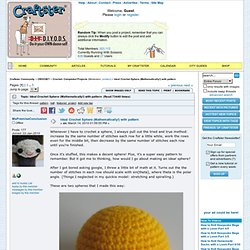
Thanks for visiting! The typical way of starting to work in the round is less than ideal for amigurumi. The standard way is to make a slip knot, chain 2, and then single crochet six times into the first stitch. Why isn’t this the best? It leaves an icky hole that lets stuffing poke through, as shown in the photo above. A number of ways have been devised to solve this problem, one of which is the magic ring. To begin, don’t make a slip knot. Now, continue on as usual. Here’s the magic part. It’s easy! Guess what? Download my free e-book:The Beginner’s Guide to Amigurumi! Ideal Crochet Sphere (Mathematically!) Whenever I have to crochet a sphere, I always pull out the tried and true method: increase by the same number of stitches each row for a little while, work the rows even for the middle bit, then decrease by the same number of stitches each row until you're finished.
Once it's stuffed, this makes a decent sphere! Plus, it's a super easy pattern to remember. But it got me to thinking, how would I go about making an ideal sphere? After I got bored asking google, I threw a little bit of math at it. Turns out the the number of stitches in each row should scale with sin(theta), where theta is the polar angle. These are two spheres that I made this way: I included the pattern for the 2 spheres at the end of this post.
I found it tricky to figure out how to squeeze a weird number of increases into a row where they in no way fit evenly, so let me know how these patterns work out for you if you try these! Also, math is fun! The Patterns: 20 Row Sphere: 26 Row Sphere: How to Crochet: The Magic Adjustable Ring. By Alicia Kachmar – 53 Comments One way of crocheting in the round is to chain 2 and then make a certain number of stitches into the 2nd chain from the hook (you can do so with any kind of crochet stitch–sc, hdc, dc, etc.
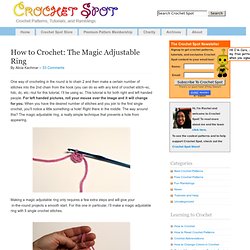
–but for this tutorial, I’ll be using sc. This tutorial is for both right and left handed people. For left handed pictures, roll your mouse over the image and it will change for you. When you have the desired number of stitches and you join to the first single crochet, you’ll notice a little something–a hole! Making a magic adjustable ring only requires a few extra steps and will give your in-the-round projects a smooth start. With the yarn tail hanging for a few inches along the inside of your left hand, form a ring and rap around your index and middle fingers. Hold where both strands of yarn overlap along the ring, the working yarn behind the ring.
Now there are two loops on your crochet hook. Do you have questions about making a magic adjustable ring?