
DIY Painting Tips.
Devine color. Concrete counters. Aging Your Painted Finishes; Wax Tutorial. Plywood to plank flooring tutorial. When recently redoing the room above our garage, we decided that we were DONE with the carpet.
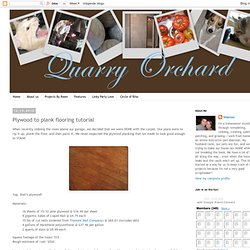
Our plans were to rip it up, plank the floor, and then paint it. We never expected the plywood planking that we made to look good enough to STAIN! Yup, that’s plywood! Materials: 16 sheets of 15/32 pine plywood @ $16.49 per sheet 9 gigantic tubes of Liquid Nail @ $4.75 each 10 lbs of cut nails (ordered from Tremont Nail Company) @ $69.63 (includes s&h) 4 gallons of Varathane polyurethane @ $37.46 per gallon 2 quarts of stain @ $9.99 each Square footage of the room: 533 Rough estimate of cost: $520 We started the project with sheets of plywood. It, surprisingly, only took us an hour and 45 minutes to cut the sheets into the planks. With the materials purchased and gathered, Dustin cleaned up the room with the shop vac. Then the fun started. Before we began, we made sure to figure out our pattern so that each row of flooring would alternate where the nails were.
We hand stained the whole floor. Wide Plank Flooring. My house (a log home...rsustic in other words) has wide plank flooring.

I am not an expert on flooring by any means, but 10 years ago I sawed out some wide Ash boards and used them in my house. In fact my whole house has these wide planks for flooring. Only the Bathroom and Bedroom have Linoleoum and Carpet respectively. If I could do it over again, I probably would screw and plug the floor with contrasting plugs. How I actually laid this floor was much more simpler. Because I did not have enough boards of any one width, I alternated them. Now the thing is, I do get some expansion and contraction. How to Decorate a Plywood Floor. How to paint horizontal stripes on your wall! Painting stripes on your wall can be a daunting task.

I promise you, it’s not very hard! I have tried several methods and found the easiest way to do it! I started with this. I really love my dresser turned tv console and I swear I have the PERFECT grey for me! Grey is a hard color to find the perfect shade but I lucked out here! Step 1: When painting stripes on a wall, you’re going to first paint the wall a solid color.
I LOVE LOVE LOVE the color! Step 2: Next, comes measuring and taping! I started at the top of my wall against the ceiling and measured 9″ down and used a sharpie (couldn’t find a pencil!) **NOTE** This method is only accurate if you do NOT have a slanted or vaulted ceiling! I wrote a “w” for “white” on the wall so just to keep everything straight. Step 3: Next, I taped off the sides of the wall on the “white” labeled stripes to get a clean look against my other grey wall. Step 4: Check your measurements, use a leveler (or your level iPhone app!) How I make 'old' signs.
Homemade Concrete Stain Recipes. Signs howto.