
NormalMap - Polycount Wiki. What is a Normal Map?
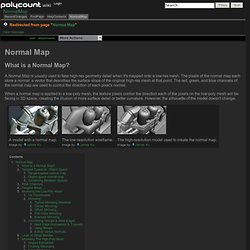
A Normal Map is usually used to fake high-res geometry detail when it's mapped onto a low-res mesh. The pixels of the normal map each store a normal, a vector that describes the surface slope of the original high-res mesh at that point. The red, green, and blue channels of the normal map are used to control the direction of each pixel's normal. When a normal map is applied to a low-poly mesh, the texture pixels control the direction each of the pixels on the low-poly mesh will be facing in 3D space, creating the illusion of more surface detail or better curvature. However, the silhouette of the model doesn't change. Tangent-Space vs.
Normal maps can be made in either of two basic flavors: tangent-space or object-space. Tangent-space normal map Predominantly-blue colors. Maps can be reused easily, like on differently-shaped meshes. Maps can be tiled and mirrored easily, though some games might not support mirroring very well. Easier to overlay painted details. Mirroring. Maya To UDK: Importing Static Meshes Using ActorX & FBX.
In this tutorial you'll be learning how to import Static meshes from Maya to UDK (Unreal Development Kit) using the ActorX plug-in, as well as the FBX Importer plug-in in Maya.
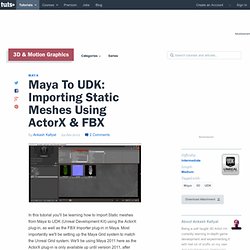
Most importantly we'll be setting up the Maya Grid system to match the Unreal Grid system. We'll be using Maya 2011 here as the ActorX plug-in is only available up until version 2011, after which Epic Games stopped developing ActorX due to the implementation of the FBX pipeline in UDK. Alright then, first let us setup the grid system of Maya to match with the Unreal Grid System. Understanding the Grid System 1. As most of you all know, Character height in Unreal units is around 96 Unreal units tall. To set that up, we really need to understand the Unreal unit first, like how are the grids divided. Click To Enlarge 128 / 8 =16 small squares, OR 16x8 =128 Larger squares. Load Maya and then go to display option, Click on the box near the Grid menu to get the grid option, just like in the pic below.
Maya Grid Options. Error: "adlmPITSetProductInformation failed" - Beyond the Paper. SetParent: Object 'renderView' not found. nDo 2 complete run-down. Texture Creation using nDo2. About : Creating textures using photosources for Diffuse, and nDo2 for the Normal map.
Target Audience : Photoshop and nDo2 users – Intermediate Platform : Photoshop/nDo2 Latest Update :October 2011 Introduction I never really got into zBrush and Mudbox, I have always stuck to the oldschool approach of pure Photoshop for 2D work. No sculpting or such. zBrush and Mudbox are great tools, but it really adds an extra layer of complexity to texture creation, and I am not too fond of using too many different tools next to each other.
I much prefer a one stop solution for all I want to do. That pure Photoshop approach regained a lot of its credibility again with the recent release of nDo2. nDo2 is a new program that hooks into Photoshop, and allows you paint, sculpt, convert, and draw normal maps directly from within PS. In this tutorial I am going to show you how I usually create my diffuse textures, and how to then take a diffuse texture into nDo2 and use it to create a normal map for it. Creating Character Rigs for UDK using CAT in 3dsMax 2011.