
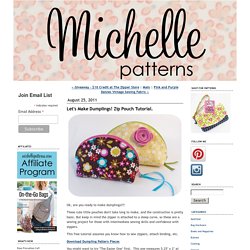
500 posts. I've been busy making patterns and samples and here's what you could make (if you'd like to join in!)
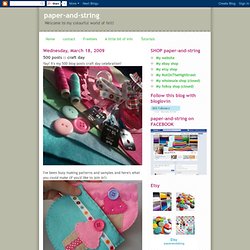
2-layer handstitched cupcake purses! Complete with an easy sew-in zip that the most terrified zip-sewer can conquer! This post has A LOT of photos to guide you through the process, I hope they make the instructions easy to understand :: To print the pattern simply right click the picture, save to your computer and print. It fits onto one piece of A4 paper. Cut out :: 2 purse pieces & 1 of each cupcake piece. On one of the purse pieces stitch the ribbon into position.
Stitch the ribbon to your cupcake piece. Make sure the ends of the ribbon are tucked underneath and then they can't fray. Pin you cupcake into position and stitch at right angles to the edge. Pin your cupcake icing into position and again, stitch at right angles to the edge. Sew your button on using a two strands of thread (it's stronger)
A Better Marker Pouch. I made more marker pouches this past fortnight.
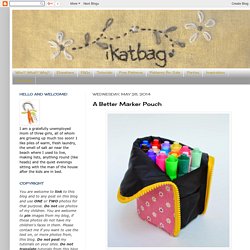
First, a peek into our handmade past. It was well-loved and much-used, but it was never any good, to be honest. Very hard to keep markers from falling out in transit, and spreads over too much space when open to access those markers. I know that this is practically craft blasphemy, given how utterly adored these pencil/crayon/marker/knitting-needle/crochet-hook/paintbrush/cosmetic implement rolls are in the DIY world, and I apologize in advance if I am offending any Devotees Of The Roll, but they don't work for me. Now, just like everyone else on that particular handmade bandwagon, I've made Rolls, and had my girls use them but . . . do you know what they almost always pick to use instead, given the choice?
Zip-top bags. Yes, those quart-size cheap sliding-zipper bags from the supermarket. I will not be shown up by a plastic bag! Pattern Free & Tutorial à CraftPassion.com. Have you ever had too many cards that your wallet can handle?
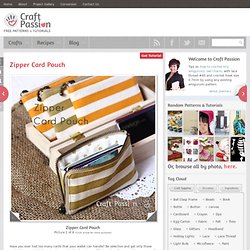
Be selective and get only those cards that you might be using in a particular shopping mall but end up they were the wrong one? Or, may be just forgot to “update” the cards in the wallet on your next trip? Can’t find the cards you thought you have already put into your wallet? Sounds familiar….. DIY: sketchy pleat clutch. Simple DIY today… Drawn with fabric markers, cut from a curved pattern, and constructed with a single pleat for a handy sized zipper clutch.
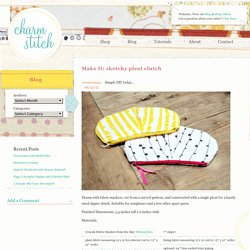
Suitable for sunglasses and a few other spare parts. Finished Dimensions: 5.5 inches tall x 9 inches wide Materials: Crayola Fabric Markers from the May Whimseybox7″ zipperplain fabric measuring 15 x 12 for exterior (cut to 7.5″ x 12″ wide)lining fabric measuring 15 x 12 (cut to 7.5″ x 12″ wide)optional: 24″ bias corded trim/pipingusual suspects: pins, thread, needle, water soluble penThis Complimentary Pattern Preparation:
Let's Make Dumplings! Free Zip Pouch Tutorial. - {michellepatterns.com} Ok, are you ready to make dumplings???
These cute little pouches don't take long to make, and the construction is pretty basic. But keep in mind the zipper is attached to a steep curve, so these are a sewing project for those with intermediate sewing skills and confidence with zippers. This free tutorial assumes you know how to sew zippers, attach binding, etc. Download Dumpling Pattern Pieces. Little boxy pouch tutorial « three bears. My latest favourite thing to make, little boxy pouches.
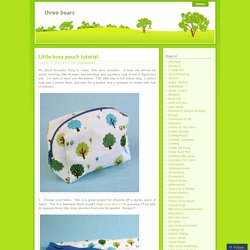
It took me almost an entire morning, lots of paper and sellotape and countless cups of tea to figure this out. I’m here to save you the bother. This little bag is 4.5 inches long, 3 inches high and 2 inches deep, just right for a lipstick and a compact (or better still, lots of sweets). 1. Choose your fabric. 2. 3. 4. 5. Needle and Spatula: Pleated Pouch Sewing Tutorial. I originally posted this project in August and have been meaning to make it again to do a tutorial ever since.
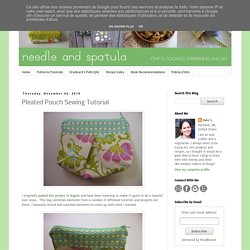
This bag combines elements from a number of different tutorials and projects out there, I basically mixed and matched elements to come up with what I wanted. It has squared off bottom corners which give it a good amount of inside volume and a nice shape. It can stand up (and would stand up even more if made with home dec weight fabric or using interfacing). It would be great as a small makeup or jewelry bag, to hold knitting or sewing notions, or for whatever you want!
Also, this is clearly not a grocery bag, but in the spirit of the Green Grocery Bag Challenge, you could make these to use as "wrapping" for small holiday gifts. Open wide zippered pouch: DIY tutorial. Doesn’t it ever get annoying digging through a zippered pouch?
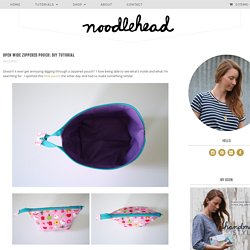
I love being able to see what’s inside and what I’m searching for. I spotted this little pouch the other day and had to make something similar. I also made a bunch of sizes, but today I’ll show you the small size, next time, I’ll share the medium and large sizes (not pictured) so you can make all three! Materials: fabric, 1/4 yard would be plentyzipper, at least 10″ long or longerthreadinterfacing of your choice, I used Pellon 101SF, or skip it all togetherscrap for zipper end pull Directions:(1/2″ seam allowance, unless otherwise noted) (Optional) Fuse on or baste on interfacing of your choice to main exterior pieces. Lay one exterior piece right side up, lay zipper (teeth side down) on top with the zipper pull at the left – aligning zipper tape edge to the raw edges of the top of the exterior piece.
Use your zipper foot and a 1/4″ seam allowance. Flip so that the fabrics are wrong sides facing and press. Travel Accessories: Roll-up Makeup Brush Case. This handy case is not only great for travel, it's also dandy for everyday storage of your make up brushes.
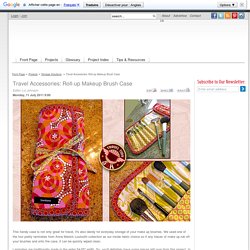
We used one of the four pretty laminates from Anna Maria's Loulouthi collection as our inside fabric choice so if any traces of make up rub off your brushes and onto the case, it can be quickly wiped clean. Laminates are traditionally made in the wider 54-55" width. So, you'll definitely have some pieces left over from this project.
In fact, you may have enough to make our stylish insulated lunch bag. Finished (and flat), the case measures approximately 18" x 9". Our Travel Accessories series is sponsored by Free Spirit Fabrics, as part of our Artist Trio Series introducing Anna Maria Horner's amazing Loulouthi fabric collection. Any Sewing Machine (we recommend the Janome 2160 Decor Computer) Creating the brush pockets From your roll of wax paper, cut one 18" x 9" piece. Make and attach the narrow ties On one 20" x 1" strip, fold in each end ¼".