
MADE: TUTORIAL: Heartbreaker Valentines - StumbleUpon. Who said valentines were only red and pink?
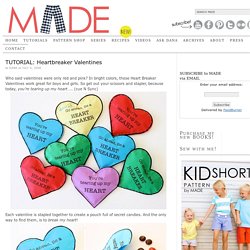
In bright colors, these Heart Breaker Valentines work great for boys and girls. So get out your scissors and stapler, because today, you’re tearing up my heart….. (cue N Sync) Each valentine is stapled together to create a pouch full of secret candies. And the only way to find them, is to break my heart! Skill Level: AnyNeeded: * colorful paper* computer printer* stapler/staples* scissors* candy Start by printing this template from your computer.Two options….1) You can find the PDF file HERE. I chose to print on bright colored paper so the Heartbreakers work for both boys and girls. Another option: print to white paper and let the your kids color the hearts themselves: Most of all, make sure your kids check out what you’re doing.
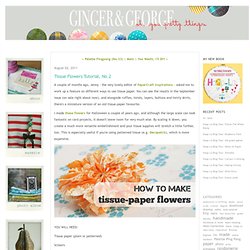
Staple around the outside of each heart, leaving an opening at the top of the heart for inserting candy (or, use your sewing machine to sew around the edge…though it might be more difficult to sew it shut. Giant Paper Rose Flower. If you loved the beautiful DIY wedding this morning and Nata’s gorgeous paper flower bouquets, you are in luck as Nata is sharing how she crafted them with us!

She was inspired by a template created by Morgan Levine on Martha Stewart (as was I in the flowers I created for this styled shoot). I just love that this basic idea has inspired different brides to create their own version of giant paper flowers – you might remember these equally awesome giant paper flowers from this wedding I shared last year. :) Thanks so much Nata for sharing how you created your giant pink paper rose + special thanks to Studio Castillero for the photos of the DIY + her wedding! Materials (to make one giant rose) Step 1: Cut the petals Cut 5-6 teardrop petals and 15-6 heart-shaped petals from the petal colored crepe paper. IMPORTANT: Crepe paper is directional so it matters which way you’re cutting the paper. Repeat until all of your petals are cut.
Tissue Flowers Tutorial, No.2 - gingerandgeorge. A couple of months ago, Jenny - the very lovely editor of PaperCraft Inspirations - asked me to work up a feature on different ways to use tissue paper.
You can see the results in the September issue (on sale right about now), and alongside ruffles, twists, layers, buttons and twirly skirts, there's a miniature version of an old tissue-paper favourite. I made these flowers for Halloween a couple of years ago, and although the large scale can look fantastic on card projects, it doesn't leave room for very much else.
By scaling it down, you create a much more versatile embellishment and your tissue supplies will stretch a little further, too. This is especially useful if you're using patterned tissue (e.g. Decopatch), which is more expensive. Tissue paper (plain or patterned) Scissors Ruler Pencil Thin wire (e.g. fuse or jewellery wire) Small button or circle of card PVA glue Measure and cut out two strips of tissue paper, each around 20cm long and 5-6cm wide. &jones design company - StumbleUpon. Welcome to flower week – five days of simple and delightful flower projects.
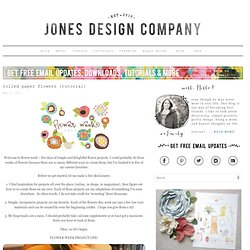
I could probably do three weeks of flowers because there are so many different ways to create them, but I’ve limited it to five of my current favorites. Before we get started, let me make a few disclaimers: 1. I find inspiration for projects all over the place {online, in shops, in magazines}, then figure out how to re-create them on my own. Each of these projects are my adaptation of something I’ve seen elsewhere. 2. 3. Okay, so let’s begin. Here’s what you’ll need: :: paper {either cover or text weight} :: florist wire :: scissors, pencil, glue gun STEP ONE: cut irregular circle This circle is approximately 8 inches, but you can do any size you wish.
STEP TWO: cut spiral Start at the outside edge and cut in a spiral fashion to the center. I like a sort of bumpy shape so that the petals end up a bit irregular If you aren’t so sure about your cutting skills, feel free to draw your spiral before cutting.