
Stuff to Make in my Old Age. Delightful country cookin': homemade air freshener. How to make your own air dried porcelain with common household ingredients. Anything that is quick, affordable and makes beautiful things is a craft winner for me . But…I often find myself uninspired for something new and different. I’ve found it in air dried porcelain (aka Porcelana Fria). What will someone make with 3 cups of white glue (PVA) 3 cups of cornstarch (Corn flour) one tablespoon of white vinegar one tablespoon of glycerin (health food or hobby shop), and 2 tablespoons of canola oil? The beautiful mouse and necklace pictured (compliments of Espirit ) is the answer! Amazingly simple and a GREAT school holiday project, get the kids into the kitchen to cook up some home made, air dried, porcelain.
Stencil with freezer paper (harry potter tee) Yes, I am a nerd.

I came up with a brilliant idea for a Harry Potter t-shirt and I couldn't resist. "Expecto Patronum! " However, you can make whatever kind of design you want with a freezer paper stencil. It doesn't have to be Harry Potter related. (Although it would be awesome if it was.) I learned about the joys of freezer paper back in my early college days. Basically, freezer paper is backed with a plastic coating that will stick to soft surfaces when ironed, but it peels off cleanly and easily. Tutorial: Homemade Sidewalk Chalk. By Michelle Vackar, Modern Handmade Child One of our favorite outside activities at our home is drawing with chalk on the driveway.

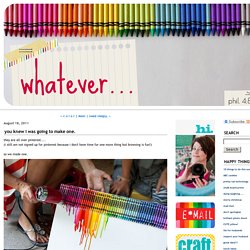
You can play hopscotch, four-square, and of course draw and create silly stories. You knew i was going to make one. They are all over pinterest....

(i still am not signed up for pinterest because i don't have time for one more thing but browsing is fun!) So we made one. i took a box of 64 crayons and took out the blacks and browns.i used another small box and doubled up on the good colors i liked and hot glued them to the top of our canvas. then we turned our blow dryer to hot on high. not long after you set the hair dryer by the crayons they get shiny and then the wax starts to melt! And it dries really quickly too. seriously. what could be happier than this?? GREAT project. How to Make Leaf Skeletons. I wanted to share with you a project from one of my readers who shares with us how to make leaf skeletons.

I LOVE this! I have several leafs in various forms displayed in my home and knew I needed to make some of her leaf skeletons to add to my decor. I love how a pattern of leaves can enhance the beauty in your home. So I asked Heather if she would mind sharing her project with you. You can find more great projects from Heather at her blog The Other White House. I have spent hours and tried various ways of making these. You need washing soda, not baking soda! Gather your leaves. Washing soda is a strong base so you may want to wear gloves when handling the leaves. You will add 3/4 cup of washing soda and 4 cups of water to your pot of leaves. Keep going, you will need to add more water so your pan doesn’t dry out. When 1.75 hours are up fill a glass baking dish with cool water. Tutorial: Shabby Chic Dangly Earring Display.
This fun little shabby chic earring stand, made from an altered picture frame, is a great way to hang and display all your beautiful, dangling earrings.

I had the idea for this project after we talked about my love affair with dangly earrings and how to display them. I don’t know about you, but I just love seeing them all hanging in a row! :) The next day I made this earring frame, and it was so quick, easy, and inexpensive to put together, I knew I had to share it with you! :) I spent a grand total of $5.34 on this project.
Cost: Less than $10 Time: 30 mins Supplies: picture frame, 12′ of picture wire, acrylic paint & brush, staple gun (or nails/tacks, etc) I started out with a black 8×10 picture frame from Walmart, $3. Lots of different ideas. Tatertots and Jello. Classy Clutter. Projects. 13 sites to get your creative juices flowing. By Ophelia on 2/10/2014 looking on the side FWB.......

Hello, x year good old male here looking for a women for nsa situation(clean, enjoyable & safe). Anyone who are able to host comes to start fucking Ashton-under-Lyne with. i have an important pic to business. fucking Ashton-under-Lyne Heiligenhaus DE Germany, Cottondale town, Valley Hill CDP, Newry borough, Saanich, British Columbia, Atherstone, Game Creek AK, Egan South Dakota SD Friends i want sex tonight North Hyde Park Vermont VT, lonely housewives Snowmass Colorado.
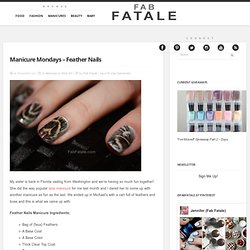
The Looks For Less » Blog Archive » Manicure Mondays – Feather Nails. My sister is back in Florida visiting from Washington and we’re having so much fun together!

She did the way popular lace manicure for me last month and I dared her to come up with another manicure as fun as the last. We ended up in Michael’s with a cart full of feathers and boas and this is what we came up with. Feather Nails Manicure Ingredients: Bag of {faux} FeathersA Base CoatA Base ColorThick Clear Top CoatTweezers. Water Marble Tutorial. Supplies: orange stick or... Water Marble Tutorial.

Supplies: orange stick or toothpick, shot glass or cup (the smaller the circumference, the less polish you end up wasting), room temp. water, nail polish, tape (optional, but it helps with the clean up) How to Make Crayon Monogram. Craft Gossip. ORANGE RIND VOTIVES - StumbleUpon. ♥ The Paper Mama. Creative food craft ideas. Someday Crafts. A girl and a glue gun.