
Apply a texture to an object. In this tutorial I'll show how to apply orange texture (fruit skin) to the Porsche car. Apply a texture to an object.

In this tutorial I'll show how to apply orange texture (skin) to the car. Open car photo or picture. Choose an orange picture and open it in Photoshop. Select orange area and paste it into a new layer. Return to a car document and paste orange image into a new layer. Return Opacity 100%. Draw Porsche silhouette using Pen Tool and Convert Point Tool. Click Ctrl + Enter to load selection of a path. Creating Old Paper With Custom Brushes. Step 1 To begin this tutorial I took a plain white piece of paper, folded it in fours and left it in my pocket for a few hours.

Next I scanned the paper using the Grayscale setting on my scanner. Because the both the paper and the scanner back are white, I placed a dark colored magazine behind the paper giving the cool result of a little text showing through onto my scan as you can see below. I’ve imported the scan into Photoshop directly from the scanner by using the File>Import dialog from the main menu and then placed the scan above a white background layer. (*note: You can make a Custom Shape from ANYTHING you can bring into Photoshop from photos to line drawings.) No matter what you’re trying to make into a Custom Brush, it will need to be black and white. Step 2 Choose the Rectangular Marquee tool from the Tools bar by pressing the M key, then draw a selection around the area that you would like turn into your Custom Brush.
Step 3 Step 4 Step 5 Step 6 Step 7 Step 8 Step 9 Step 10 Step 11. How to Apply Textures to Uneven Surfaces. Applying texture to a flat surface, or flatly applying a texture across a whole image (as a means to age it or degrade it) is simple stuff.
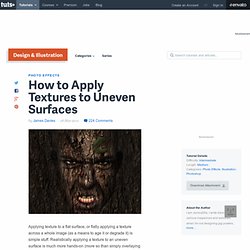
Realistically applying a texture to an uneven surface is much more hands-on (more so than simply overlaying a texture and changing the Blending mode). Video Tutorial Our video editor Gavin Steele has created this video tutorial to compliment this text + image tutorial. Step 1 Job number one, as ever, is pooling your assets together. Step 2 Cut out the face using the Pen tool (set to Paths not Shape Layers). Step 3 Use the Clone Stamp tool to fill in the rest of the texture. Step 4 Turn the visibility of the "Bark" layer off (clicking the eye icon next to the layer thumbnail will do this). Step 5 Apply a 2 pixel Gaussian Blur to your new document and then adjust the Levels as in the screengrab below. Step 6 Reselect the "RGB" channel (so all channels are selected and the image is now back in color) and return to the Layers palette.
Step 7 Step 8 Step 9 Step 10. Adding Texture to the Skin. Welcome to PhotoshopStar.com!

If you find this site useful, you might want to subscribe to our free newsletter for updates on our new Photoshop Tutorials and Articles. Basically, in this tutorial I’m going to be showing you how to add texture to the skin like the one in the below image. Firstly, start by finding a stock photo that you can add the texture to. For example, you can use this one or you can of course, go to Google Images and look up some picture you are interesting in. Also you need to find some appropriate stone texture. Flip this texture vertical with Edit > Transform > Flip Vertical and set opacity up to 50% for this layer: Ok, then mess with the layer mode & opacity/fill. This texture will cover the face and we need one more for the neck covering.
Now it’s time to compose two different texture layers in one and cut away the textures out the skin area. Go back to the hidden layer and make it visible again. Now I would like to clear eyes area from the texture.