
The Pretty Picot Cast On...a Tutorial. I have uploaded two videos demonstrating the details of today's post, but in the first video, I was alone, and had to content with severe body contortion and a deep sustained squint (I was eventually sure that I was looking myself in the eye...) in order to film this here little clip...

Normally my precious daughter does the filming while yours truly demonstrates knitting bliss, but in the first video, I set up my trusty tripod and after considerable trial and error , I managed to get the whole thing focused, while leaning, arms akimbo, back pretzeled, around the darned tripod. This resulted in me only being able to see what the heck I was doing , by looking at the video viewer a half inch from my nose :[ Ok, so what am I trying to say? The video makes me look like I am trying to knit while demonstrating sign language, so please forgive this ambisinistrous knitter...
The Picot Cast On...with a twist! Most of the web sources will describe the picot cast on by using 5 stitches initially. Judy's Magic Cast-On. You have cast one stitch on to needle #1. 5.
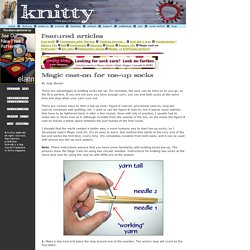
Bring needle #2 over the yarn tail on your thumb, around and under the yarn and back up, making a loop around needle #2. Pull the loop snug around the needle. You have cast one stitch on to needle #2. There are now two stitches on needle #2 Ñ the stitch you just cast on plus the anchor loop. The top yarn strand always wraps around needle #1 (the bottom needle), and the bottom yarn strand always wraps around needle #2 (the top needle). 6. 7. 8. In this picture, a total of 20 stitches, or 10 stitches on each needle, have been cast on.
Turn back to the right side to begin knitting. 9. Knit the row of stitches from needle #1. You will see a row of stitches appear between the two needles. 10. Be careful! You have completed one round and are back where you started. Note: Do the stitches between the needles appear too loose or "sloppy? " There are two rows of stitches between the needles now. Round 3: K all stitches on both needles (no decreases). Jeny's Surprisingly Stretchy Bind-Off. This bind off combines the classic simple bind off with a yarn wrap.
It is thus named because it defies logic that anything so simple would be so elastic. Before you scoff, give it a try. It has a higher elasticity than Elizabeth Zimmermann’s sewn bind off, and has an advantage in that it is not sewn, and therefore easier to execute over a long length of fabric. For optimum elasticity, avoid snugging the stitches tightly after you knit or purl them. NOTES This bind off is well-suited to hats, sweater necks, and especially toe-up socks – anything that requires a lot of stretch to get into place! To process a knit stitch: Yarn-over in reverse (that is, wrap the opposite direction around the needle from the standard yarnover)... knit 1... insert left needle into yo and pull it over the stitch that was just knit. To process a purl stitch: Yarn-over (in the usual direction) purl 1... insert left needle into yo and pull it over the stitch that was just purled.