
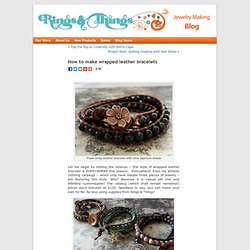
How to make a wrapped leather bracelet. Triple-wrap leather bracelet with blue tigereye beads Let me begin by stating the obvious – this style of wrapped leather bracelet is EVERYWHERE this season.
Everywhere! Even my athletic clothing catalogs – which only have maybe three pieces of jewelry – are featuring this style. Why? Because it is casual yet chic and infinitely customizable! Five different leather wrapped gemstone bracelets designs: green opal, mookaite, African turquoise, hematite and rhodonite The supply list is pretty short: 4-6mm round beads We used gemstone beads, but glass, crystal beads or pearls would also be lovely.
Wrapped bracelet made with green opal gemstone beads and natural Greek leather. The technique: Choose your bracelet length and cut your leather. If your button has a small loop, you might need to miter (angle) the leather end and pull it through with pliers. Other design options: Have fun creating your own wrapped bracelets! Need supplies? Other how-to’s: (answers selected from replies to blog comments) DIY Braided Bead Bracelet. It’s been awhile since our last bracelet DIY.

I don’t know about you, but our wrists have been begging for another colorful addition for months now. So after playing with some materials that were already on hand, we’ve created a tutorial for a braided bead bracelet, which is a not so distant cousin of the hex nut and wrap bracelet. Because honestly, you can never have too many . . . You’ll need: Cut the waxed linen cord into a 26″ and 19″ piece. Tie a knot about half an inch down from the loops.
Start braiding the strands. Push the bead against the base of the braid, and cross the left strand over the middle. Keep a finger at the base of the braid, holding the beads in their place and keeping the braid tight. Finish the bracelet with another inch of braided cord, measuring it against the wrist. Thread on a two hole button – two strands through one hole and one strand through another. Trim the end. Your bracelet is finished! (all images by HonestlyWTF) The Adventures of an Urban Socialite™ Top two images from Honestly… WTF (total cost about $5)/ Bottom image from Oak– retail $372.00 Love this clever project from Erica and Lauren of Honestly… WTF… so much so I might even attempt it– I love these bracelets!

The best part is, there are tons of options in terms of hex nuts (they have bronze, steel, etc.) and twine color, size, etc. and the project is super straight-forward. Have fun! Via MCSpice. DIY Wrap Bracelet - Honestly WTF - StumbleUpon. You should all know by now that we are all about stacking bracelets on our wrists.

The more, the better. In fact . . . the most, the best! With that being said, we’ll show you how to master a version of the ever so popular wrap bracelet. It’s so simple and addicting, you’ll soon be churning out these wristlets with your eyes closed. Clearly this arm party train isn’t stopping and it’s about time you get on board! You’ll need (for a double wrapped bracelet) :* Lengths will vary depending on the size of your wrist (see comments for suggestions).
Fold the length of leather cording in half to form a loop. Place the ball chain along the leather cording with the end of the chain meeting the end of the wrap. Continue wrapping while checking it for fit around the wrist. When you have reached the end of the ball chain wrap the linen cording around the leather strands 2-3 more times. Thread the hex nut through the strands and tie a second knot. Trim with scissors and your wrap bracelet is finished!!