
How to Add Multiple Spotlights in Photoshop. Simple Focused Lighting Effect In Photoshop. Written by Steve Patterson.
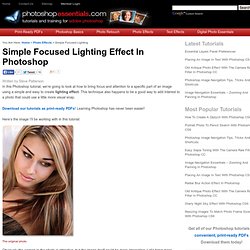
In this Photoshop tutorial, we’re going to look at how to bring focus and attention to a specific part of an image using a simple and easy to create lighting effect. This technique also happens to be a good way to add interest to a photo that could use a little more visual snap. Here’s the image I’ll be working with in this tutorial: The original photo.
Obviously the woman in the photo is attractive, but the image itself could be more interesting. Photoshop Lighting Effect: The final result. Let’s get started! Step 1: Add A Curves Adjustment Layer Let’s begin by darkening the overall image using a Curves adjustment layer. Clicking on the “New Adjustment Layer” icon. Then select Curves from the list of adjustment layers that appears: Select a Curves adjustment layer. Step 2: Drag The White Point Down To Darken The Image When the Curves dialog box appears, you’ll see a large square grid with a diagonal line running through it from the bottom left to the top right. Amazing Photoshop light effect in 10 Steps. Last year I had written a tutorial showing how to create some lighting effects in Photoshop, it was called Magic Lighting Effects.
A lot of people liked it, but some people still have some questions on how to achieve that effect. When I added a “buy me a coffee” featured on my blog I decided to use an image I had done when I was showing my cousin how to do the Magic effect. Instead of using a hat I used a coffee cup and the process is basically the same, however this time I will explain it in more details.
Step 1 Create a new document, apply a Layer Style on the background layer. Step 2 Here I've used an icon I found on a cool site, but you can use whatever you want. Step 3 Select the Ellipse Tool (U) and create a shape like I did. Step 4 Create a new Folder name it “Light Effects”. Step 5 In order to create the sparks we will use the amazing brush engine. Step 6 Using the Layer Styles add a Outer Glow to the sparks Step 7 Lets add some smoke. Step 8 Step 9. 28 Powerful Photoshop Lighting Effects. There is something about beautiful lights that can mesmerize an audience.
Take a fireworks show for example. It’s been around for thousands of years, yet still has the power to put looks of amazement on faces of all ages. That’s why lighting effects make such powerful design elements. They are a great way to grab the attention of your audience and leave a lasting impression. Below is a collection of the best Photoshop tutorials for creating powerful lighting effects. Amazing Photoshop Light Effect In 10 Steps A smokey light effect complete with glowing particles. Fire Lines Tutorial This tutorial teaches you how to create stylish fire lines in only 10 steps. Luminescent Lines Iron Man View Interface Effect In Photoshop This is very close to the amazing effects seen in the movie. Luminescent Lines Advanced Glow Effects A Cool Lighting Effect In Photoshop End of the World Photo Manipulation Creating Smoke A popular effect explained very well.
15 Best Photoshop Light Effect Tutorials. Photoshop Tutorial - Soft light Effect.