
Voir le sujet - Better Scaning. Bonjour, fotd a écrit : en scannant, émulsion en bas au contact de la vitre du scanner le probleme avec ce scanner c'est qu'il a deux objectifs, l'un pour la vitre d'exposition et l'autre pour les caches (réglé pour le focus a 3mm +/- 0.5mm plus haut).
Or selon ces testset ma propre expérience, le second objectif donne de bien meilleurs résultats en piqué et définition (saut certains cas bien précis). j'ai essayé de plaquer une vitre de 3mm sur celle du scanner mais ca fait de la diffraction, notamment autour des crénelages de film 35mm. Official Scanhancer Site. Well, we didn't until we invented the Scanhancer 5LE: the little piece of hardware Minolta forgot to put in the box.

Scanhancer 5LE is a 'smart' diffuser, treating the (overly) collimated scanner light so that much better scans are now possible, rivaling drum scan quality by mimicking the effect of wet mounting. The Scanhancer is made of a high quality non-extruded optical polymer containing billions of micro bubbles. This makes it highly light transmissive, when compared to grained or frosted diffusing materials. It has no visible structure, so that it cannot disturb the image quality of scans. The surfaces are not frosted, but smooth as glass, so that the Scanhancer 5LE can be placed just above the film surface without being 'seen'. The 'smart' diffusing is found in the fact that different wavelengths are diffused to a different amount. Another Remarkable Fact: recently Imacon, maker of state-of-the-art film scanners, has also been illuminated by the diffuser idea.
Scanner facilement. Pour commencer nous allons scanner un négatif difficile, très contrasté.
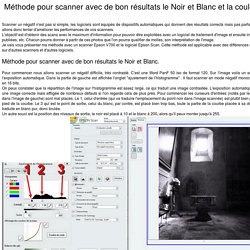
C'est une Ilford PanF 50 iso de format 120. Sur l'image voila un scan avec l'exposition automatique. Dans la partie de gauche est affichée l'onglet "ajustement de l'histogramme" . Il faut scanner en mode négatif monochrome et en 16 bits.On peux constater que la répartition de l'image sur l'histogramme est assez large, ce qui traduit une image contrastée.
Vuescan & ColorPerfect, A Guide. Introduction, Raw Scans, Neg Film, Highlight Compression, Slide Film, PhotoShop, Conclusion (updated 7 Mar 2013) Introduction Some time ago I wrote an article about getting the most from colour negative scans with VueScan.
Since writing the article my workflow has changed significantly, and these are the main reasons why: It takes far too long to profile the film base colour using VueScan, scanning isn’t fun at the best of times and I’m an impatient person.I’m now shooting a lot more colour slide film, and wanted something that would work equally well if I needed to tweak colour.I’m shooting 8×10 & 4×5 sheet film which doesn’t have an area of clear base that I can sample.I realised that the old method didn’t stop me having to tweak colour in PhotoShop, and that often the output was worse than from a film preset. By chance A friend, Raoul Gatepin (Who is an awesome photographer) introduced me to the PhotoShop plugin, ColorNeg, and since then I’ve not really looked back. EPSON V750 review. Fluid Mount Accessory - extra page As with any new piece of equipment it takes time to get used to it and find out its strengths and weaknesses.
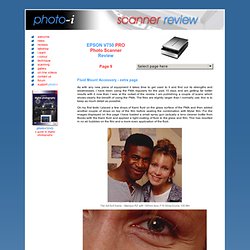
I have been using the FMA regularly for the past 10 days and am getting far better results with it now than I was at the outset of the review. I am publishing a couple of scans which shows clearly the benefit of using the FMA. The files are slightly larger than I normally use, this is to keep as much detail as possible. On my first tests I placed a few drops of Kami fluid on the glass surface of the FMA and then added another couple of drops on top of the film before sealing the combination with Mylar film. The FMA wet mount sample is displaying far more detail on the the skin (notice the facial hair on the models face) and has given the scan a slight lift in tonal quality - the same settings were used for both scans.
A Comparison of Various Film Scanners and Digital Captures. How much image detail from 0.25" by 0.25" of film?
Comparison of drum scans, CCD film scans and direct digital captures. The idea of this study is to explore how much real detail can be extracted from a standard sized area of film -- arbitrarily chosen to be 0.25" by 0.25". Digital captures have been normalized to match the dimensions of a 35 mm frame, as explained below. My thanks to all who have contributed images, and in particular Jim Davis who helped get this project off the ground. If you think you've got a worthy scan sample that you'd like to post, I'd like to see it. The rules are simple: send a high-quality JPG of a raw scan snippet representing 0.25" by 0.25" of film.
Viewing and Judging the images The "constant" in this study is the area of film being scanned. Note also that fine details in highlights or shadows may be obscured by improper monitor setup. Epson slide scanner and flat bed scanner with transmission unit for reflective scans and transmissive scans, mounted slides, film strips, negatives - ScanDig.