
Create Gold Foil Text in Photoshop. I have been in love with the new trend of metallic gold lettering in graphic design.

Who doesn't love shiny text! I bet if you do, you've been wondering how to get it. I mean, your text doesn't just come in those fancy letters. There is no Hex code for that metallic sheen. So I knew this would make for a great tutorial to share with you all. Open the canvas you will be working on, as well as the gold foil texture you want to use. Working on your Foil Text canvas, create a new layer. Toggle over to your window with the gold foil background. Toggle back over to your canvas and paste the gold foil background to the layer you just created. First, move the layer up or down until it is directly over the text you want to add texture to. You just clipped two layers together!
Adjust the size and/or position of the gold foil texture until it is how you like it. There, you're done! Video Library. Photo Frame Template Tutorial. Written by Steve Patterson.
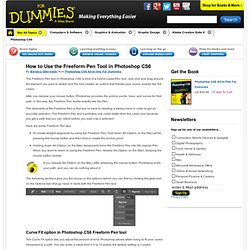
In this Photoshop photo effects tutorial, we’ll learn how to create a simple three-image photo frame, and when we’re done, we’ll see how to easily convert the final result into a reusable template using Photoshop’s Smart Objects! Smart Objects were first introduced in Photoshop CS2, which means you’ll need Photoshop CS2 or higher for the final steps in the tutorial. I’ll be using Photoshop CS4 myself. However, if you’re using an earlier version of Photoshop, you can still create the actual photo frame itself. The only thing you won’t be able to do is convert the images into Smart Objects at the end of the tutorial.
Here’s the three-photo frame we’ll be creating: The final result. Let’s get started! Step 1: Create A New Document Let’s begin by creating a new Photoshop document. Go to File > New, or press Ctrl+N (Win) / Command+N (Mac). Either way you choose brings up Photoshop’s New Document dialog box, which is where we set the options for our new document. How to Use the Freeform Pen Tool in Photoshop CS6. The Freeform Pen tool in Photoshop CS6 is kind of a hybrid Lasso/Pen tool.
Just click and drag around the element you want to select, and the tool creates an outline that follows your cursor, exactly like the Lasso. After you release your mouse button, Photoshop provides the anchor points, lines, and curves for that path. In this way, the Freeform Pen works exactly like the Pen. The downside of the Freeform Pen is that you’re back to needing a steady hand in order to get an accurate selection. The Freeform Pen tool’s probably one notch better than the Lasso tool because you get a path that you can refine before you load it as a selection. Here are some Freeform Pen tips: To create straight segments by using the Freeform Pen, hold down Alt (Option on the Mac) while pressing the mouse button and then click to create the anchor point. If you release Alt (Option on the Mac) after releasing the mouse button, Photoshop ends your path, and you can do nothing about it. Designing for Print – Setting Up Crops and Bleed. This post was originally published in 2008 The tips and techniques explained may be outdated.
A design destined for print requires setting up to certain specifications to ensure that the work is printed correctly by industrial lithographic or digital print firms. This often starts with the initial document upon which the design is to be created by adding the correct bleed area and crop marks. Let’s take a look at what crops and bleed actually are, why they are required and how to set them up in your favourite Adobe package. Baffling Bleed Let’s start with the term bleed, this is the area of artwork that is extended beyond the actual dimensions of the document. It is used to avoid strips of white paper showing on the edges of your print should the batch be misaligned when cut to size. In the UK at least, bleed of 3mm is commonly required. A4 Paper = 210mm x 297mm 210mm + 6mm = 216mm 297mm + 6mm = 303mm Total Document Size = 216mm x 303mm. Colouring Line Art Photoshop Tutorial. Tutorial Links: Page 1 | Page 2 | Page 3 | Page 4 | Page 5 | Page 6 Digital Art Tutorial Recommended for Beginner to Intermediate Level Photoshop Users The tutorial that follows shows MY way of colouring using Adobe Photoshop.

I do not claim to be a Photoshop expert by any means, this is just the technique I use. It’s a really good way of colouring/shading your pictures if you are indecisive about the colour palette, as you can easily change the colours at any stage! Please note this tutorial is written for PC users (because that’s what I use) and for mouse users.