
Www.uCApps.de. Protodeck MIDI controller for Ableton Live. CDM article : menu: preamblethe midibox frameworkthe basic layoutthe protodeck’s architecturethe protodeck’s partsthe protodeck’s firmwaresthe protodeck’s software interface with max for livethe protodeck’s software javascript code for clip grid handlingthe protodeck’s little LCD THE PROTODECK controller features: - 87 potentiometers - 90 buttons - 81 rgb leds - 2×20 LCD - 2 PIC 18F4620 (20MHz RISC processors) - fully custom rgb led drivers - fully custom firmware - 2 MIDI IN/OUT interface - power supply unit included in the box The problem is easy to understand: I wanted to drop my PC keyboard + mouse during live performance in order to be focused on music/sound/live.
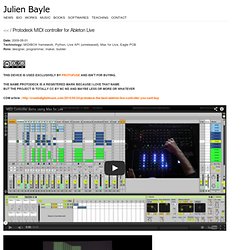
The only way to solve my problem was to use an hardware to control Ableton Live, but not only that, I need a feedback from it too. But I need a lot of pots/knobs, a lot of multicolor lights, a lot of buttons… So, I guess … I have to think, read, code, test, build, learn to solder better… to create my OWN hardware. MIDIbox SEQ V4Lite - MIDIbox SEQ - MIDIbox Forum. 'taximan', on 01 Sept 2011 - 01:12, said: 1.
Will it be possible to transfer patterns between the lite v4 and the seq v4? Yes, the file format is compatible, and the complete engine is available.So: you could prepare patterns on a MBSEQV4 and play back on a MBSEQV4LAnd vice versa (e.g. step/live recording patterns on a MBSEQV4L is more intuitive) Just swap the SD Card -> done In fact MBSEQV4L is identical to MBSEQ V4, just only the user interface has been reduced (e.g. a LCD will *never* be supported!)
Midibox Sequenzer MBSEQ V4 / The Project. Nachdem ich nun Zeit hatte mich mit dem Ausmessen des Rear Panels zu beschäftigen, kann das Projekt weiter gehen.
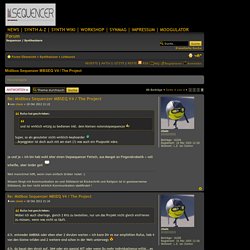
Da ich etwas andere PCB’s für die Ethernet Schnittstelle (OSC) und den SD Kartenleser verwendet habe, musste ich nochmal die unterschiedlichen Abstände der Bohrungen im Rear Panel überprüfen und anpassen. Im Vergleich zu Wilbas und TK’s Panel habe ich folgende Änderungen vorgenommen: 1. Einbau eines Standardschalters. Dafür gibt es mehrere Gründe. 7. Der Ein/Aus-Schalter wird einfach in das Rear Panel gesteckt. Ich verwende zum Fixieren der verschiedenen Boards M3 Sechskant-Distanzhülsen aus Metall in der Länge 0.5, 1.5 und 2.0 cm. Die 0,5 cm Distanzhülsen werden für das Fixieren des Core32 Boards verwendet: Die Abstandshalter werden in meinem Projekt nicht mit dem Boden verschraubt, da mir das geeignete Werkzeug zum „sauberen herstellen“ der Löcher (Bohren und Versenken) in der Bodenplatte fehlt.
Danach kann mit dem Klebevorgang begonnen werden. MIDIbox SEQ V4 Release + Feedback - MIDIbox SEQ - MIDIbox Forum. Gridracer link=topic=14053.msg122115#msg122115 said: I use sinkdrivers for the Cathodes, but it makes no difference whether I set the Inversion Mask 0x00 or 0xf0.
Behaviour of the LEDs is the same with both settings! The BLM driver is completely implemented, but the inversion mask wasn't changed. I fixed this in beta3 Echopraxia link=topic=14053.msg122118#msg122118 said: I didn't even know that was possible. Yes, to mute individual parameter layers. MIDIbox SEQ V4 User Manual. Click here to display the navigation bar Back to main page...
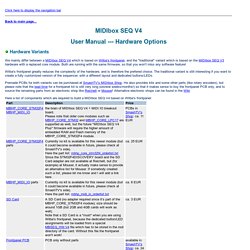
Hardware Variants We mainly differ between a MIDIbox SEQ V4 which is based on Wilba's frontpanel, and the "traditional" variant which is based on the MIDIbox SEQ V3 hardware with a replaced core module. Both are running with the same firmware, so that you won't miss any software feature! Wilba's frontpanel greatly reduces the complexity of the hardware, and is therefore the prefered choice. MIDIbox SEQ V4 User Manual. Click here to display the navigation bar Back to main page...
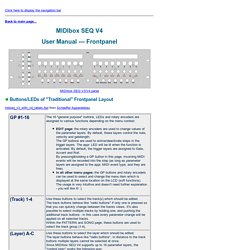
MIDIbox SEQ V3/V4 panel Buttons/LEDs of "Traditional" Frontpanel Layout mbseq_v3_with_v4_labels.fpd from Schaeffer Apparatebau Additional Buttons/LEDs of MIDIbox SEQ V4 Frontpanel Layout Enhanced (optional) MIDIbox SEQ V4 panel If you are planning to create your own frontpanel, following additional buttons and LEDs are recommended, which are new for MIDIbox SEQ V4, and therefore haven't been considered in the MBSEQ V2 frontpanel layout. The picture shows Wilba's Frontpanel layout. The frontpanel PCB can be connected to the MBHP_CORE_STM32 resp. MIDIbox NG. Click here to display the navigation bar Created 2012/13 MIDIbox NG is the "next generation" controller, running on a MBHP_CORE_LPC17 or MBHP_CORE_STM32F4 module.
It replaces the old PIC based projects MIDIbox64, MIDIbox64E and MIDIbox LC The firmware is currently in beta state. Details can be found in in this forum article. Meanwhile also the creation of the User Manual is in progress. Concept. MIDIbox SEQ V4. Click here to display the navigation bar Created 2008-2010 Features optimized for live playing and editing intuitive user interface with flat menu hierarchy, wide screen display (2 * 2x40 = 160 characters) and 16+1 rotary encoders with menu page dependent "soft function".
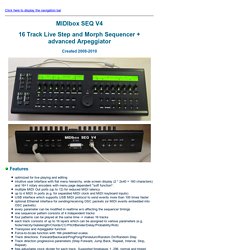
Multiple MIDI Out ports (up to 12) for reduced MIDI latency up to 4 MIDI In ports (e.g. for separated MIDI clock and MIDI keyboard inputs) USB interface which supports USB MIDI protocol to send events more than 100 times faster optional Ethernet interface for sending/receiving OSC packets (or MIDI events embedded into OSC packets) every parameter can be modified in realtime w/o affecting the sequencer timings one sequencer pattern consists of 4 independent tracks four patterns can be played at the same time -> makes 16 tracks each track consists of up to 16 layers which can be assigned to various parameters (e.g. History. MIDIbox Hardware Platform. Click here to display the navigation bar English Version French Version Spanish Version The MIDIbox Hardware Platform is the consequential continuation of my work on MIDI controllers in the last years.
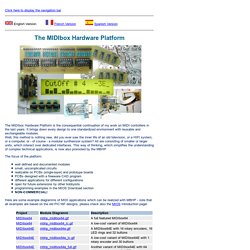
It brings down every design to one standardized environment with reusable and exchangeable modules. The focus of the platform: MIDIbox NG. MIDIbox NG User Manual. Click here to display the navigation bar Back to main page...
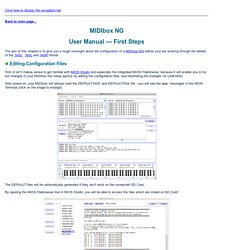
The aim of this chapter is to give you a rough oversight about the configuration of a MIDIbox NG before your are working through the details of the .NGC, .NGL and .NGR format. Editing Configuration Files First of all it makes sense to get familiar with MIOS Studio and especially the integrated MIOS Filebrowser, because it will enable you to try out changes in your MIDIbox NG setup quickly by editing the configuration files, and transfering the changes via USB-MIDI.
After power-on, your MIDIbox will always load the DEFAULT.NGC and DEFAULT.NGL file - you will see the appr. messages in the MIOS Terminal (click on the image to enlarge): The DEFAULT files will be automatically generated if they don't exist on the connected SD Card. By opening the MIOS Filebrowser tool in MIOS Studio, you will be able to access the files which are stored on SD Card: UPDATE: since V1.019 the file will be loaded automatically whenever it has been uploaded.