
How-To: "Stained Glass" Votive Holders. By Jenny Ryan Many times when I’m at the grocery or drug store, I can’t resist throwing a few scented votive candles in my cart.
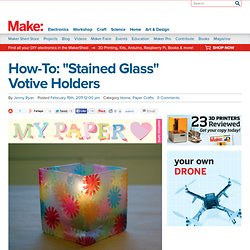
When I’m ready to burn them, it’s easy enough to sit one on a cute little vintage china saucer, but I recently decided to try and find a fancier display solution for them. I also wanted the project to be inexpensive, and the materials used to be things I already had on hand. I was inspired by memories of making faux-stained glass in elementary school and came up with these fun little glass votive holders. This project is quick and easy, and a great way to whip up custom party décor on the cheap. Materials Tissue paper in your desired colors Mod Podge (matte finish), in a pinch you can also use school gluePaintbrush Scissors Glass containers to fit your candle(s), I used thrifted vases and wine tumblers Paper punches in various shapes Q-tips, optional Directions Step 3: Start affixing the punched-out paper shapes to the glass using your paintbrush. More: Related. Megan nielsen design diary - DIY tutorials. Www.purlbee.com/hand-sewn-felt-dolls/
The beautiful handmade dolls pictured above were created from a pattern developed for The Purl Bee by the incredibly talented, brilliant and generous Mimi Kirchner.
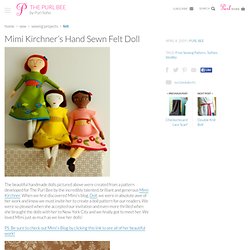
When we first discovered Mimi's blog, Doll, we were in absolute awe of her work and knew we must invite her to create a doll pattern for our readers. We were so pleased when she accepted our invitation and even more thrilled when she brought the dolls with her to New York City and we finally got to meet her. We loved Mimi just as much as we love her dolls! PS. Be sure to check out Mimi's Blog by clicking this link to see all of her beautiful work! Finished Measurements Approximately 14-inches tall from heel to top of head. Materials You'll need one piece of our Wolvitz 100% Wool Felt for each color used to make your doll. Yellow Doll: # 2, 12, 13, 33, 36, 91 Green Doll: # 9, 14,19, 22, 42, 43, 51, 40 Pink Doll: # 8, 10, 14, 25, 35, 43, 40 Taupe Doll (in how-to photographs below): # 6, 19, 22, 34, 35, 36, 91 Tools Pattern Templates.
Felt Flower tutorial: How to make a Poinsettia. These Poinsettia Pins are as fun to wear as they are to make. I have to admit, I’ve been slacking in the kitchen a bit this holiday season. But I did put on my elf hat and have come up with another simple craft. Recently I shared the waterless snow globes, and this week I’m excited to share these adorable Felt Poinsettia Pins I made! They are very easy to make and don’t take much time. I made pins to wear on a sweater, but they would also be cute pinned on to a stocking or pillow, used as a gift topper, fridge magnet, or even a tree ornament.
You can make them any size using felt yardage, or simply using the felt sheets you can get at the craft stores, like I did. *Please note that ALL of my measurement are approximate, there’s no need to be very specific, and you can make them any size you wish. What you need (have linked most of these items to Amazon, but they can all be purchased at any craft store like Michaels or Hobby Lobby Steps 1. 2. 3. 4. 5. 6. 7. 8. So cute on my shirt!! MeninasFuxiqueiras.