
Large T-Shirt to Fitted Tee Tutorial. I have these two t-shirts that I love.
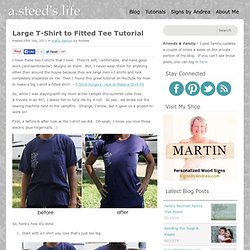
They're soft, comfortable, and have good worn (and sentimental) designs on them. But, I never wear them for anything other than around the house because they are large men's t-shirts and look completely shapeless on me. Attempts to crack the party code, pokébra tutorial :D I keep getting questions... bEING pERFECT iS hARD: Reupholstering Some Shoes. First I got together an old pair of shoes that I wasn't too fond of, a bottle of Sobo fabric glue, a pair of scissors, and about a yard of fabric ( I used fabric from a long dress I had cut into a mini dress ).

I wasn't really sure where to start. So I just started cutting random pieces of fabric and then sort of molding them to the shoe (cutting off excess as I went). I slathered the fabric glue straight onto the shoe in some cases, and sometimes onto the fabric, then gently pressed it down onto the shoe. How to Make a Ruffled Top from a Men's Shirt. Tutorials for Recycling T-Shirts. So way way back, in June, I wrote this Studio Organization post, about starting the process of organizing my studio by cleaning out the closet full of junk.

Well, it's September and...let's just say the closet is a work in progress. Tutorial: how to sew a simple maxi dress. The Plan.
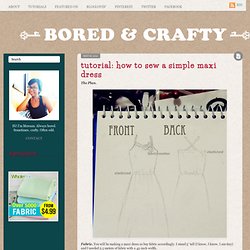
Fabric. You will be making a maxi dress so buy fabric accordingly. T-shirt latch hook rug tutorial. I really love flokati rugs. I have two that are safely tucked away in my parents basement awaiting our reunion. When I learned that I would be having a child and building a nursery for him, I wanted a flokati. A gray one. Refashion Tutorial - Long Sleeves to Bow Sleeve T-shirt. If you've ever checked out my blog you'll know I love to change things up, my Hand-Me-Down Horror series has been all about buying yucky or just plain boring clothes and making them into something I'd be proud to wear.

Hack off those sleeves, raise that hemline and bob's your uncle a cute custom piece, for pittence. This project is no different except I'm using a top that fits me and nothing goes to waste in this tutorial. So without further ado get your sewing needles and thread out and sharpen up those scissors! Before, a plain long sleeve Tee from Old Navy, that cost me a wopping $2.60. T-Shirt “Yarn” Tutorial. My Project Tutorials and Patterns. 10 Free Tote Bag Patterns and Tutorials. Totes make great handmade gifts.

Here is a Tuesday Ten that shows a round-up of lovely totes. If you love to sew you might also like these free sewing tutorials right here on Skip to my Lou! Every tote needs a matching pouch. Pleated Zippered Pouch Lined Zippered Pouch. Freshly Picked: Elastic Waist Skirt Tutorial - Mama Edition. How to add elbow patches to a sweater! Elbow patches are one of my favorite trends this season!

Last month, I shared how to hand print hearts on your jeans and we recieved many requests for a patch tutorial! I asked Amanda to show you how she would do it in this next feature.... Enjoy! Supplies needed: cardigan, fabric (this is a great way to use scraps!) , fabric marker/crayon, 1 sheet of card stock, scissors, pins, embroidery thread and embroidery needle. 1. 3. 6. Thanks so much, Amanda! Happy Monday, everyone.... xo. Tutorial: Scrap Buster Fall Pillow. This is my favorite thing to do with my little scraps, and since its Scrap Buster month over at Sew, Mama, Sew, I made a quick tutorial so you can make your own.

This pillow cover is 16" square with an envelope back & the design possibilities are endless! I added some pillows I’ve previously made with this same method at the end of this post. Happy Sewing! You’ll Need: 1. 2. 3. 4. Iron your fabric scraps onto your appliqué material according to the directions on the appliqué material. Now with scissors cut out your trunk and leaf shapes. When you get all your leaves cut out, tear the backing appliqué paper off the leaves and trunk. Then you can arrange them how you want on your pillow front. Once your design is how you like it, press with an iron over each spot for a few seconds making sure not to bump anything out of place. Now you can sew either along the inside edges of your leaves, or you can do a zig zag stitch or blanket stitch around the edges if you prefer. 10 Awesomely Altered T-Shirts. By ashleyhackshaw | Do you have a bunch of t-shirts lying around that you just aren’t into anymore?
Don’t throw them out…..alter them into something amazing! I’ve rounded up 10 cute t-shirt tutorials that will make your friends ask “Where’d you get that adorable top?!” It will be fun to say “Oh this old thing? Apron Tutorial.