background preloader

Crafts

Facebook Twitter

DIY Braided Bead Bracelet. It’s been awhile since our last bracelet DIY. I don’t know about you, but our wrists have been begging for another colorful addition for months now. So after playing with some materials that were already on hand, we’ve created a tutorial for a braided bead bracelet, which is a not so distant cousin of the hex nut and wrap bracelet. Because honestly, you can never have too many . . . You’ll need: Cut the waxed linen cord into a 26″ and 19″ piece. Tie a knot about half an inch down from the loops. Start braiding the strands. Push the bead against the base of the braid, and cross the left strand over the middle.

Keep a finger at the base of the braid, holding the beads in their place and keeping the braid tight. Finish the bracelet with another inch of braided cord, measuring it against the wrist. Thread on a two hole button – two strands through one hole and one strand through another. Trim the end. Your bracelet is finished! (all images by HonestlyWTF) Untitled. Etsy Russian Team. Galafilc creates amazing and unique hand felted items. 
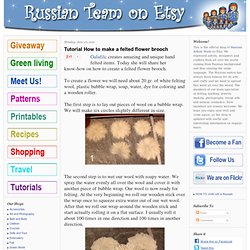
Today she will share her know-how on how to create a felted flower brooch. To create a flower we will need about 20 gr. of white felting wool, plastic bubble wrap, soap, water, dye for coloring and a wooden roller. The first step is to lay out pieces of wool on a bubble wrap. We will make six circles slightly different in size.

The second step is to wet our wool with soapy water. Our wool is semi-felted now. Now we are ready to start creating an actual flower. To dye our flower we will need to soak it in a vinegar first. My brooch flower is almost ready. Translated by TonyaUtkina. It's all in the details: HOF3 Jewelry Printable Kit Tutorial... I mentioned yesterday that this kit is now up on the site and that I would put together a little tutorial about how I put mine together. 
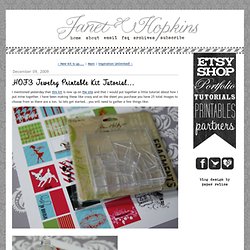
I have been making these like crazy and on the sheet you purchase you have 25 total images to choose from so there are a ton.

So lets get started...you will need to gather a few things like: HOF3 Jewelry Printable, Tim Holtz Fragments, Glossy Accents Chandelier Crystals, plastic jewels, beads and jumprings. I purchased the long hot pink jewel I used in the example necklace from Tracy at By Design Scrapbook Boutique when I was there teaching. But chandelier crystals, beads, bells, almost anything sparkly would be fun to use. So once you have gathered your supplies and printed your page of tiles you are ready to start creating. Next, choose the tile you want to start with, coat the back of your fragment with glossy accents and adhere down over the tile you have chosen.

Once the tile is dry, using your scissors, trim around the edges of the tile. Needle Felting Patterns Needle Felted Animals PDF by Crafterica.