
DIY Craft Project: How to craft a twine-ball light garland {As featured on Rock n Roll Bride} Time for another DIY craft project and today I’ll be showing you exactly how you can make this twine-ball light garland yourself.
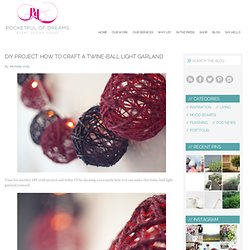
It’s one of those projects that’s a little bit messy and does take quite a bit of time, but it is so much fun. Plus you have a really cool piece of decor at the end of it. Perfect for parties or around the home, you can paint it up in any colour you want to match your design scheme, and when lit, it looks so pretty, casting lots of patterned twinkly light everywhere. Mine is now taking pride of place in my office. How-to make a Twine Ball Light Garland I’ve seen twine balls used for all sorts of purposes, from chandeliers to dining table decor, so I thought I’d have a go at making a light garland using this idea.
I chose to use coloured twine, alternating between pink and purple twine balls. {You will need} {Four} This is the really messy part. {Five} Leave to dry overnight. Before & After: Crazy Beautiful Toy Kitchen. 23.2K Flares23.2K Flares × LOOKING for more DIY play kitchens?
Click here for a roundup with lots more projects, photos and ideas, including a DIY toy workbench for a little boy! And if you like this post, Subscribe to Green Your Decor for more DIY projects and green ideas! I like to think of myself as pretty crafty. Papernstitch. Skip to navigation DIY Project & Tutorials I love making things!
Below is a catalog of all the tutorials that can be found on the blog. Click the links below to view full tutorials. And if you’d like to sign up to receive weekly diy projects straight to your inbox, fill out the box below to get on the list. Get your weekly dose of diy now! Easiest Valentine’s Day dessert // $2 mini (secret message) bouquet // ink blot gift bags DIY glitter ombre ornament DIY // stitched clutch giftable DIY // copper decal Christmas wall art merry and bright holiday wall art DIY // mid-century ornament decor piñata // wooden tree display shelf project. A ModernTake on the Doily - $850 Lamp for less than $50. A Modern Take on the Doily $850 Lamp for less than $50?

DIY: Button Statment Rings. It’s September and that means it’s time to add another statement piece to your collection…. obviously!

I heart almost every piece Nicole Richie designs for House Of Harlow 1960, especially her oversized rings. As amazing as these rings are they’re also an easy DIY. My friend Jenni, from I Spy DIY, did a project a few months back where she transformed buttons into earrings. #SuperFab This got me thing…let’s transform buttons into statement rings! Buttons, buttons everywhere!! Materials: Buttons, Clippers, Glue, Rings With Flat Tops (available at the jewelry supply store) Use your clippers to remove the shank from the back of the button. Once you’ve made the back of the button flat, use an ample amount of glue to secure the ring to the back of the button.
Here’s another hint: If you can’t find a flat ring base, Ring Pops are a fun alternative. Once the base has dried, glue on the button. How To Make A Stylish Photo Frame For Several Photos. Here is a simple yet stylish photo frame that can accomodate quite many photos at once. The idea is very simple. Fasten twines on the empty frame and hang photos using clothes pins on them.
You can use a frame you bought or a frame you made by yourself. To make it you just need to find some wood strips, sand them, paint or stain them and fasten together with the staples and nails. Yes, everything is as simple as it sounds. How to Make Cherry Blossom Lights. Design Folder: Your Online Design and Decorating Resource. Happy Hour Projects: Wish Bracelets. Tree Inspired Shelves! How to Make Leaf Skeletons - The Idea Room - StumbleUpon. I wanted to share with you a project from one of my readers who shares with us how to make leaf skeletons.

I LOVE this! I have several leafs in various forms displayed in my home and knew I needed to make some of her leaf skeletons to add to my decor. I love how a pattern of leaves can enhance the beauty in your home. So I asked Heather if she would mind sharing her project with you. You can find more great projects from Heather at her blog The Other White House. I have spent hours and tried various ways of making these. You need washing soda, not baking soda! Gather your leaves. Washing soda is a strong base so you may want to wear gloves when handling the leaves.
You will add 3/4 cup of washing soda and 4 cups of water to your pot of leaves. Keep going, you will need to add more water so your pan doesn’t dry out. When 1.75 hours are up fill a glass baking dish with cool water. I carefully removed them and rinsed with water and added clean water to the pan. 37.1Kstumbleupon. Manualidades.