
Decoration : Cozy Minimalist Bulbs Pendant Light With Colorful Wooden Veneer Lovely Wooden Pieces as Attractive Decorative Elements Interesting Decorative Elements‚ Creative Wooden Touch‚ Slanted Shape also Decorations. Verzameling oma-lampjes voor op de kinderkamer Door DaphneBB. ICFF 2013 Trends: Geometric Patterns & Shapes.
I have a hard time resisting geometric prints and patterns.
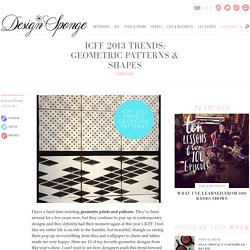
They’ve been around for a few years now, but they continue to pop up in contemporary designs and they definitely had their moment again at this year’s ICFF. I feel like my entire life is an ode to the humble, but beautiful, triangle so seeing them pop up on everything from tiles and wallpaper to chairs and tables made me very happy. Here are 10 of my favorite geometric designs from this year’s show. I can’t wait to see how designers push this trend forward next year… If you missed yesterday’s ICFF trends they’re right here: Green and Great Tables. Image above: Tiles by Keiou Design Lab Images above: Sofa by O & G Design. Image above: A triangle-print wooden credenza from MatterMade.
More geometric designs from ICFF 2013 continue after the jump… Image above: I loved the grid-shape shadows cast by these chairs. Weekly wrap up + paper scrap light. It’s a whopping 70 degrees in Brooklyn right now, so I’m going to get out from under the pile of packing boxes in our house and get some fresh air. Before I head out, I wanted to share this beautiful (and totally genius) DIY light project that graphic designer Gabrielle Guy created for a friend. After moving into a new house and finding an old lantern left behind, Gabrielle decided to cut strips from scrap paper and glue them onto the shade. Two days later, the result was an incredibly stunning artichoke-like lamp that looks expensive but cost close to nothing.
I’m so impressed with this project that I had to share it as inspiration for the weekend. Here’s to everyone making something beautiful out of what they have around them. Below is a summary of this week’s highlights: DIY Wood and Brass Hanging Hoop Pendant Lights. You guys, this tutorial is an easy one!
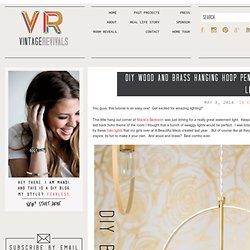
Get excited for amazing lighting!! This little hang out corner of Macie’s Bedroom was just itching for a really great statement light. Keeping with the laid back boho theme of the room I thought that a bunch of swaggy lights would be perfect. I was totally inspired by these halo lights that my girls over at A Beautiful Mess created last year. But of course like all things that inspire, its fun to make it your own. To make this light you will need: (1) Brass Socket Cup (1) Brass Gas Cap (1) Brass Tube. Abat jour en métal dentelle Jardin d'Ulysse. DIY Cardboard Pendant Light. Contributor Post by Chelsea of Lovely Indeed Hi all!
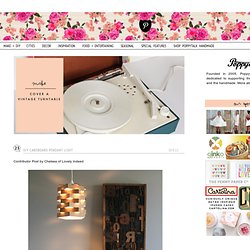
Chelsea here from Lovely Indeed, happy to be joining the amazing DIY squad at Poppytalk! I'm a big fan of recycling and repurposing, so I decided to get to work on some cardboard boxes I had laying around the house. As it turns out, cardboard makes a pretty sweet little pendant light. First, gather your materials. Corrugated cardboard, 25" wide and as tall as you'd like your lightSpray paintYard stickBox cutterGlue gunPendant light cord (this one from Ikea is only $5!)
Step 1: Start by spray painting one side of the cardboard. Step 2: Mark the cardboard at 5-inch intervals lengthwise with the box cutter. Step 3: Lay the cardboard flat again and cut it into strips lengthwise by tracing along the yard stick with the box cutter. Step 4: Once your strips are cut, hot glue the ends of each strip together (painted side in) so that you have pentagons.
Step 5: Finally, cut a solid pentagon out of cardboard for the top of the pendant. DIY Origami Lampshade. This DIY has been long in the making!
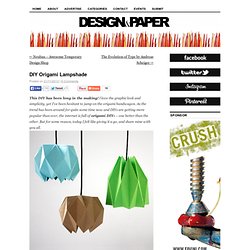
I love the graphic look and simplicity, yet I’ve been hesitant to jump on the origami bandwagon. As the trend has been around for quite some time now and DIYs are getting more popular than ever, the internet is full of origami DIYs – one better than the other. But for some reason, today I felt like giving it a go, and share mine with you all. Sometimes origami DIYs tend to be more of a hassle than fun, with all the stress of getting the folds exactly right and for someone who’s not so experienced at it, the whole process might seem a bit taunting. But trust me, if you follow these simple instructions, there is very little room for error. Once again you can use which ever paper you happen to have, just make sure it over 160 gsm, as lighter versions will not stay in shape.
Version 1. Version 2. To keep the structure from moving or opening, use a piece of string and sew the top end of the lampshade closed.