
Headband Makeover {How to Make a Bow} Mrs.
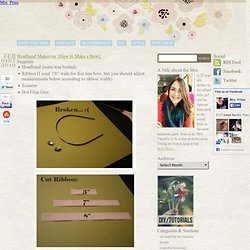
Priss Headband Makeover {How to Make a Bow} Feb01st2010 Supplies: Headband (mine was busted)Ribbon (I used 7/8″ wide for this size bow, but you should adjust measurements below according to ribbon width)ScissorsHot Glue Gun (If you’re wondering, I’m gazing down at my toilet.) Other tutorials: Bib Clips: A Simple DIY for Moms Anthropologie Floral Necklace Anthropologie Bonheur Necklace Tags: bow crafting crafts diy headband tutorial Categories: DIYs and Tutorials Me Being Crafty Personal Related Posts Dainty Flowers for Your Hair – Yeahhh, it’s another tutorial.I came up with these flowers one day when I was in a crafty mood...DIY – Anthropologie Inspired Flag Bunting NecklaceI absolutely love this necklace, but with the $70 price tag I was like, ummmmmm…...Anthropologie Bonheur Necklace TutorialA few months ago (okay, six), I posted a photo of an Anthropologie-inspired necklace I... 50 Comments Thus Far.
10 T-Shirt Scarf Tutorials — my blessed life™ Girly duct tape wallet/clutch. 16 Headband Tutorials. As a busy mom of three little boys, I don’t always have time to do my hair.
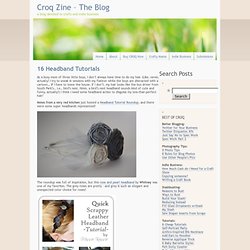
(Like, never, actually! I try to sneak in sessions with my flatiron while the boys are distracted with a cartoon… IF I have to leave the house. If I don’t, my hair looks like the bus driver from South Park’s… i.e., bird’s nest. Hmm, a bird’s nest headband sounds kind of cute and funny, actually!) I think I need some headband action to disguise my less-than-perfect hair! Notes from a very red kitchen just hosted a Headband Tutorial Roundup, and there were some super headbands represented! The roundup was full of inspiration, but this rose and pearl headband by Whitney was one of my favorites.
This scrappy leather headband by Missie Krissie is super cute, too! Anthro Necklace Week - Paisley Rebirth Necklace & Flamingo Toes - StumbleUpon. Anthro Necklace Week Day 4!
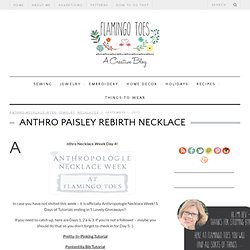
In case you have not visited this week – it is officially Anthropologie Necklace Week! 5 Days of Tutorials ending in 5 Lovely Giveaways!! If you need to catch up, here are Days 1, 2 a & 3. If you’re not a follower – maybe you should do that so you don’t forget to check in for Day 5. :) Pretty-In-Pinking Tutorial Pontentilla Bib Tutorial Narcissus Net Tutorial Today we are creating the Adorable Paisley Rebirth Necklace. Where on earth do they come up with the names for these?? Here is mine: And here is theirs: This one is a blast to do. I went with a little darker colors than they did because I just fell in love with the fabric in the scarf I found. Here’s your handy dandy tutorial!!
Materials: Sewing Machine (you can hand sew it, it will just take longer) Supplies: Scarf or lightweight fabric (you need enough for a 33″ x 12″ piece)Silver chain – 4 yardsSmall pieces of different chains2 Large beaded pieces or pins (I bought these at Michaels)Needle and matching thread. The Cross Body Bag + The Hobo Bag. Re-purposing: Tshirts into 5-strand-braided-headbands. I was walking through Target a few weeks ago and noticed this little knit fabric headband that was not just braided together…….but woven.
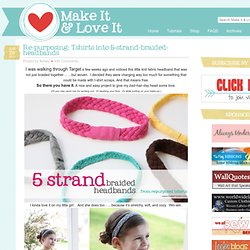
I decided they were charging way too much for something that could be made with t-shirt scraps. And that means free. So there you have it. A nice and easy project to give my bad-hair-day head some love. (Or you may need one for working out. I kinda love it on my little girl . She always has little hair fly-aways that get into her face…….and this helps with that problem. It even works great with her hair down…..and keeps that hair tucked behind her ears. And yep, good for me too. Thanks little t-shirt scraps. Want to make your own? First, find some old t-shirts. Then, cut your fabric into long strips. Next, stack your 5 strips on top of each other and sew together at one end. Now, pull on each strip of fabric so that they kind of curl on the edges. But let me explain a little better. First, you’ll work on the left side. And that’s it. This post is sponsored by:
DIY envelope clutch - StumbleUpon. (vintage romper, river island feather headband) I’ve been wanting an oversized clutch for a while now, especially since I laid eyes on that Celine clutch shot by Tommy Ton for style.com.

Its minimalism is so beautiful. Then, I saw the Clare Vivier La Pochette on ofakind.com and instantly knew what my next DIY would be. I couldn’t decide what color fabric to choose, so... why not make 2? The steps are pretty simple and I probably could’ve made 10!!