
Where USB Memory Sticks are Born. Electro-Eng. About Spin: Fedora Electronic Lab. Design, simulate, and program electronics.

Fedora's Electronic Lab is dedicated to support the innovation and development brought by opensource Electronic Design Automation (EDA) community. Community Space Latest Articles Fedora Electronic Lab is. AI Challenge. Free Online Course Materials. Stanford School of Engineering - Stanford Engineering Everywhere. The Cisco Learning Network - Cisco Certification, Cisco Training, IT Training, IT Certifications, CCENT, CCNA Test, CCNP, CCIE, VOIP Training. MC MCSE: Free Cisco study guides and Cisco training. Embedded Lab. Electro-Art. RADIX16 Laptop Touchpad Matrix MIDI controller - scottmetoyer.com. How to Build Your Own Acoustic Panels. How to Build Your Own Acoustic Panels (DIY) Last Updated on Sunday, 10 November 2013 12:40 Written by AcousticsFREQ Thursday, 13 October 2011 08:41 Make Cheap, Easy, Attractive DIY Sound Absorption Wall Panels Also Check out our Complete Guide to Home Theater Acoustics for more information, including where to place your acoustic panels.
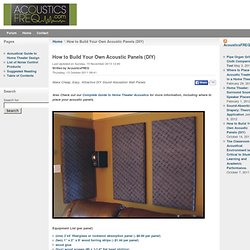
Sound absorption panels trap acoustical energy (sound) and prevent it from reflecting off of the surfaces they cover. The panels are used to eliminate echoes and reflections that muddle or color amplified music and speech. *Note that choral music, piano, orchestral instruments, group singing, and pipe organ benefit from reasonably reverberant acoustics, with many reflective surfaces.
Suitable applications for sound absorption panels include: Note that sound absorption material is often called “soundproofing.” Mr Hopkinson's Computer ™ Photonicinduction. Daniel Rozin's Wooden Mirror. James Houston. EOL Robot Band covers The Beautiful People by Marilyn Manson Felix's Machines. Robotic Xylophone. Solenoid Theory. V2.01 18-Mar-03.

Open Spark Project. Hydrocrystallophone. So You Want to Build Electronics. The equipment you need to get started in building electronics.
Introduction to dsPIC33 programming. From DP This introduction aims to help you start writing and compiling your own applications for the web platform.
We cover lots of basics like toggling pins, configuration bits, clock settings, and peripheral setup. The programming language used is C. Sketch, simulate, and share your circuits. An attempt to access a memory card (MMC) using a PIC with limited RAM (PIC16F877A) Video of my PIC16F877A based MMC digital voice recorder: This is my first digital voice recorder which is made using a mid range PIC with a total RAM of only 256 bytes.

Generally people may say that we cannot access MMC/SD card using a microcontroller with a RAM < 512. I had seen such posts and comments in many electronics forums, sites etc. DIY Bend Sensor (Using only Conductive Bags and Masking Tape) So, after lurking around in the shadows for years I've finally gotten round to making my first step-by-step instructable.
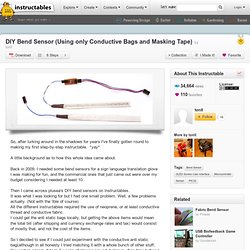
*yay* A little background as to how this whole idea came about. Back in 2009, I needed some bend sensors for a sign language translation glove I was making for fun, and the commercial ones that just came out were over my budget considering I needed at least 10. GRduino. It's hard to convey in two pages what some people spend a lifetime learning, its been my experience that you have to be aware of some basics, the rest can be gleaned from the internet and looking at examples of specific problems.

When we say programming we usually think software, but the ulterior motive of any bit of code is to get our hardware to do something useful. I've seen such vastly different programming styles concurrently used on the same system,even though all the programs would perform the same functions. Percussion Sensor Circuits. The signals produced by most percussion sensors will require some processing before they're useful as triggers.

Usually this means converting an oscillatory signal into a single unambiguous pulse that is appropriately scaled to carry the widest possible range of velocity information to the circuit being controlled. The circuitry in the diagram below performs this function. Unofficial Behringer Control Development Kit. Introduction The Behringer Control series are general purpose MIDI controllers.

They are quite popular among users of digital mixing and synthesizer software. The firmware of these devices can be updated by sending special midi messages. This package contains the tools generate these midi messages from a firmware image and vice versa, and to upload them. This development kit was created to promote interoperability of Behringer Control devices, and to allow fixing errors by the community.
Note: This software is unofficial and based on reverse engineering efforts. Code Tinker Hack: How to add Velocity sensitivity / Aftertouch to Piano toy midi controller. 7400-Drum-Machine - GitHub. MiniMill. Decoupling by Example. Reversi - iClicker. USB Framework for AVR and Windows. Introduction The Atmel AVR range of USB capable devices provides a wide-range of functionality and peripherals to the professional and hobbyist; however the additional complexity of both microcontroller firmware and host PC drivers is a tall barrier to anyone wishing to get started with USB development.
Although the firmware is greatly simplified by freely available open-source USB stacks (such as LUFA) there is still the requirement for a base of AVR software, Windows software and physical hardware to support the application. The USB Generic HID Open Source Framework for Atmel AVR and Windows solves this issue by providing a ready-made framework on which to build your applications. The framework includes a reference hardware design, a reference firmware design and a Windows based DLL library and host-test application.
By providing a tested, working base for development, the framework greatly eases the task of both learning USB development and building USB driven devices. Licensing. Hard drive + laser pointer = sonic wave display. Unbricking with Arduino. Flashing a Computer BIOS (Basic Input Output System) – The hard way… Every computer has what is called a BIOS or Basic Input Output System (this will soon be called the Unified Extensible Firmware Interface UEFI). This is a very small program stored in a chip on the motherboard, but it has a very big job. When you press the power button on your computer the first thing it does is execute this program. It then goes out and checks the basic circuitry needed to boot the computer.
It checks for things like a processor, memory, hard drive and any other additional devices connected to the computer that could be needed. Once it completes its checks, also known as POST (Power On Self Test), the BIOS checks the hard drive and other block devices for boot code. BeagleBoard.org. Resistive Touch Interfacing. How to Build a Robot Tutorial - Society of Robots. 6DOF Arduino: Compass & Accelerometer. Radar caseiro - Homemade Radar. OpenWRT compatible hardware.