
Tutorials - Gingercake. Purse Week Guest Tutorial: I Am Momma – Hear Me Roar. Today we are lucky people.

Cheri from I Am Momma – Hear Me Roar is here with an adorable clutch. Her blog is so great—it seems her posts always interest me, and she has such a variety of topics as well. From hair week, sewing, home decorating tips, etc., her blog is a definite favorite of mine. I’ve met Cheri a couple times now. She’s great. I’m trying out her upcycled hats this week. And her craft room, playroom, and family room? Let’s see what she has for us today, shall we? Hello Lemon Squeezy Ladies (and gentlemen). Today I'm going to show you how to make this. I will explain the process, but I won't give exact measurements because it all depends on how large you want your clutch to be.
Okay, let's take a time out here. I took my rectangle and folded up the bottom so that it was about the size I wanted the clutch to be. Next I wanted the flap to be circular so I found a bowl the right size, traced the line onto the leather, and cut it. Next I made the scalloped edge. LIttle Boy's Tie. This little boy's Easter tie is quick but very well made and will brighten any Easter outfit.

The tie is sewn almost entirely by hand, so if you don't have a machine its easy to finish without one. Materials Cut Front and Back Tie Cut the 27-inch x 54-inch piece of Tana Lawn in half length-wise to create two 27-inch squares. Take one of these squares and fold it in half diagonally as shown above and press it. Place your Front Tie template piece along the diagonal fold where indicated on the template and pin. Cut out the Front Tie piece. Cut Front Tie Lining and Back Tie Lining Using the second 27-inch Tana Lawn square cut out the Back Tie in the same manner as above, along the bias fold. Cut a 9-inch square of Muslin, fold it in half diagonally and press it. Cut Front Tie Interfacing and Back Tie Interfacing From the Sew in Stabilizer interfacing, cut the Front Tie Interface and the Back Tie Interface pieces. Prepare to Sew Tie Open up your pieces, you will have: Do not iron these pieces flat.
A Coin Purse Tutorial. So, some of you who read my tweets might have seen that I've been sewing like mad for an up-coming craft fair.

It's the first one where I'm selling mainly handmade items and I'm panicking slightly about what to sew amongst (many) other things. As it's at a school there should be plenty of children so I wanted to make some small, affordable items that children might like. I had a feeling coin purses could be popular but much as I wanted to make them they have been something of a problem for me over the years. I know they should be simple but it seems every time I try I get ugly, bulky corners that drive me mad. See! I've tried all kinds of different methods but still have the same problem and it only seems to occur on purses. I listed my main criteria... Tidy corners, a lining in a different fabric from the outer, a zip, no raw edges showing inside. You will need... You will also need... A zipper foot A size 16 needle (for heavy weight fabrics)
Free Craft Patterns, Projects & Tutorials. Chibi_kitty_and_rabbit. For the home. Married to a bmw Free Sewing Patterns: For the home 06.

February 2009 · Write a comment · Categories: Sewing Back to Free Sewing Patterns Share this: More Connect Search Categories Archives © 2011 married to a bmw. Design by picomol. Bounding Bunnypins - a Freebie for Friday! - allsorts. Happy Friday!
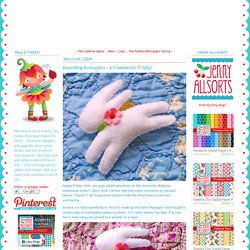
Wow, you guys outdid yourselves on the comments about my cleaned-up studio! I don't think I've ever had that many comments on one post before. Thanks!!! All those warm fuzzies made the effort seem a lot more worthwhile. So here is a little something in return! They stitch up really quickly, so you could end up with a whole herd (flock?)
Click here to download the Bounding Bunnypin pdf pattern*. How to make your Bunnypin: (sorry about the wordiness, I'm not great at this part) Out of felt, cut two of the bunny shape and one of the flower. Enjoy making your bunnypins! Cheers, Jenny. Sewing Pattern Designer Blogs « Craft Apple.