
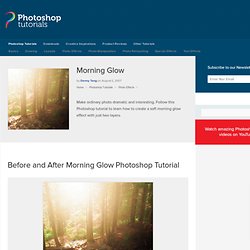
Create Andy Warhol Style Pop Art - Lady Ga Ga [Photoshop CS5] - YouTube - (Private Browsing) Photo Effects. Morning GlowReviewed by Denny Tang on Aug 2Rating:
Create A Starry Night Sky In Photoshop Tutorial. Written by Steve Patterson.
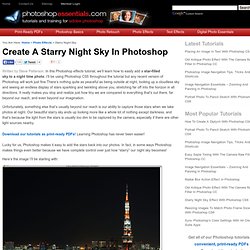
In this Photoshop effects tutorial, we’ll learn how to easily add a star-filled sky to a night time photo. I’ll be using Photoshop CS5 throughout the tutorial but any recent version of Photoshop will work just fine.There’s nothing quite as peaceful as being outside at night, looking up a cloudless sky and seeing an endless display of stars sparkling and twinkling above you, stretching far off into the horizon in all directions. It really makes you stop and realize just how tiny we are compared to everything that’s out there, far beyond our reach, and even beyond our imagination. Unfortunately, something else that’s usually beyond our reach is our ability to capture those stars when we take photos at night. Our beautiful starry sky ends up looking more like a whole lot of nothing except darkness, and that’s because the light from the stars is usually too dim to be captured by the camera, especially if there are other light sources nearby.
Photoshop Tutorials - Adding Sunlight Through The Trees. Written by Steve Patterson.
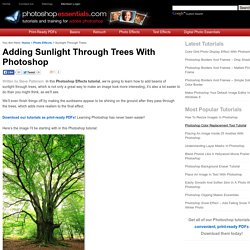
In this Photoshop Effects tutorial, we’re going to learn how to add beams of sunlight through trees, which is not only a great way to make an image look more interesting, it’s also a lot easier to do than you might think, as we’ll see. We’ll even finish things off by making the sunbeams appear to be shining on the ground after they pass through the trees, which adds more realism to the final effect. Here’s the image I’ll be starting with in this Photoshop tutorial: The original image. And here’s what it will look like after we add our sunbeams: The final result. Let’s get started. Step 1: Find The Color Channel With The Highest Contrast With our image open in Photoshop, the first thing we need to do is find out which of our three color channels (Red, Green and Blue) contains the highest amount of contrast. The Channels palette in Photoshop.
Click on the Red channel first and you’ll see your image turn black and white. Manipulation tutorial - 2 by `night-fate on deviantART. Make your image look awesome with a few light effects. We will ad some more sparkles later.

Now I want to make something new here. Make a new folder, name it Big Cirles and in this folder we will create a new layers. Make a selection like mine using the Eliiptical Marquee Tool. Create a Black Swan Inspired Movie Poster. On CreativeFan awhile back, we published a series of Inspirational, Dark and Moody Black Swan Movie Posters, which all were notable for using a variety of design techniques that we’ve covered here, including photomanipulation, texture overlay, and digital painting of makeup.
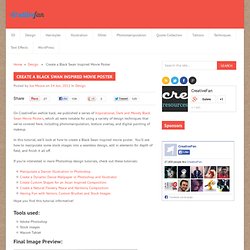
In this tutorial, we’ll look at how to create a Black Swan inspired movie poster. You’ll see how to manipulate some stock images into a seamless design, add in elements for depth of field, and finish it all off. Combine Stock Photography to Create an Abstract Poster Layout. Today, we will demonstrate how to combine several stock photos to create an abstract poster layout.
Let’s get started! Tutorial Assets The following assets were used during the production of this tutorial. Step 1 We'll want to start off with a base outline for our triangle. Step 2 This is where the fun starts happening. Grab your pen tool again. Create a Surreal Girl with a Raven Composition in Photoshop Tutorial. This is a very detailed and step by step tutorial for creating an Vector based design composition in Photoshop, with great aesthetics and almost flawless cohesion of elements.
In this tutorial we’ll be walking through the process of creating a Girl with a Raven Composition using some awesome techniques, you’ll learn loads of great tricks in this tutorial. If you want to take your creative composition skills to the next level, this Photoshop tutorial is perfect for you. Let’s get started! Tutorial Details Estimated Completion Time: 6 hoursDifficulty: AdvancedProgram: Photoshop, Illustrator. Create a Colorful Aged Poster With Special Lighting Effects. In this tutorial, you’ll learn how to use texture and adjustment layers to create an aging effect on a colorful abstract poster design. Materials Needed: Paper Texture 1 by Bashcorpo (Free)Brushes by 123freevectors (Free) What we’ll be making For a full size preview, click here.
Photoshop For Beginners: 6 techniques to extract anything from its background - (Private Browsing) This is the second of a series of tutorials thought for Photoshop beginners.

I’ll explain in depth those features that can result difficult to understand for a newbi. Today I’ll show you 6 techniques you can use to extract a person/object from its background. From now on extraction won’t have secrets for you! Extraction is one of the worst enemies for those who start using Photoshop. How to Give Color to One Object in a Black & White Photo. Combining Different Exposures in Photoshop. Tutorials by Christopher O’Donnell 3inShare Some photos – especially photos that include a sky and a ground – lack the blessing of having all elements in the image exposed perfectly.
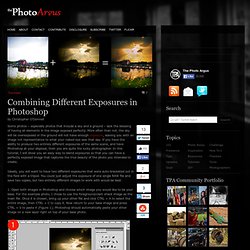
More often than not, the sky will be overexposed or the ground will not have enough exposure, leaving you with an image not representative to what your naked eye saw that day. If you have the ability to produce two entirely different exposures of the same scene, and have Photoshop at your disposal, then you are quite the lucky photographer. Ideally, you will want to have two different exposures that were auto-bracketed out in the field with a tripod. 1. 2. 3. After adding some finishing touches in post process, this is the end result: Exposure blending is meant to be an invaluable way to obtain images that have a variety of different exposures, but at a much higher level of control than if you were to blend these images with HDR. Like Our Site? 7 Comments. 20 Useful Photoshop Actions to Make Your Post Processing Easier. Resources by Bill Jones 7inShare Here are some great Photoshop actions that will help the post processing of your favorite images.

They are great for quick edits or good starting points on images you want to experiment with. Vanilla Tones Peacefull Action. Create a Dark and Surreal Photo Manipulation in Photoshop. Create a Dark and Surreal Photo Manipulation in PhotoshopReviewed by Ishan Dahiya on Nov 1Rating: Preview of Final Results Dark and Surreal Photo Manipulation Photoshop Tutorial Avatar, the movie, gave us a beautiful imaginary world with inverted mountains and distinct creatures.
We take it to the dark side and turn it into a surreal photo manipulation, inspired also by the Greek legend of Prometheus. Resources Step 1 – Starting with the Background Layer We start off by taking the landscape scene as the starting layer. Step 2 – Adding haze Next, we duplicate the portion shown by red and similar cloudy areas and change the ‘Blending Option’ to Soft Light and lower the opacity a bit, to around 85%. Add Dynamic Lighting to a Flat Photograph. In this tutorial, I will show you how to spice up a fairly dull and flat photograph. It's very easy and fast! Go from flat photo to a uniquely lit style. Editor's note: This tutorial was originally published on Psdtuts in March of 2008. For this tutorial, we'll need two photos that I took. You can download them to follow along. First of all, my apologies for this step. Anyway, just use the Patch Tool (J) to remove the car and the Clone Stamp Tool (S) to recreate the pattern of the bricks where it used to be.
If you've never used the Patch Tool, there are a couple of ways to use it. Once the van has been removed, apply Filter > Render > Lighting Effects to make the light come from the top right. With the tool that you prefer, create a selection of the part that you want to hide. Duplicate the background layer, desaturate it with Ctrl+Shift+U, apply Filter > Blur > Gaussian Blur with 4-pixel Radius, and set the Blending Mode for the layer to Overlay.