
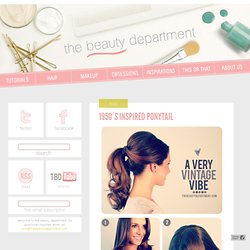
Home. Interior decoration, design, inspiration - StyleRoom. The Beauty Department: Your Daily Dose of Pretty. A NEW TWIST. 1950′s INSPIRED PONYTAIL. Photos + post: Kristin Ess Golly gee, we love very vintage-inspired ponytail.
This is what I like to call the “Barbie Pony” when talking to a client. NAILED IT! Photos/post/design: Kristin Ess (wood floor insert photo from remodelista.com) You gotta love those magical moments when you’re just minding your own bizz and inspiration jumps out and smacks you right between the eyes. Not long ago I was looking through floor patterns for a home project. My favorite pattern in the world is called the “herringbone pattern”. While I’m speaking to this flooring guy, all I could think about is making this pattern into a manicure.
As he started demonstrating the way it gets laid down, I only saw colorfully painted nail strips. MANI MONDAY. Photos and post by Kristin Ess So Valentine’s Day has come and gone… but it’s never too late to learn how to do this!

We got a lot of emails after Valentine’s Day asking how to make a heart on your nails. Love is a year ’round thing so here we go: TOOLS: Toothpick, polish, a piece of paper or foil. BACK TO BASICS. BEAT THE HEAT. Photos/post/design: Kristin Ess Since it’s about 550 degrees here in sunny Los Angeles, I figured this would be the perfect day to show you a quick + pretty way to get your hair up and off your shoulders.

Don’t let the 13 steps fool you– this tutorial is fairly simple, just wanted to make sure you saw every little step! BLACK + GOLD. Photos by Grace Niu and post designed by Eunice Chun BLACK + GOLD for the win!
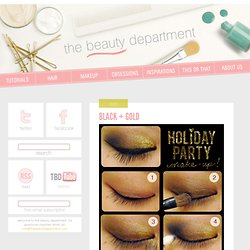
Congratulations to Grace Niu who is the winner of our most recent “Guest Post” contest. We absolutely loved her holiday eye makeup tutorial. We received so many great tutorials and it was really difficult to pick just one. But we thought Grace’s tutorial was seasonally appropriate and will look great on any eye shape or color. 1. 2. 3. 4. 5. QUICK TIP: HOW TO PREVENT YOUR EYELINER FROM RUNNING. Photos + post by amy nadine, graphic design by eunice chun When I’m talking to friends and strangers, I can’t help but notice if their lower eyeliner has traveled down the lids, making it look like they have black eyes!

It’s not their fault, really… kohl and kajal liners are made to be smudge-able and have a “slip” to them; even some longwear liners will smear a little if your eyelids are on the oilier side. Yet the whole mess could have easily been prevented if only they had ”set” the liner with a little powder immediately after applying it. THE PAINT JOB. YOU ASKED FOR IT… Photos + post by Kristin Ess So many emails have come in asking how I did the braid on Lauren’s hair for her last Chelsea Lately appearance.

I recently recreated that braid and took a couple photos so you could see it up close. Here’s the very simple secret to this braid: In a regular braid there are 3 strands. For this look, all you do is braid one of those strands beforehand and loosen it up with your fingers, then braid as usual. Watch this video to see how it looks as the pieces loosen up and naturally fall out of the braid: Tags: braid, braid in a braid, braids, chelsea lately, hair, hair style, kristin ess, lauren conrad, lauren conrad braid, lauren conrad plait, layers, messy braid, messy plait, plait, style, textured braid, the beauty department, thebeautydepartment.com, video. 6844737349_73361a061f_b1.jpg (512×931) TBDjamievolume-copy. FANCY FINGERS! Photos + post by Kristin Ess By now you all know how much we love bows around here.

This little mani is so spring-y + girly and we simply couldn’t wait til mani monday to share it. Here’s how it’s done! TOOLS: mint or turquoise polish (we used THIS ONE), white polish, black polish, a thin paint brush, top coat Paint 2 coats of mint or turquoise as a base.Make a double scallop shape at the tip using the white polish.Take a little black polish on a very thin paint brush and follow the shape of your scallop and end with a loop as seen above.Next, take a little more black polish and follow the other scallop, go past the previous loop, and cross over the first black line. As always, tweet us a photo when you do it!! NAILED IT! PARTY MAKEUP SERIES: EYES. Photos + post by amy nadine, graphic design by eunice chun Here at TBD, we’re always trying to simplify things for you so you see how easy it is to re-create our favorite red carpet looks.

Yes there are 8 steps above but they’re not hard and if you remember to blend blend blend, there’s really no way to mess it up! A CLEAN CANVAS. Photos: justin coit + thebeautydepartment.com post designed by kristin ess Lots of requests for a very basic blow out.
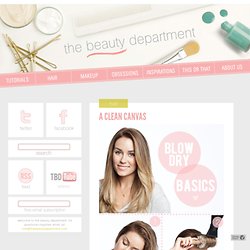
Here’s your step by step! I’ll do one for curly hair and one for fine hair as well. These are the basics steps for anyone with wavy and/or thick hair like Lauren’s. Tools: Blow dryer with the nozzle, leave-in conditioner or detangler, protective serum or frizz taming serum, medium to large round brush, clips. 1. 2. 3. 4. 5. 6. Feed your eyes. 1898646_460s.jpg from cloudfront.net - StumbleUpon. Top Bloggers Favorite DIY Projects. Look to inspire. The Brick Testament. Polyvore.