
23 super creative repurposed items. Design for Life: Recycled Wine Bottle Tiki Torch. 08.09.09 | by Erik Anderson Whether it’s product branding, package design or projects for ourselves, we’re pleased when we find a solution that’s very effective and creative, while keeping resources to a minimum.

This idea is very inexpensive idea and it’s a great way to recycle a wine bottle. See how this simple idea inspired this brand and wine bottle design. It’s been a record year for mosquitoes here in Indianapolis, Indiana and I’d been wanting to add some Tiki-esque torches to the patio to combat the little buggers, and add a little ambiance. After searching the world over to find a torch that was affordable and atypical I came to the conclusion that unless I wanted wicker or bamboo, I needed to be a bit more resourceful. Here’s what you’ll need. Empty Wine Bottle (Use any bottle as long as it’s glass and the neck is 1” in diameter. Helpful Tools: Channellocks, adjustable wrench, hacksaw, power screwdriver, and a funnel. Safety Note: This is for outdoor use only. The Hanger -Erik. What I made. What I made days ago 1) I wonder if he knows he’s made from two toilet rolls… 2) …and an old plastic deodorant bottle!
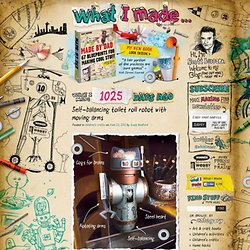
3) Wow… he’s light on his feet (or should I say foot)! This Steampunk inspired toilet roll robot is so agile it can balance on the edge of a ruler, so strong its heart is made of steel, so clever its brain is made of cogs… and so cheap he’s made from trash! A couple of cool additional features are the see-through head, made from the lid of a can of shaving gel and the arms that rotate up and down, revealing the robot’s steel heart. How to make your own self-balancing toilet roll robot with moving arms I have provided full instructions below, but feel free to improvise, you can create your Steampunk inspired robot from almost anything.
Download project files› Includes: 1) Collectable instructions – print them out & put them in a folder! [display_adsense ad_type="300x250"] How to make your own beautiful recycled chopstick and soda can bird feeder Download project files› Hang up a Mason jar planter. Ducks in a Row - All Things Parties + DIY: DIY Pillows Made from Daddy's Shirts. Want a little insight into what my husband signed up for when he said "I do"?

I've had a box squirreled away in the bottom of the closet for the past three years. Every time my husband has announced that he's going to sort through his clothes and get rid of old items, I'd hover over him like a ravenous vulture circling a horse carcass. I would wait on baited breath for an old button-down shirt to hit the "give away" pile, swoop in, nab the shirt with my sharpened craft talons, and hastily slink off to the box in the bottom of my closet.
I hope your mental image of me doing this involved drooling and a hunchback. So what, pray tell, could possibly evoke such strange behavior? Tutorial: How to Make a Mason Jar Lantern. So, here's a little tutorial for you, courtesy of the dapper Mr.
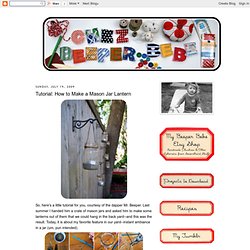
Beeper. Last summer I handed him a crate of mason jars and asked him to make some lanterns out of them that we could hang in the back yard--and this was the result. Today, it is about my favorite feature in our yard--instant ambiance in a jar (um, pun intended). Get your own ambiance-making instructions right here:DOWNLOAD TUTORIAL And step by step photos above for your reference.
(and those are NOT my hands in the photos--Mr Beeper's, thank you very much). And this is what I recommend you do by the light of your mason jar lanterns: pour yourself a glass of white wine, set your bare feet in the grass, listen to the crickets, and think about nothing (or Jude Law, if you really want to). DIY Succulent Table. Matti's Succulent Table Mission DIY succulent table complete.

I’ve wanted to make this baby for months. It’s a dissected old shipping crate and some other random scraps of wood lying around the house turned into a patio side table with a planting strip down the middle. Old shipping crate deconstructed. The next couple of pics show a bit of the process. Center planting box layed out. The outside walls were about the same shape as I wanted the table, and I started to build everything around that size.
Table tops getting set in. Randomly walking around looking at gardens in the hood, I spotted a big pile of old scrap lumber. Fastening it together. I really tried to screw everything in so that the screws were hidden from sight. Matti's test of strength. …and it passes the Matti’s strength test. Nearly finished. DIY magic. ...and filled with succulents. Yeah, another project to check off the list.