
Diagram: Solid Fujimoto-æske. En gang i vistnok 1991 fortalte min mor om en tv-udsendelse hvor en japaner (?)
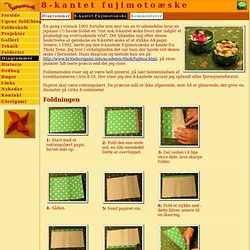
Havde foldet en "vist nok 8-kantet æske hvori der indgår et pludseligt og overraskende vrid". Det lykkedes mig efter denne beskrivelse at genskabe en 8-kantet æske af et stykke A4-papir. Senere, i 1992, lærte jeg den 6-kantede Fujimotoæske at kende fra Thoki Yenn. Jeg tror i virkeligheden det var ham der havde vist denne æske i fjernsynet. Hans diagram og metode kan ses på på visse punkter lidt mere præcis end det jeg viser. Foldemetoden viser sig at være helt generel, på nær bestemmelsen af bunddiameteren i trin 8-10. Papiret skal være rektangulært. Start med et rektangulært papir, farvet side op. Fold den ene ende ind, en lille niendedel. Del resten i 8 lige store dele, lave skarpe folder. Sådan. Vend papiret om.
Fold et stykke ned - dette bliver senere til en låsering. Og igen. Først bukkes hjørnet ind til den første streg, så er man 1 oppe ad enden. DIY recycled t shirt braided scarf tutorial. This tutorial will teach you how to make your very own homemade recycled t shirt braided scarf.
There are several different ways to go about making these scarves, but all are extremely simple. For this project, I used XL t-shirts I got from a local thrift store but you can also use store bought jersey fabric as well. Let's get started!! - Fabric OR XL used seamless t-shirt (no need to buy new)- Fabric scissors That's it! You will need approximately 1 - 2 meters of fabric depending on the desired length. If you are using a t-shirt first you need to WASH it....who knows where it's been or who's been doing jumping jacks in it.
Feel free to splatter fabric paint or tie dye your material at this point, I have kept this scarf plain. Cut 1/2 - 1 inch strips along the width of the fabric creating loops. You will end up with something like this: Once all the strips have been cut out, gently tug along the length of the strips to curl the edges under. DIY Braided Hex Nut Bracelet. We’re nuts for nuts.

Is there a more versatile and inexpensive DIY component than a hex nut from the hardware store? You can imagine our excitement when we first discovered Philip Crangi’s Giles & Brother Hex Collection. Honestly, nuts braided into jewelry is WTF genius! With a few items that we always seem to have lying around, we tackled the technique and made our own spine-like braided hex nut wrap bracelet. You’ll need:3 strands of cotton butcher’s twine cut into one yard pieces18 small brass hex nutsa bit of dexterity! Gather the 3 strands of twine and tie a knot at the top, leaving about 2 inches of slack. Keep your thumb at the base of the braid, holding the nut in its place.
Repeat the steps, by threading the rest of the nuts to the outer pieces of twine before they are crossed over. The bracelet should wrap around your wrist at least two or three times. Good luck!! (top image from here, rest of images by Honestly…WTF) DIY BURBERRY INSPIRED TRANSPARENT RAIN CAPE. DIY TRIBAL PRINT KIMONO. DIY Shoes. Top 11 DIY Fashion Blogs. Update 7/23/12: Hey guys!

I wrote this post in February of 2011 and since then I’ve discovered lots more awesome DIY blogs! Either there are tons of new ones popping up or I didn’t even know how much great stuff was out there. Keep sharing them in the comments, I love checking each one out! These are in no particular order. I mean, how could I *possibly* rank them? Honestly… WTF I Spy DIY P.S. Stripes And Sequins Studs and Pearls Lemmemakeit A Pair & A Spare Be Vain or DIY …love Maegan Phosphene Fashion Outsapop Trashion Do you love DIY, fashion and craft? Tagged as: a pair and a spare, bevainordiy, diy, honestlywtf, i spy diy, lemmemakeit, love maegan, outsapop, phosphene, ps i made this, stripes and sequins, studs and pearls.
DIY Woven Chain Collar Necklace. Earlier this month Lauren and I escaped city life with our dear friend Grace, of Stripes & Sequins, for a weekend chock-full of sun and DIY.

With an abundant supply of rhinestone and brass curb chain, we decided to try weaving the components together to make our own collar necklaces. It was fun to see how wonderfully different the pieces turned out - each so fabulous in their own unique way! Honestly, isn’t that the best part about DIYing with friends? You’ll need: Start by laying two pieces of curb chain side by side. Thread the floss under the first link on the left side and through the top of the 2nd link on the right side. Continue this weaving pattern.
Tie a knot at the end. Using a different color flow, weave the floss around the first few links – again leaving about a foot of extra slack. Continue weaving and tie a knot at the end. Tie a knot onto the chain. Keep the necklace curved while attaching the rhinestone chain. Your necklace is now adjustable and finished!!