
Todays Creative Blog - Creative Blogs for DIY Crafts and Home Decor. The Quick Unpick: A tiered ruffle refashion… Braided headbands. I am STILL growing my hair out and while I have surpassed the really difficult stage, it seems I am always one bad hair day away from shaving my head.

I've done it before and could do it again- once you know how easy it is to have short hair or very little hair, it is SO tempting to go back. That is why having lots of hair accessories on hand is a MUST! I have a variety of ways that I like to pull my hair back and lately I've been having fun making my own braided headbands. They are really easy to make and super cute to wear on a bad hair day :) No Matter Where I go...I ALWAYS Meet Myself There!: Woven Rose Tutorial.
Miss RoseAnne asked how I did woven (spiderweb) roses.

So here are lots of pics, and words that hopefully make sense, to show the one little trick I do when creating these. 10 minutes later..... Ok. I have tried and tried to get the words next to the picture (with the pic on the left of the screen) and it just is not going to work. I am very frustrated with whatever changes blogger has recently made because they ARE NOT working the way they did. No Matter Where I go...I ALWAYS Meet Myself There!: Fargo rose tutorial for Susan. Bring the needle thru to the front of the fabric.

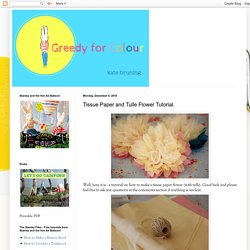
I measure where I will place my knot by the length of the needle, but you can make it as long or as short as you like, but I do think they need 4 to 5 petals (wraps) to look good....read on. wrap the ribbon once around the needle, the same as a french knot. The tail of the ribbon , that is under my thumb (just the way I like it LOL) stays there for the whole process. It keeps the knot secure. Greedy For Colour: Tissue Paper and Tulle Flower Tutorial. Well, here it is - a tutorial on how to make a tissue paper flower (with tulle).

Good luck and please feel free to ask any questions in the comments section if anything is unclear. First of all, assemble your stuff - tissue paper (2 colours if desired), tulle, string and scissors. Cut two rectangles of each colour and two rectangles of tulle. The flower I have made used 38cm x 25.5cm sheets but it doesn't really matter, just so long as the pieces are all rectangular and of the same size. Lay the six sheets on top of each other. Once the folding is complete, bend it in half like a fan and tie it tightly (so that it gathers) in the middle with string Snip the ends with scissors to make a petal shape.
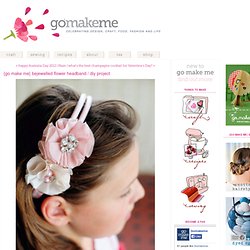
Fan out one side into a half circle. Then, delicately begin separating the layers, taking care not to ruin the pleats or tear the tissue paper (when this happens, don't cry... Continue separating and Unfurl the other side and continue in the same way, separating, lifting and zshoozshing. p.s. {go make me} bejewelled flower headband / diy project - Go Make Me. {go make me} bejewelled flower headband / diy project Flowers in the hair, how girly!

You can increase your eostrogen levels too by making these jewel encrusted fabric flowers in minutes and glue to a headband for the latest look (see Fashion Designers below). It only takes a few scraps of fabric, glitzy buttons, glue, needle, thread and time and you've got the current look for a fraction of the price Here's how.
Hello wednesday - taggie bib. Don't you just LOVE wednesday's? Say hello to wednesday "hello wednesday" It's all downhill from now on to the weekend - yippee!!! Hello everyone, it is me Rachie. Ali asked me to be a "guest designer" for this weeks Hello wednesday project. Ooooh that sounds so grand - me a guest designer!! I Craft. The Polka Dot Shop. Ribbon Crafts - Make Ribbon Crafts And Projects. Hello, readers. It’s a stormy Monday, or at least it is here in New York, and my outlook has taken a nosedive as a result. It’s the kind of day that’s really only good for a few things, but since an afternoon nap isn’t in the cards for me, crafts it is!
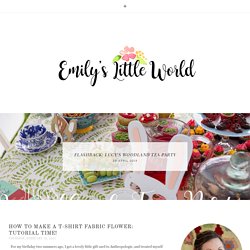
I just came upon a stash of assorted ribbon that I’ve socked away from hair accessories, gift wrapping, clothing and other crafty endeavors. So, my mission is clear: To find ribbon crafts that anyone can make to brighten up a rainy day. Start with this accented shower curtain, check out Farima’s delightful find, and then move on to the stunners I spotted on Pinterest… Wrap It Up! How Tos from the Container Store. Hair bow instruction. St. Louis children's newborn maternity senior photographer: How To Make A T-Shirt Fabric Flower: Tutorial Time! For my birthday two summers ago, I got a lovely little gift card to Anthropologie, and treated myself to two hair clips that looked like these: They were a bit pricey, as Anthro stuff tends to be-- $15 apiece, and after months of wearing them and pondering them and KNOWING I could make them myself somehow, I finally took some time to actually dissect the flower (not LITERALLY, but close!

Photo Holiday Cards, Personalized Gifts, Photo Birth Announcements, Baby Shower Invitations, Birthday Party Invitations, Notecards, & More by Elizabeth Victoria Fine Stationery. Willow Would: A Project A Week: Envelop Clutch Finished, Tutorial? Fashion, Sewing Patterns, Inspiration, Community, and Learning. Handcrafted Hitching Post: Chronicles Of A Shoe-Obsessed Bride, Part 5 (Ribbon Flower and Shoe Cuff Tutorial)
Embroidery Sewing Machines - How To Information. Before & After: 4 Bias Tape Upgrades Make this the Summer of the Homemade Upgrade.

Armed with your own arsenal of bias tape, you'll be able to add a personal touch to many ordinary items. The Craft-Arty Kid: School jumper to sequin shoulders. Sequined shoulders seem to be the current thing so here's the run down of how I produced the look myself.

The jumper I used was my old P.E. sweatshirt from school. It has an ugly neck and the school logo on it. They had to go. How to Make Easy Fabric Flowers. Easy Wrist Corsage Tutorial - A Creative Life. Gosh, it's been busy around here! Landscaping our front and back yard, Cinco de Mayo Party, Prom, Graduation, my hubby's B-day, and a trip to FL for my mother-in-law's birthday celebration. How to Make a Yo-Yo: Step 01. Tutorial ~ Simple Magnet Board Bow Keeper. I am so excited about this project! Ever since I saw the magnet board my sister used to keep my niece’s hair accessories on I have wanted one.
Fabric Flowers Tutorial Site by MakeBowsandMore.com. How to make twisted bowtique bow 16mm grosgrain - Wholesale grosgrain ribbon supplier Australia. Easy Peasy Tuxedo Hair Bow Tutorial – A Little Moore. Hello readers and Pinterest fans!! My blog has moved from here to www.alittlemooreblog.com All new updates, tutorials and crafts can be found there! Do you have a few scraps of ribbon left over from other craft projects? Well, if you have a little girl in your life then you can make these easy peasy Tuxedo Hair Bows. They are ridiculously easy and you can use up all of your scraps and have some sweet accessiories for your little one. Ready? Cut your scrap of ribbon. Pointy/leaf tip bow instructions - Hip Girl Boutique Free Hair Bow Instructions.
9 - This is the bow all tied together. Normally I would consider this the reverse of the bow. 10 - This is the reverse. The original photo posted a while back had the hollow side of the bow (9) as the top layer and the flatter side of the bow (10) as the bottom layer (as far as I could tell). 11 - Trim the tail as you prefer (V or diagonal cut) and make another bow the same size or with 1/2" longer loops. In person, you can actually see the lower layer from the top, but when photographing bows, it seems that the top layer always ends up looking larger than it actually is.
I also need to mention that "prleaf" adds a shank button to the center so the shank fits down into the folds and she sews through all the folds, securing the shank that way. Free Hair Bow Tutorials. FingerSnapper! Great deals at your Fingertips. Grosgrain Ribbon, Hair Bows, Ribbons, and Much More. Happy tape — japanese masking tape. tape galore! Masking Tape Headboard - mad mim. So, people have been pretty sneaky with masking tape lately.
I’ve seen masking tape wallpaper , and wall art (the last picture in the sneak peek. The Whole Happy Fabric Flower Tutorial Family + Fabric Flower eBook - mad mim.