Turn your cables and extension cords into art instead of hiding them. This is the kind of thing you look at in magazines, admire for a second, and then never do… But whatever, it’s still kind of cool.

(via XBMC) (via Maisie Broadhead) The first one seems pretty doable. Homemade Toys for Creative Play. Homemade toys are not just more economical alternatives to mass market toys, but can be so much more than what’s bought in the shops. The joy of making something – however simple – for your toddlers to play with, to learn from, to remember when they grow up is priceless. Toys made from recycled or scrap material are also good for the environment our children will inherit. It’s also great to be diverse, to give a child many options to choose from and help nurture their independent taste and imagination – after all there are many cat toys that are not Hello Kitty.
So for all the heart felt reasons, we have made this page dedicated to all our homemade toy projects. We love homemade stuff and want to share with you our ideas for making toys at home – unique paper toys to print and make, simple templates for craft toys from home sourced materials and many other simple tutorials that don’t require printing. Butterfly Bracelet. 8' Folding Kayak. Backlit Canvas Art.
Do you have one project that you've been longing to do, but just haven't found the time yet?
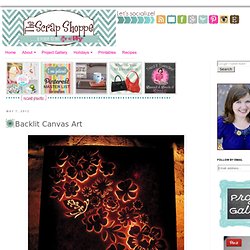
This is it for me. I call it my Backlit Canvas Art and the inspiration piece has been pinned in my "Crafts to try" Pinterest board for ages. My "pin"speration is an artist's piece made from metal that has hand cut flowers all over it. Sea creatures origami. Flower origami ball. Paper Flowers - Anyone Can Do That.
Japanese Kusudama, this tutorial is featured on Craftuts Anyone can do that, I assure you.

The proof: I can, just take a quick look at my result below. And, believe me, I am neither meticulous nor particularly patient. - StumbleUpon. Printable Paper. How to make a wrapped leather bracelet. DIY Macrame Bracelet - Honestly WTF. Growing up by the beach in Southern California, the ability to knot a macrame bracelet was practically a right of passage.

Although those days are long behind us, we’ve never forgotten the ever-so-simple square knot technique. This time, however, we’re replacing hemp and wooden beads for more updated elements like colorful nylon cord and glossy metal charms. Happy knotting! You’ll need: Start by cutting the knotting cord into two 30 inch, two 20 inch and one 10 inch lengths. Center the 30 inch cord under the two middle strands. Pull tightly and slide the knot up to the top. Finish the 2nd half of the square knot by folding the left cord over the middle strands and under the right cord. Pull tightly and repeat the steps – left, right, left, right . . . To finish the knots, thread one of the cords onto a needle and sew up the center of 3-4 knots along the backside.
Repeat the same step on the other cord. After sewing up both knotting cords, trim away any excess. Make a mega-crochet pouf. Jellyfish Tank. I was always terrified of jellyfish as a kid.
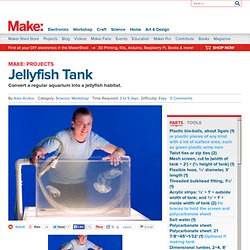
The thought of a slimy translucent blob just below the water’s surface that could deliver a painful sting kept me out of the ocean most of the summer. It wasn’t until years later when I collected a small jellyfish at the beach and observed it in an aquarium that I realized how stunningly beautiful they are. As it pulsed steadily and allowed its tentacles to flutter behind it, I was completely hypnotized. Soon, I decided to design and build an aquarium that could keep jellyfish alive and well.
Do-it-Yourself DIY String Wedding Lanterns Yarn Chandeliers. Jessica of Wednesday Inc shows us how to make those gorgeous twine chandeliers from the inspiration shoot she shared with us this morning.

Using balloons, glue and twine, you can also make these lanterns for your wedding – and then bring it home and use it as your very own mid century lampshade. What you will need are: balloons, glue, yarn, tray for glue, corn starch 1/2 cup of Corn starch, 1/4 cup of Warm water, clear fast drying spray paint, hanging lamp cord or fishing line (depending on your desired final product), and a lighting kit if you’re looking for a fully functional lantern. Water Balloon Luminaries. A fun and easy project with a beautiful payoff.
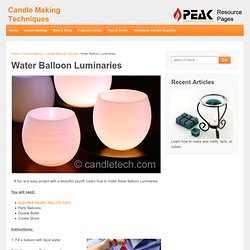
Learn how to make these Balloon Luminaries. You will need: High-Melt Paraffin Wax (IGI 1260)Party BalloonsDouble BoilerCookie Sheet Instructions: Whirl-it&lampshade - Whirl-it lampshade - free DIY tutorial. We really needed a new lamp, and we´ve planned to make one for months.

This week we finally got around to it. It takes a bit of different materials, but it´s really easy when you´ve started. We recommend making it outdoors, as it gets quite messy. The result is pretty neat, especially at night when the threads cast shadow on the walls.