
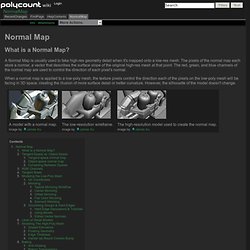
How to Create a Seamless Texture from Photo. Years ago, seamless textures were used primarily for desktop wallpaper and web page backgrounds.
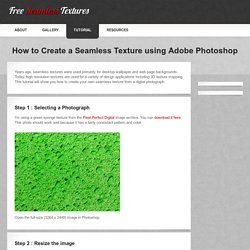
Today, high resolution textures are used for a variety of design applications including 3D texture mapping. This tutorial will show you how to create your own seamless texture from a digital photograph. Step 1 : Selecting a Photograph I'm using a green sponge texture from the Pixel Perfect Digital image archive. You can download it here. Open the full-size (3264 x 2448) image in Photoshop. Texture Baking with Turtle - Maya LT 2015 - Autodesk. Texture Hacking 101. Normalmaps for the Technical Game Modeler. Normalmaps for the Technical Game ModelerBy Ariel Chai, 15th of June 2010, all rights reserved.
*Article is constant work in progress*This article is aimed towards technical modeling (such as weapons vehicles, pros, etc), and is made to give an overview of common normalmap issues, walkarounds and solutions. This article assumes knowledge of UV's, and the core idea of what normalmaps are. Theory : Implementation :2.1 Obtaining Clean Results Using Hybrid mapsNormalmaps are baked differently depending on object's smoothing.
The renderer goal is to compensate for the smoothing, so the lowpoly with the applied result will be as close as possible to the highpoly version. Each method has its issues and therefore we want to mix them to produce good maps. Advanced renderbump and normal map baking in Blender 3D from high poly models. Normal maps are essentially a clever way of 'faking', on low poly, low detailed models, the appearance of high resolution, highly detailed objects.
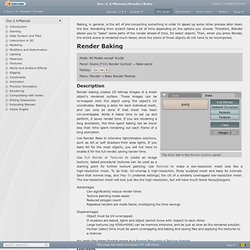
Although the objects themselves are three dimensional (3D), the actual part that 'fakes' detail on the low resolution mesh is a two dimensional (2D) texture asset called a 'normal map'. What are normal maps and why use? ^ The process of producing these normal maps is usually referred to as 'baking' (or 'render to image'), whereby an application - in this instance Blender 3D - interprets the three dimensional geometrical structure of high poly objects as RGB ("Red", "Green" & "Blue") values that can then be 'written' as image data, using the UVW map of a low resolution 'game' model as a 'mask' of sorts, telling the bake process where that colour data needs to be drawn. Generally speaking, there are two ways to generate these types of baked normal maps using 3D; Manual/Render/Bake. From BlenderWiki Baking, in general, is the act of pre-computing something in order to speed up some other process later down the line.
Rendering from scratch takes a lot of time depending on the options you choose. Therefore, Blender allows you to "bake" some parts of the render ahead of time, for select objects. Then, when you press Render, the entire scene is rendered much faster, since the colors of those objects do not have to be recomputed. Mode: All Modes except Sculpt. Normalmap_deepeninga.jpg (1664×861) How important is triangulation? NormalMap. What is a Normal Map?
A Normal Map is usually used to fake high-res geometry detail when it's mapped onto a low-res mesh. The pixels of the normal map each store a normal, a vector that describes the surface slope of the original high-res mesh at that point. Quad mesh import support? When to triangulate [Archive] Hi there!!
![When to triangulate [Archive]](http://cdn.pearltrees.com/s/pic/th/triangulate-archive-polycount-73821599)
Well after a while I found out that some artists and tech artists sometimes do things out of habit without really questioning things. Especially with stuff like triangulation - it's one of these details that can easily create shading errors, but most people seem to not notice because it's 'good enough'. I personally mostly build my ingame meshes based on a loop system for one simple reason : clean loops make selection very easy (select one, and grow/shrink from there) hence it makes both UV and skin weighting much easier and faster.
However when it comes to baking, things can get tricky as some apps dont even triangulate the same way before (hidden edges oriented one way) and after the bake (shown edges oriented the opposite way) so to avoid all that I tend to triangulate before the bake and keep the asset that way from that point on. But I do keep the mostly quad version in a safe place, if I ever need to go back to it. NormalMap. Normal maps (and importing them correctly) Dev:Shading/Tangent Space Normal Maps. From BlenderWiki Implementation Dependent A common misunderstanding about tangent space normal maps is that this representation is somehow asset independent.
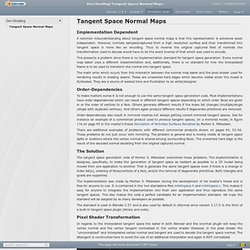
However, normals sampled/captured from a high resolution surface and then transformed into tangent space is more like an encoding. NormalMap. Maya User's Guide: Feature-based displacement map attributes. ZBrush to Maya Displacement map. Displacment maps.
Maya. Combined, the two words sends shivers down the spine of any CG artist. It’s a topic I’ve spent countless hours trying to wrap my head around. Maya User's Guide: Troubleshoot black holes appear on rendered surfaces with displacement maps. Maya User's Guide: Connect a texture as a displacement map. Displacement Mapping in Maya: Creating a roll-up garage door. I always forget where the displacement mapping is in Maya 7.
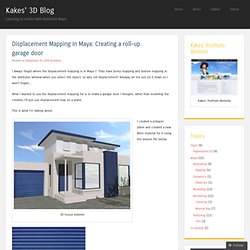
They have bump mapping and texture mapping in the attributes window when you select the object, so why not displacement? Anyway, let me just jot it down so I won’t forget… What I wanted to use the displacement mapping for is to make a garage door. I thought, rather than modeling the crinkles, I’ll just use displacement map on a plane. This is what I’m talking about: 3D house exterior. Maya User's Guide: Edit UVs > Layout. Really Dumb Question about Specular Maps in Maya... 3ds Max Help: Baked Texture Elements. Low Poly Game Asset Creation - Fire Hydrant in Blender and Unity 3D. Create Low Poly, Game Ready Assets in Blender and Unity 3D!
Through this Blender and Unity tutorial you will learn how to create low poly assets for games. Over the course of this tutorial you will learn the high poly and low poly modeling techniques needed to create the fire hydrant subject matter. You will learn how to unwrap the UVs of the final low poly model and how to bake out normal maps, ambient occlusion and texture maps. Note: it came to our attention that some serious mistakes were made in the normal map baking tutorial, video #6. Due to this we’ve added an addendum video that goes over each of the errors and shows how they were fixed for much higher quality, and more accurate normal maps. After the UVs are unwrapped and the baking is done we’ll take you into Photoshop to show you how to finalize the textures by adding the ambient occlusion and extra detail. What You’ll Learn in this Course:
Baking color (diffuse) maps from high poly to low poly in Maya. Creating Displacement , Normal & Bump Map - 3dtutorialzone.com. This tutorial will teach you the differences of displacement and bump maps and normal maps and how to assign them to a shader and a model. This is just an overview tutorial on both subjects, and will teach the basic attributes of both of them. Set-up Step one -Create a sphere by going to create>polygonal primitives>sphere. And that's it. Saving an image as TGA with transparency. Multi UV sets / Textures in Maya. Combining normal maps in one Shader in mental ray for Maya.
In a previous post, I talked about combining a bump map and a normal map In this post we will explore the idea behind adding 2 normal maps on one mesh and render with mental ray for Maya Here is the render for both maps separately. To add them together, we will use a node called plusMinusAverage found under the general utilities of the Maya nodes. First make sure that both texture files have their own bump2d nodes MMB drag the first bump2d node on top of the plusMinus node and choose other from the pop up window Connect the outNomal from the bump2d to the input3D of the plusMinus, it will give you a new input called input3d[0] Repeat the process for the second bump2d and choose input3d[1]Note: if you are using an older version of Maya and you don’t see the option to input3d[1], click on the Add New Item button in the AE of the plusMinus node.
Mirror UV Maps. Mirror uvs. View Full Version : mirror uvs Rudity with cylindrical mapping for a face you sorta can. I cylindrical map the face. Then take all the uv's on one side of the face, scale them on -x untill it looks the same size as the other side. Then I move it over top of the other side.. scale and move again untill it looks like its half a face. The Secrets of Realistic Texturing. In this tutorial you will discover: The fundamentals of texturingHow to use CrazyBump to generate texture mapsHow to make a realistic cobblestone material I realized that there aren’t too many tutorials out there that explain the different texture types.
Diffuse, normal, specularity, displacement, occlusion. WHAT DO THEY MEAN!? Well in this tutorial I cover exactly that. We’ll be creating our own versions of those texture types using a base image, then using those textures in Cycles to create a realistic cobblestone material. Finished Result. Basics of Creating UV Maps. By Brian Immel This tutorial covers the basics of generating UV projections, editing UV points, exporting UV maps to Photoshop, and bringing the finished texture map back into Maya. This tutorial assumes that the user has a fundamental understanding of the Maya interface, has some knowledge of polygonal modeling, and has experience with editing raster-based images in Photoshop. Note: Some of the steps and proceeds may need adjusting if you are using version 6 and up. Headus UVLayout - Buy AU.