
DIY Follow Focus on 7D using Servo and Arduino. Android+Arduino – Face Following RC Car. Pan / Tilt face tracking with the raspberry pi. Face detection and tracking with Arduino and OpenCV. UPDATES Feb 20, 2013: In response to a question by student Hala Abuhasna if you wish to use the .NET Serial class, use the naming convention "\\\\.
\\COMn" and replace n with a number > 9 to define your com port for COM ports above 9 such as COM10, COM11, etc. Mar 23, 2012: Featured on Adafruit's Blog Mar 23, 2012: Featured on Interactive Design Dec 13, 2011: Featured on Floss For Science This guide will also be maintained on my blog In this project I have assembled a face detection and tracking system. You can see the video of the final project here: Basically, the webcam sends video frames to OpenCV running on a Windows PC. OpenCV (Open Source Computer Vision Library: is an open-source library that includes several hundreds of real-time computer vision algorithms.
This is an integration project between hardware and software tools. This project would not have been possible without the team who developed OpenCV. Software Required Code Required Hardware Required. Minimosd - arducam-osd - MinimOSD: DIYDrone's ArduPilot Mega OSD Board for FPV cameras. - Arduino based Camera Control and OSD for UAVs. MinimOSD is a super-tiny board designed by 3DRobotics.
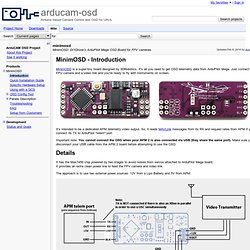
It's all you need to get OSD telemetry data from ArduPilot Mega. Just connect your FPV camera and a video link and you're ready to fly with instruments on screen. It's intended to be a dedicated APM telemetry video output. So, it reads MAVLink messages from its RX and request rates from APM if you connect its TX to ArduPilot "telem" port. Important note: You cannot connect the OSD when your APM 2 is also connected via USB (they share the same port).
It has the Max7456 chip powered by two stages to avoid noises from servos attached to ArduPilot Mega board. The approach is to use two external power sources: 12V from a Lipo Battery and 5V from APM: Raw 12V from Lipo Battery: Feeds directly FPV camera and video transmitter. Note: Optionally, you can use two solder jumps to "tie" digital and analog lines.
MinimOSD has no extra pins exposed, because the concept is "capturing all the needed data from MAVLink". Face detection and tracking with Arduino and OpenCV. Arducam-osd - Arduino based Camera Control and OSD for UAVs. Hacking A Keychain Digital Camera for Arduino Control. Photography options for the Arduino are few and far between.
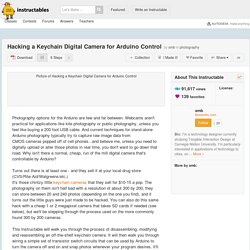
Webcams aren't practical for applications like kite photography or public photography, unless you feel like buying a 200 foot USB cable. And current techniques for stand-alone Arduino photography typically try to capture raw image data from CMOS cameras popped off of cell phones...and believe me, unless you need to digitally upload or alter those photos in real time, you don't want to go down that road. Why isn't there a normal, cheap, run of the mill digital camera that's controllable by Arduino? Turns out there is at least one - and they sell it at your local drug store (CVS/Rite-Aid/Walgreens/etc.) It's those chintzy little keychain cameras that they sell for $10-15 a pop. This Instructable will walk you through the process of disassembling, modifying and reassembling an off-the-shelf keychain camera. Before we start, a few notes: *The camera being hacked may change from blue to silver and back in the photos.
Automatic Camera Shutter Switch. If you are fortunate enough to have a camera that has a built-in shutter switch terminal, then it is really easy to connect an external circuit to your camera and activate it remotely.
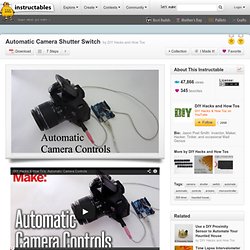
All you need is a connector that matches the terminal on your camera. Different camera models use different connectors. So here is a link to a good page that shows the various connector types: For example, a Canon EOS Rebel T3i uses a 2.5mm stereo plug (3/32" can also work). As shown in the picture, the sleeve is connected to ground. DIY Follow Focus on 7D using Servo and Arduino.