
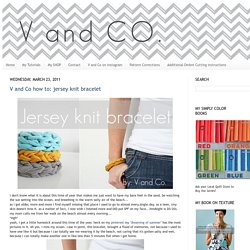
DIY Macrame Bracelet. Growing up by the beach in Southern California, the ability to knot a macrame bracelet was practically a right of passage.

Although those days are long behind us, we’ve never forgotten the ever-so-simple square knot technique. This time, however, we’re replacing hemp and wooden beads for more updated elements like colorful nylon cord and glossy metal charms. V and Co how to: jersey knit bracelet.
I don't know what it is about this time of year that makes me just want to have my bare feet in the sand, be watching the sun setting into the ocean, and breathing in the warm salty air of the beach...as i get older, more and more i find myself missing that place i used to go to almost every.single.day. as a teen.
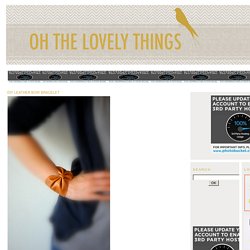
(my skin doesn't miss it. as a matter of fact, i now wish i listened more and DID put SPF on my face...hindsight is 20/20). my mom calls me from her walk on the beach almost every morning... *sigh*yeah, i get a little homesick around this time of the year. heck on my pinterest my "dreaming of summer" has the most pictures in it. ah yes. i miss my ocean. case in point. this bracelet, brought a flood of memories, not because i used to have one like it but because i can totally see me wearing it by the beach, not caring that it's gotten salty and wet, because i can totally make another one in like less than 5 minutes flat when i get home. *sigh* okay... A chevron leather cuff is my fave (guest post from clemence) I had a baby so I’ve invited some fave guests to take over for me while I spend time with the little guy.
Today’s post is from a DIY queen (and birthday girl yesterday!) , Clemence of Oh The Lovely Things. I love the look of geometric jewelry these days + I have a ton of scrap leather + I always have fun making my own bracelets, so I decided to treat myself with a chevron leather cuff. I’m so excited to share the easy how-to with you! You will need : - A piece of soft leather, about 1mm thick. 1.
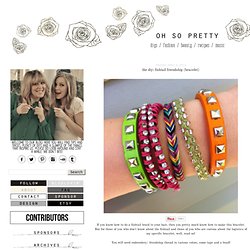
5 Ways to Turn Zippers into Awesome Arm Candy. UPDATE: By popular demand, Zipper Bracelet Kits ($15) and readymade Zipper Bracelets ($20) are now available in the Brit + Co. shop!

You know we love turning unconventional materials into wearable accessories. Today, we’re tackling zippers! We figured out 5 simple, beautiful ways to create bracelets, cuffs, and bangles out of metal, plastic, and repurposed zippers. Materials: - zippers - E-6000 quick hold contact adhesive - velcro or snap buttons - leather crimps + clasps - Tools: needle nose pliers, sharp scissors. Happy Hour: DIY Neon Rope Cuff. Friday, Friday we gotta get down on Friday!
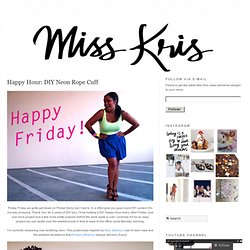
Sorry, but I had to. In a effort give you guys more DIY content (It’s my way of saying ‘Thank You’ for 2 years of DIY fun), I’ll be hosting a DIY Happy Hour every other Friday. Just one more project and a few more pretty pictures before the work week is over. I promise it’ll be an easy project you can tackle over the weekend just in time to wear to the office come Monday morning. I’m currently obsessing over anything neon. Materials: Neon Rope, Cuffs, Glue DIY TIP: For those cuffs with fancy designs simply add a piece of neon duct tape to the back. D.I.Y. #3: Liven up Your Plain Accessories! Today we’re going to add some life to some simple wooden bracelets!
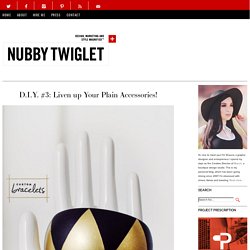
If you have some too-plain accessories lying around, this is a perfect and easy way to add a bit of pizzazz! I had these Kollabora bracelets on hand and decided that sharp lines were the way to go — I also wanted a mix of finishes so the base is matte black while the metallic gold has some shimmer. Supplies needed: 1. Bracelets of your choice (we used wooden ones, ℅ Kollabora)2. DIY Leather Bow Bracelet. You will need : - A piece of leather, approx. 22cm x 10cm (approx. 8.7" x 4") - Scissors - Leather glue or super glue - Thread - A snap button 1.
Cut an oval piece of leather, approx. 22cm x 10cm (approx. 8.7" x 4"). You can make it longer or smaller, depending on the size of your wrist. DIY Hardware Store Bracelets. Beaded Bracelet. I’m super excited to share this project with you, as it has been over two weeks in the making.
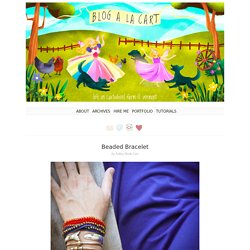
I fussed around with many a mini-crochet needle and embroidery thread, and my house is now littered with bitty seed beads, to arrive at what I think is my favorite and most unique tutorial yet! Woo hoo! Materials: Embroidery thread (I used 6 stranded thread) Crochet hook size 1 (2.75mm) Seed beads Jewelry clasps Needle Scissors Directions: Note: This pattern is for a bracelet that measures 6.5″ at completion. I needed just under 16′ of embroidery thread for that length. Step 3. The DIY: FISHTAIL FRIENDSHIP (BRACELET) If you know how to do a fishtail braid to your hair, then you pretty much know how to make this bracelet.
But for those of you who don't know about the fishtail and those of you who are curious about the logistics of my specific bracelet, well, read on! DIY Wired Love Bracelet. DIY Sequin Bracelet. After purchasing an abundant (and unnecessary) amount of sequins for last week’s tutorial, I mulled over ways to repurpose them into another project.
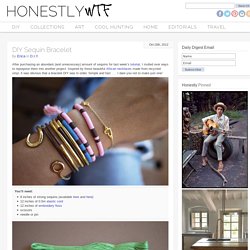
Inspired by those beautiful African necklaces made from recycled vinyl, it was obvious that a bracelet DIY was in order. Simple and fast . . . I dare you not to make just one! You’ll need:8 inches of strung sequins (available here and here)12 inches of 0.5m elastic cord12 inches of embroidery flossscissorsneedle or pin Cut 12 inches of elastic cord and tie a double knot at the end. There’s a quick and easy shortcut for adding sequins rather than threading them on one at a time.
Continue stringing on sequins, in any pattern, using the same method. Wrap the strung sequins around the wrist to check for size – remember to account for the bracelet stretching. Cut the embroidery floss into a few 2 inch pieces. Trim the ends. Nautical Knot Bracelets. Bring a little seafaring flair to your style with these bright, bold bracelets.
Inspired by Simone’s sailor’s knot bracelet tutorial, I decided to re-imagine this nautical classic. The project itself is very approachable, so even if you’re not an experienced knotter, you’ll be able to cruise through these steps. You will need:Cotton, paracord or maritime cord Measuring tapeLightly colored masking tape E-600 glue or hot glue gunLarge spring claspEmbroidery floss Large needle Pen (not pictured) Optional: Paint brush and acrylic paintRhinestone chainIron-on studsLarge jump rings (not pictured) Step 1: Measure and Cut First, make a measuring cord. Next, set your clasp next to the piece of cut cord, and trim away the total length of the clasp. Step 2: Create Your Knot Next, cut 2 pieces of cord measuring at least 22 inches long. Ric Rac Rose. I love these easy-to-make Ric Rac Roses!
Isn’t it beautiful? You can make these and use them in hair, on jewelry, on clothing, as embellishments on anything! And with The Ribbon Retreat’s large selection of Ric Rac, your possibilities are endless! They are also sold at an awesome price for $.65 a yard! – Supplies – Ric Rac (I used 3/4″) Hot Glue Accessory to attach it to The first thing to know about this Ric Rac Rose is that the wider the Ric Rac, the taller the rose. I started out by cutting two pieces of Ric Rac at 21 inches. Button Statment Rings « It’s September and that means it’s time to add another statement piece to your collection…. obviously! I heart almost every piece Nicole Richie designs for House Of Harlow 1960, especially her oversized rings. As amazing as these rings are they’re also an easy DIY. My friend Jenni, from I Spy DIY, did a project a few months back where she transformed buttons into earrings. #SuperFab This got me thing…let’s transform buttons into statement rings!
Buttons, buttons everywhere!! Materials: Buttons, Clippers, Glue, Rings With Flat Tops (available at the jewelry supply store) Use your clippers to remove the shank from the back of the button. Once you’ve made the back of the button flat, use an ample amount of glue to secure the ring to the back of the button. Here’s another hint: If you can’t find a flat ring base, Ring Pops are a fun alternative. Once the base has dried, glue on the button. DIY: Easy Bow Napkin Rings.