background preloader

Diy

Facebook Twitter

Faux Bob Hair Tutorial. This tutorial will show you how to achieve a completely new look. 
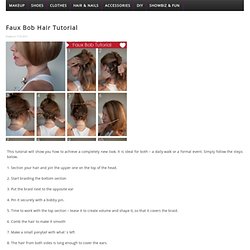
It is ideal for both – a daily walk or a formal event. Simply follow the steps below. 1. Section your hair and pin the upper one on the top of the head. 2. Start braiding the bottom section 3. 4. 5. 6. 7. 8. 9.Fit the ponytail underneath as shown on the picture . 10. The Easiest Pretty Pompadour Tutorial You’ll Ever See. This tutorial will be useful for every girl, keen on Pompadour style. 
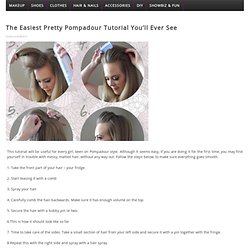
Although it seems easy, if you are doing it for the first time, you may find yourself in trouble with messy, matted hair, without any way out. Follow the steps below, to make sure everything goes smooth. 1. Take the front part of your hair – your fridge 2. 3. 4. 5. 6.This is how it should look like so far 7. 8.Repeat this with the right side and spray with a hair spray. 9.

Wooden Gems. Try This: Wooden Gems Today's tutorial will set you back a couple of bucks and ten minutes, and in the end, you'll have a handful of little gemstones ready for whatever projects your imagination can scheme up. 
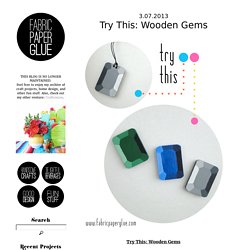
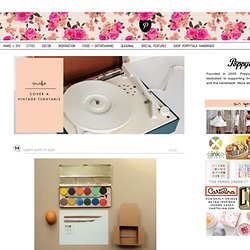
Read on for the easy step-by-step and few ideas for how to put these little beauties to use. MATERIALS: wooden rectangles, pencil, fine tip paint brush, craft paints in colors of your choosing, black, and white ONE: Begin by sketching the facet lines as shown. They don't have to be perfect. TWO: Mix up six shades of the color of your choosing using black and white paint.

THREE: Use the fine tip brush to carefully paint inside your sketched facet lines. Try out some other colors and use them in all sorts of ways...jewelry, keychains, napkin rings. 27 Ways 2 Make Money 4 Teens. A New Way To Tie A Scarf - Mrs. Polly Rogers.

How To Mix Chalkboard Paint in Any Color. We love using chalkboards as backdrops for displays and parties (like this one here!). So we were super excited to learn that you can create your own custom colors-and it's really easy! We first learned how from Martha Stewart whose tutorial you can read here. She recommends that you use latex paint, but we tried it out with acrylic paints with much success.

Here's how you too can create your own chalkboard paint... Supplies: 1/2 cup acrylic paint (choose any color you like, or mix colors together to make the perfect shade!) 1. 2. Once your chalkboard has fully dried be sure to slate the surface before using it for the first time. Have fun creating any color combination you like!! Get inspired. Get motivated. Practice. Improve your drawing skills! Most favorited all-time. Always Chrysti - Always Chrysti - 100+ Ways to Creatively Reuse Old Magazines. Paper Flowers – Anyone Can Do That | FindInspirations.com. Japanese Kusudama, this tutorial is featured on Craftuts Anyone can do that, I assure you. The proof: I can, just take a quick look at my result below. And, believe me, I am neither meticulous nor particularly patient.

You could even say I’m the opposite. Below you can see my very first attempt to create paper flowers. What you will need to make your own Kusudama paper ball? 1. 3. 4. (optionally) I prefer torn paper instead of cut. You have to start with a single petal. Now you have to glue your 5 petals into a flower. Apply the glue to only one side of each petal, except for the last one, in this case cover both sides with glue. Your first flower is done. Don’t glue every petal right after you make it. When all 12 flowers are finished you have to glue them together. When two halves of Kusudama Flower Ball are ready you have to glue them together. Happy Hippity Hop! We're taking a long weekend off here for the Easter break (we're working on a new website with hopes of getting a bit more done with the extra day tucked in there). So we're bidding you farewell early with a few links and this cute little picture tutorial (see more below) sent to our e-mail from the folks at Present&Correct.

Happy wishes for your Easter and Passover break. We're heading over here later to learn how to make some marshmallow peeps! Care to join us? High/low Easter party. West coast applications close Friday at Renegade. Loving this free (April calendar) desktop wallpaper from the Free People blog. And I saw lots of rabbits hopping around here. Have a fantastic weekend! Melted Crayon Art | Unsimple Living. Perhaps I should begin this post by introducing you to my mom, also known as Her Ladyship Craftiness…er, Her Royal Craftiness? I’m still working on the title. Regardless, she’s the coolest, most creative and talented woman I know. She can make pretty much anything. At least once during high school, I borrowed a friend’s purse, brought it home to Mom, and she whipped one up just like it for me.

Yes, I probably abused the power of being Her Ladyship’s daughter, and I no longer steal my friends’ purses, but the point is: my mom is awesome. If you follow Young House Love, Bower Power, Making a House a Home, or Style by Emily Henderson you know how timely her visit was, as today is the big reveal for the Pinterest Challenge. The supplies were pretty simple: canvas, crayons, and hot glue. The next step was to peel off the paper labels from all 60 crayons. It worked like a charm. What do you think of our masterpiece? Total money spent: $9.60 Total time spent: about 1½ hours Like this:

Most favorited all-time. From panka with love: Glowing jar project - varázslat a lakásban (EN/HU) Audible gasp... Tattoo Sketches by Tati Ferrigno. Sketch Amazing Tattoo Sketches by Tati Ferrigno. 
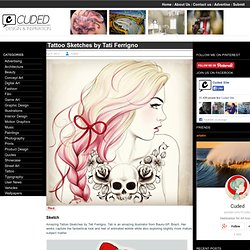
Tati is an amazing illustrator from Bauru-SP, Brazil. Her works capture the fantastical look and feel of animated worlds while also exploring slightly more mature subject matter. Merry christmas sketch Pink dye sketch Save the Queen Rouge in love Chandelier Cats just want to have fun Sketch b 7 lives new sketch View the website. - StumbleUpon.

Lotion Bits - All Natural - Melts in the Palm of your Hands. Lotion Bits - kids love them! Keep them in a small jar in the bathroom and after a shower just grab one, put it in the palm of your hands and rub your hands together! The solid shape will "melt" in your hands and you can put it all over! My nieces love it because it's not just lotion, but it's safe and non-toxic and they like to use it on their lips as well!

If you only need a little, you can grab a thinner piece - for the whole body grab a big one! Items Needed: Take a small pot and fill it about halfway with water (you may need to empty some of it out). That's it - you're done! *Optional: I also dyed some of mine with beet juice. Stumblers Who Like Art 1. Optical Design. DIY Macrame Bracelet. Growing up by the beach in Southern California, the ability to knot a macrame bracelet was practically a right of passage. Although those days are long behind us, we’ve never forgotten the ever-so-simple square knot technique. This time, however, we’re replacing hemp and wooden beads for more updated elements like colorful nylon cord and glossy metal charms.

Happy knotting! You’ll need: Start by cutting the knotting cord into two 30 inch, two 20 inch and one 10 inch lengths. Center the 30 inch cord under the two middle strands. Pull tightly and slide the knot up to the top. Finish the 2nd half of the square knot by folding the left cord over the middle strands and under the right cord. Pull tightly and repeat the steps – left, right, left, right . . . To finish the knots, thread one of the cords onto a needle and sew up the center of 3-4 knots along the backside.

Repeat the same step on the other cord. After sewing up both knotting cords, trim away any excess. DIY Braided Bead Bracelet - Honestly WTF. It’s been awhile since our last bracelet DIY. I don’t know about you, but our wrists have been begging for another colorful addition for months now. So after playing with some materials that were already on hand, we’ve created a tutorial for a braided bead bracelet, which is a not so distant cousin of the hex nut and wrap bracelet. Because honestly, you can never have too many . . . You’ll need: Cut the waxed linen cord into a 26″ and 19″ piece. Fold the longer strand in half. Tie a knot about half an inch down from the loops.

Start braiding the strands. Push the bead against the base of the braid, and cross the left strand over the middle. Keep a finger at the base of the braid, holding the beads in their place and keeping the braid tight. Finish the bracelet with another inch of braided cord, measuring it against the wrist. Thread on a two hole button – two strands through one hole and one strand through another.

Trim the end. Your bracelet is finished! (all images by HonestlyWTF) DIY Marbled Glassware. When graphic designer and artist Joanna Bean Martin shared with us her technique for marbling the bottoms of glassware with nail polish, we couldn’t wait to try it ourselves. 
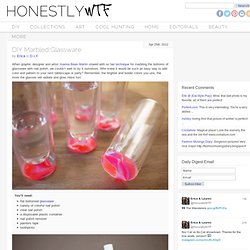
Who knew it would be such an easy way to add color and pattern to your next tablescape or party?

Remember, the brighter and bolder colors you use, the more the glasses will radiate and glow. Have fun! You’ll need:flat bottomed glasswarevariety of colorful nail polishclear nail polisha disposable plastic containernail polish removerpainters tapetoothpicks Mask off the bottom of the glass with painters tape. Fill a disposable, plastic container with water. Open all the nail polish bottles and start dripping polish into the water, one color at a time. Layer the colors one on top of the other. Submerge the bottom of the glass into the polish.

Allow to dry completely before applying a layer of clear polish. Once everything has dried, remove the painters tape and touch up with nail polish remover and a cotton swab. Pipecleaner Craft Ideas. If you're new here, you may want to join us on Facebook or Google +. Thanks for visiting! Well.. this is EXCITING! Not only is this a post about Pipecleaner Craft Ideas… this is a post about Google+! Some of you may know, that I do love social media.. and that I spend a good amount of time crafting and writing about crafts, but also a similar amount of time on social media – i.e. places like facebook, twitter, pinterest and now GOOGLE+!! Whoop whoop. Google set out to provide the best social media platform EVER – taking the best elements from other areas and adding some fantastic new bits and pieces. Bring on Google+ and one of their features – Google Hangouts! Hangouts are a bit like skype – but that you can “hang out” with up to 10 people.

So. The first one is all about Pipecleaners – cute and fun Pipecleaner craft ideas for all age groups! So we have the video – and below, there are links to the differnent bloggers websites, so you can get some more information! In order of appearance: JADERBOMB |JADERBOMB | Official site of award-winnning artist and novelist, Kathy Cano-Murillo. Martha Stewart Crafts™ How to cut glass. I posted a picture about 1 week ago on Instagram, Facebook and Twitter of me cutting glass using just string. I got LOT’S of requests for a tutorial on how I DID THIS! So here it is. FINALLY! You will be able to learn how to cut glass. I want to warn you.

It’s best to triple your yarn because it will burn longer! Soak it GOOD! I like to tie my yarn where I want my glass to “cut” then quickly pour polish remover over the string again. Get a big bowl with ice and water ready. VERY IMPORTANT! Slowly turn your bottle. You can’t let the flame go OUT then dunk it in the ice water. YAY!!! I reallly hope you enjoyed this tutorial because I had ALOT of requests for it! © Copyright jaderbombllc, All rights Reserved.