
How to build a cold frame. Every summer I look forward to fall when I can harvest the potatoes of my labour.
And beets. And squash and tomatoes and carrots. I also look forward to cleaning the garden up and putting it to bed. Let’s face it. We all have good intentions in the spring. And then 2 weeks pass and we’re sick of watering, can’t be bothered to dead head, lose our sun bonnet and buy our second set of hanging baskets because the first ones withered and died already. With fall and winter come long days and nights indoors that aren’t spent scrubbing dirt out of our fingerprints. In keeping with my year of tragedy I’m going to keep the pain going. Velvet Jewelry Box: Look DIY. Nesting: Ladder Display Makeover. Recycled leather & wood shelf. A hanging leather shelving project has been on my to-do list for a while; to be honest, the biggest delay was just finding the right belts.

Has anyone else discovered that thrift-shop leather belts are often unreasonably overpriced? Regardless, a little patience yielded some great finds: one super long thick black belt and a couple dark brown well-worn beauties, all for less than $10, which makes the cost of this shelf less than $15. What I love most about this project is that it is extremely unfussy: a mix of belts looks great; the more worn the wood, the better; and the whole structure is very easy to size up or down, customize (painted shelves, new or colored leather, etc.) and adjust as needed. The only difficulty is that it starts to get a bit heavy if you use thick wood as I did, so I recommend getting a helping hand for the installation, especially if you size the project up to a larger shelving unit. Happy crafting! (P.S. Read the full how-to after the jump . . . Materials 1. 2. 2-Minute Bathroom Organization. I try to keep all my organization not only functional, but attractive as well.
"hidden storage" books. We have a lot of books - many of which we haven't read.
We collected a lot of pretty hard cover books for the wedding (we used them with our center pieces) and they have been sitting on our open shelving for the past 10 months. Wire and nail hanging spice storage. Birdcage desk organizer - How to convert an old birdcage into a desk organizer. Hi Everyone!
We are SO SO happy to be back from our little break! We’ll be posting soon about our first show and display booth from President’s Day Weekend. Until then, here is an item that we had in our inventory at the Bay Village Antiques & Vintage Show. It is a fairly simple DIY / Up-cycling project. AND such a great idea… Simple Scarf Storage - DIY Ideas 4 Home. DIY: Scarf Hanger. DIY Leather Handle Box. Have you seen the $3 natural wood boxes in Target’s dollar section?
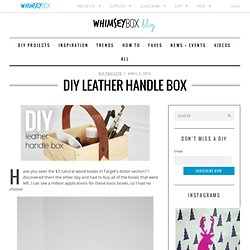
I discovered them the other day and had to buy all of the boxes that were left. I can see a million applications for these basic boxes, so I had no choice! One of them is now a little utility box that I can put random things in. I have my dedicated art space, but sometimes I need to do work in the kitchen or the living room, so I see myself using this box often. Besides the box and upholstery tacks, I’ll bet you already have all of the supplies on-hand for this project. 1 natural finish box (Target, Michael’s, Hobby Lobby)masking tapebrushpaintscissorsleather belt or thick scrap (3-5 oz.)upholstery tackshammer Get creative! If you want to go for a dipped approach, You’ll want to tape off the paint area. Apply paint in perpendicular strokes, starting from the middle of the tape line, outward. Remove the tape just before it’s completely dry. Cut your leather scrap or belt down to size.
Voila, you’re done.
DIY // Custom Cork Board - Ikea Hack. DIY Decorative Cork Board!! ONE TINY MOUNTAIN AT A TIME. Some people collect stamps.
I collect greeting cards. I hate making a trip to the store just because I have to pick up a last minute birthday card or a card to go a long with a gift, so I started collecting them. If I see an abnormally cute or clever card, I just go ahead and buy it, even if I have no idea who I’ll give it to. Needless to say, my card collection has grown by leaps and bounds over the past few years. I’ve been keeping my stash in one of the cabinets in my office, but the boxed Thank You card collection is slowly overtaking the occasion cards. I picked up this Nate Berkus file box from Target. Before I got started organizing the cards, the first thing I did was attach a bookplate label to the front of the box. Craft Organizing: Cigar Boxes. I love having my own little studio, but it’s quite chaotic most of the time because of all of the stuff I tend to hoard.
Vintage hardware, old cigar labels, broken jewelry parts, and all kinds of pieces and parts I pick up at flea markets and thrift stores that I know I can find a use for one day in a craft project. But storing supplies in plastic bins out in the open isn’t too attractive, aesthetically speaking. I have plenty of plastic storage, but those are tucked away in my cupboards. 47. If you’re anything like me, you’ve got a ton of coffee cups. some older and not so good looking ones i can’t part with for sentimental reasons and some really cute ones that deserve to be on display in the kitchen. jessica created a DIY that not only showcases those daily mugs of yours, but also doubles as cool wall art in your space. check it this 3-D wooden cloud… what you’ll need: • Dowels in various sizes (1/2”- 1 1/8”) • White spray paint • Gold paint (we used Martha Stewart Crafts acrylic craft paint) • Sponge brush • Elmer’s Glue-All (or wood glue) • Three 1 ¼” white cup hooks • 2 small screw eyes • Safety glasses • Drill • Compound miter saw • Wearing safety glasses, cut dowels in varying heights between ¾” to 2”.
We used 125 pieces. • Spray paint dowels white and then use sponge brush to dab gold paint onto one end. • Glue about 75% of the dowels together in clusters, keeping unpainted ends flush with one another. . • Drill small holes into two of the clusters and attach screw eyes.