
Everything-in-jar-handmade-gifts. With just a little over 10 weeks until Christmas, it is already time to start thinking about gifts! The more gifts that can be taken care of ahead of time, the easier the holiday season will be. I came up with a really fun idea that can be customized to pretty much any person or occasion called: {Everything} In A Jar Today, I am going to show you the ones I made for teachers! Teachers spend so much time at school so I tried to think of items that could be used at school. {energy} in a jar Peanuts White Chocolate Hot Drink Mix Suisse Mocha Latte Mix White Chocolate Macadamia Nut Energy Bar Milk Chocolate Truffles. Homesthetics. Picking up a gift is no easy task.

We all know it. Whether it`s for a close friend or your grandparents the gift should be thoughtful, filled with substance and possibly memory. It is only natural to invest our time in these rare moments that can bring smiles and happiness into the lives of our loved ones. We invite you to browse through the DIY gift ideas showcased below and feed your imagination with a few gift crafts that we have found interesting. Www.buzzfeed. Ohhappyday. Mar 9 by Alix Sorrell St.

Gifts-for-beer-lovers. 20 Handmade Gifts in 30 minutes or less - It Happens in a Blink - StumbleUpon. Are you planning your holiday gifts yet?
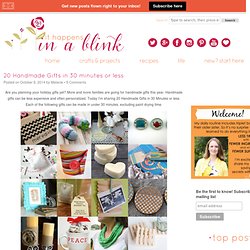
More and more families are going for handmade gifts this year. Handmade gifts can be less expensive and often personalized. Today I’m sharing 20 Handmade Gifts in 30 Minutes or less. Www.theboredninja. CD Art. Packing Tape Image Transfers. I love image transfers.
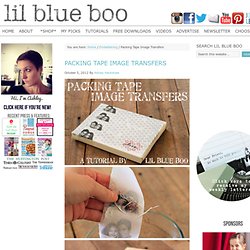
It’s something I’m always using in my journals but there are so many other fun uses for them. All you need to make a transfer is a photocopy of an image or words and packing tape. You can also use printouts from a laser printer or magazine pages. Inkjets will not work because they are not heat based toner. So take some photos to the copy machine or tear some pages out of your favorite magazine to get started. First, take a strip of packing tape and place it over the images you want to transfer: Then use the back of your scissors or the side of your fingernail to make sure the tape is adhered firmly: Next, dip the tape and paper into a bowl of water to wet the back: Using your fingers, start to rub off the paper from the back of the tape: Like magic….your image is left behind on the tape!
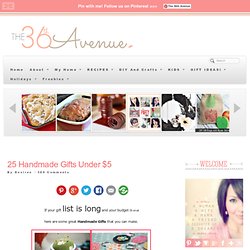
DIY Candle Printing - This Girl's Life Blog - StumbleUpon. 25 Handmade Gifts Under $5. If your gift list is long and your budget is small here are some great Handmade Gifts that you can make.
Keep in mind that handmade items are not just beautiful but special… How-To: Grow Your Own Crystal Necklace. 39 DIY Gifts You'd Actually Want To Receive. Chunk Candles : Candle & Soap Making Techniques. Step by step instructions on making chunk candles.
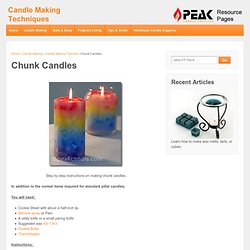
In addition to the normal items required for standard pillar candles, You will need: Instructions: Step 1: Melt Wax and add dye or fragrance oil as desired. Using a double boiler and a thermometer, melt your wax and bring it to a temperature of about 190 degrees F. You can scent and dye the chunks, the overpour wax, or both. For this project, I selected IGI 1343 to make the chunks as well as the overpour. Color Suggestion: Work with colors that are complimentary, generally those that occur together in nature. Step 2: Grease a cookie sheet To prevent the chunks from sticking to the cookie sheet, apply a thin film of non-stick cooking spray such as Pam, or a silicone spray lubricant. A seasoned cookie sheet will not require anything to aid the release. Step 3: Pour wax into the cookie sheet. With your wax at about 190 degrees F, pour it into the cookie sheet. Step 4: Slice wax into chunks. Step 5: Remove the chunks from the cookie sheet. Leaf-Imprinted Clay Necklace.
DIY Chan Luu Bracelet. My goal this holiday season was to really try my best to make some homemade gifts.

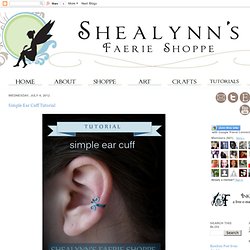
Shealynn's Faerie Shoppe: Simple Ear Cuff Tutorial. What you've all be waiting for... an ear cuff tutorial!
101 Simple Handmade Gift Tutorials. These simple handmade gift tutorials will make any crafty person’s heart sing with joy!

You don’t need special skills or a bunch of time because these can all be done super fast! Simple and cute…that works for me! Oh, and think of all the money you will save making these gifts. {At least that’s the story I tell my husband…shhhh!} How to Make Chain Maille & Pearl Bracelet. 20 Inspiring Posters with Design Quotes. Design exits for as long as humans are on this planet.

It is a very creative process and requires exceptional skills, talent and lots of hard work. Today I’ve collected some of the most inspiring design quotes on creating, inventing, polishing and achieving success in design scene. In this collection you will find 20 inspiring posters with intelligent design quotes. Hopefully these will inspire you to work harder to achieve your goals and become an outstanding designer. DIY Wrap Bracelet. Most favorited all-time - page 3. DIY Macrame Bracelet. Growing up by the beach in Southern California, the ability to knot a macrame bracelet was practically a right of passage. Although those days are long behind us, we’ve never forgotten the ever-so-simple square knot technique.
This time, however, we’re replacing hemp and wooden beads for more updated elements like colorful nylon cord and glossy metal charms. Happy knotting! You’ll need: Start by cutting the knotting cord into two 30 inch, two 20 inch and one 10 inch lengths. Center the 30 inch cord under the two middle strands. Pull tightly and slide the knot up to the top. Finish the 2nd half of the square knot by folding the left cord over the middle strands and under the right cord. Pull tightly and repeat the steps – left, right, left, right . . . To finish the knots, thread one of the cords onto a needle and sew up the center of 3-4 knots along the backside.
Repeat the same step on the other cord. After sewing up both knotting cords, trim away any excess.