
5-Minute Cute Bow Clips. Sometimes, all we just need is something easy and fun to craft, right?

With a few easy steps, I'll show you how to make these cute bows to adorn your hair, or actually, anything that you want to embellish with bows - I'm thinking about making a pair for my v-flats in a pinkish color, if I can find pink leather, that is. Anyway, let's jump to the tutorial, shall we? What do you need for this project? Just these: Leather / Pleather / Felt Scissors Glue gun Square notepad paper Pencil Clip / Barrette / Hairpin / Shoe clip - or whatever you want to attach these bows to.
Fold your square piece of notepaper in half, and then half again. Cut that while the notepaper is still folder in fourths, and you'll come up with something like this when you unfold it. Trace it on your piece of leather or felt, then cut that out. Glue just the ends down toward the center of the 'butterfly' shape. Do the same to the other side. Vintage Clip Art - Beautiful French Typography. Tales from Mount Pleasant: #HandmadeChristmas - Vivi Gade Paper Baubles. So, how many of you have tried the Paper Stars yet?

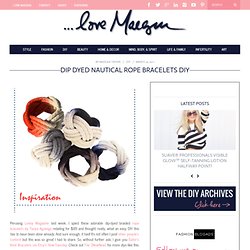
Want to have a go at some lovely paper baubles to match? Of course you do!! Vivi Gade Paper Baubles Amongst the little bundle of goodies Creativity Direct sent me was a pack of pre-cut strips to make these fabulous decorations. ...love Maegan : Dip Dyed Nautical Rope Bracelets DIY Fashion + DIY + Home + Lifestyle. Perusing Lonny Magazine last week, I spied these adorable dip-dyed braided rope bracelets by Tanya Aguiniga retailing for $85 and thought, really, what an easy DIY this has to have been done already.

And sure enough, it has!! It’s not often I post other people’s content but this was so great I had to share. So, without further ado, I give you Sailor’s Knot Bracelets via Etsy’s How-Tuesday. Check out The {NewNew} for more diys like this. * 3.5 yards of rope. * 14 ounce can for a smaller bracelet or a 20 ounce can for a larger bracelet. . * Wrap one end of the rope around the can to shape an X. *Wrap the long end of the rope around the can again and bring it up to the middle of the X. . * Next, move the upper left leg of the X over the right leg of the X to create an oval shape. * Pull the long end of the rope through the oval shaped opening you just set up. * Turn the can a bit and you will see that the oval shape has created another X shape.
Apple Dumpling Cinnamon Rolls - EVERYDAY EMMA. This is what I made Christmas morning.

What I love about these cinnamon rolls is they take about 30 minutes to make, including baking time. Yeah. I know. In the center of each roll is a bite of baked apple. It's like a little prize in the center. Apple Dumpling Cinnamon Rolls, makes around 15 small/medium-sized rolls. Crochet granny headband. DIY Leather Bow Cuff - ISLY. Back in January wen I went thrift shopping with a bunch of awesome ALT ladies, I picked up a really rad bow-inspired belt. I’m not sure why I never included a pic of the belt here because it’s awesome. You can sort of see it in this outfit, but the lighting isn’t great. Anyway, that’s what spurred this cuff. Plus the fact that Chris & I bought a cow & a half worth of leather the other day.
We bought a full hide of silky awesome black leather & a half hide of gorgeous grey patent leather. I’m very pleased with the end result of this little project. Now without any further ado, here’s the tutorial. DIY Tutorial: Nautical Rope Bracelet » Operation Overhaul. I’ve been so busy with school that I haven’t been diy-ing anything, but now that my project is completed, I’m back!

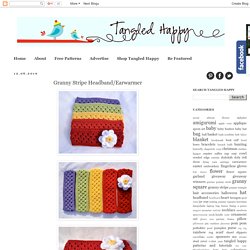
Here’s a pretty easy tutorial for everyone—a nautical rope bracelet to add to your arm candy. Materials needed: Rope – 4 strands, 30cm each (I got mine from Daiso!) 2 Leather Strips – Cut to 3.5cm eachSnap buttonsThreadNeedleScissors 1. 2. Granny Stripe Headband/Earwarmer. I had to stop in the middle of working my Granny Stripe Boutique Bag the other day and when I set it down realized it would make a perfect headband/earwarmer.

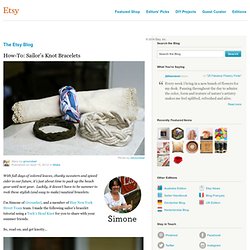
I used a smaller hook size so the shells would be closer together. I think it turned out perfectly! I love how these look all stacked together. This pattern is written for children 6-12. You can increase or decrease the size of this by adding or subtracting by 3's to the initial chain. This is my beautiful daughter Isabel modeling. MATERIALS LIST: Worsted Weight Yarn (I used Impeccable found at Michaels.) STITCH COMBINATIONS: Shell is "work 3 dc in same st or sp. " TIPS: Join all rounds. Starting out: Ch 67. Finish off. How-To: Sailor's Knot Bracelets. With fall days of colored leaves, chunky sweaters and spiced cider in our future, it’s just about time to pack up the beach gear until next year.

Luckily, it doesn’t have to be summer to rock these stylish (and easy to make) nautical bracelets. I’m Simone of Groundsel, and a member of Etsy New York Street Team team. Knotted Crochet Headband Tutorial. Well, I woke up excited this morning (it seems like an unusually high number of my posts here start with me waking up feeling good) because I'm a guest blogger today over at Craftaholics Anonymous!

I'm sharing a tutorial for a knotted headband and it is super cute, if I may say so myself, and very simple to do. My husband, when he saw it, asked me why I didn't do something more complicated and impressive, but my goal was for you to see it and be able to accomplish it, even if it's your first time crocheting--this project is just about as easy as it gets! So don't be scared . . . get your paws on a crochet hook, use some scrap yarn (you won't use much!)
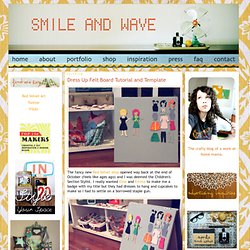
, and get to work! You can hop on over to Craftaholics Anonymous (click on the button above!) Knotted Crochet Headband (I sure hope you appreciate this picture because as we were taking it, someone was honking on the street as they drove by. Smile and Wave: Dress Up Felt Board Tutorial and Template. The fancy new Red Velvet shop opened way back at the end of October (feels like ages ago) and I was deemed the Children's Section Stylist.

I really wanted Elsie and Emma to make me a badge with my title but they had dresses to hang and cupcakes to make so I had to settle on a borrowed staple gun. I wanted part of the children's section to include something interactive that kids could play with while their mamas and their papas shopped. I remembered the felt boards my Sunday School teachers utilized to teach stories from the Bible and paired that concept with paper dolls for a kid-friendly, dress shop-themed activity.
Tutorial Tuesday: Peter Pan Collar.