
Transformer une alimentation ATX en alimentation de laboratoire. Cette technique permet de réaliser une alimentation de laboratoire à partir d’une vielle alimentation ATX d’ordinateur.
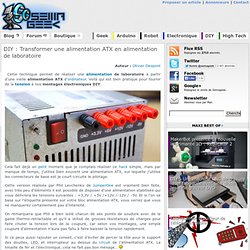
Voilà qui est bien pratique pour fournir de la tension à nos montages électroniques DIY. Cela fait déjà un petit moment que je comptais réaliser ce hack simple, mais par manque de temps, j’utilise bien souvent une alimentation ATX, sur laquelle j’utilise les connecteurs de base est je court-circuite le pilotage. Cette version réalisée par Phil Levchenko de JumperOne est vraiment bien faite, avec très peu d’éléments il est possible de disposer d’une alimentation stabilisée qui vous délivrera les tensions suivantes : +3,3V / +5V /+12V /-12V / -5V. Et si l’on se base sur l’étiquette présente sur votre bloc alimentation ATX, vous verrez que vous ne manquerez certainement pas d’intensité. Si ce peux aussi rajouter un conseil, c’est d’éviter de percer la tôle pour le support des douilles, LED, et interrupteur au dessus du circuit de l’alimentation ATX.
How to Convert a Computer ATX Power Supply to a Lab Power Supply. Edit Article Edited by Abizarl, Krystle C., Jack Herrick, Vertent and 42 others Computer power supplies cost around US$30, but lab power supplies can run you $100 or more!
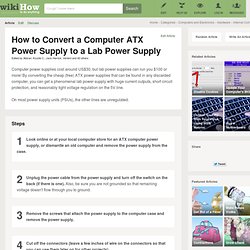
By converting the cheap (free) ATX power supplies that can be found in any discarded computer, you can get a phenomenal lab power supply with huge current outputs, short circuit protection, and reasonably tight voltage regulation on the 5V line. On most power supply units (PSUs), the other lines are unregulated. Ad Steps 1Look online or at your local computer store for an ATX computer power supply, or dismantle an old computer and remove the power supply from the case.Ad 2Unplug the power cable from the power supply and turn off the switch on the back (if there is one). 13 Plug the power cable into the back of the power supply and into an AC socket.
Bench PowerSupply - My Scratchpad. Ive increasingly found I need a better power supply while working on my Arduino projects.
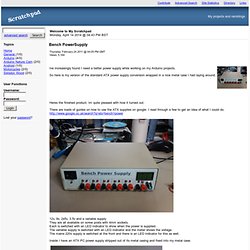
So here is my version of the standard ATX power supply conversion wrapped in a nice metal case I had laying around. Heres the finished product. Im quite pleased with how it turned out. There are loads of guides on how to use the ATX supplies on google. I read through a few to get an idea of what I could do. 12v, 9v, 2x5v, 3.5v and a variable supply. Inside I have an ATX PC power supply stripped out of its metal casing and fixed into my metal case. Ive taken the power socket and fixed it onto the back plate of the case.Im using a smaller 12v fan to fit beside the power socket. 12v, 5v and 3.5v are taken directly from the ATX power supply and connected to the switch and then to the red post.
The 9v supply is from an LM7809 regulator connected to the 12v supply and an LM317 is used for the variable supply, again connected to the 12v supply. Converting ATX Power Supply to Lab Bench Power Supply » Jumper One.