
Digital Velvia - Adobe Photoshop Action tutorial. Creating the Digital Velvia action in Adobe Photoshop Steps below will guide you in the creation of an action that gives your images that Velvia Look.

By using the below steps, it will greatly speed up the process of giving your images that added boost in color. Do not run this action on your original images. Make a copy of the original and then precede with the action. Creating the Digital Velvia Action 1. 2. 3.Click "create new action" Creating A Signature Brush. Submitted by mitch on Sat, 01/31/2009 - 01:51. Ever wanted to add your signature as an artist to the corner of a photograph? Well, it's easy to create a Brush Preset in Photoshop for your signature using whatever font you prefer. You can even embellish your signature with some line art, if you like. (This same technique will work for adding a copyright, a watermark, etc.) Step 1. I suggest something like 3000 x 2000 pixels. Step 2. Choose a font and then set the Font Size to something 250 points.
Step 3. Use the Rectangular Marquee tool to make a selection around the signature. Step 4. The menu item for this is Edit | Define Brush Preset. Be warned! Step 5. Add a new, empty layer. 65 Photoshop Actions for Photo Touch-Ups and Enhancements. Get the FlatPix UI Kit for only $7 - Learn More or Buy Now In the past we have written on Photoshop actions for touchups related to photography enhancements.

But it is common for designers to release their actions for free attribution on certain projects. And many of these newer releases are difficult to track down without scouring the Internet for links! Thus I have put together this collection of 55 fantastic new Adobe Photoshop actions for photo enthusiasts. Graphics editors will adore many of these which provide a solution for generating clean effects in many different photos. Idiot Actions Faded Sunlight Nothing but Memories Retro Touch Polaroid Generator Cookie Dough Effect Kream Action Vintage II Cool Vintage Nature Summer & Winter Old Series Vintage Actions AFW’s Bluezy Swagger Jagger Color Action Caramel Haze Vintage Pack of 50 Actions Simple Vintage Pink Action Variety Pack Neon Vintage PS Actions Pack AFW’s Vintage Color Colors Five Vintage Pack Spring Mini Actions Vintage Breeze Colored Highlights Runaway.
Speed Up Your Photoshop CS5 Workflow by Making Your Own Custom Panels. Speed up your workflow with the power of custom panels in Photoshop.
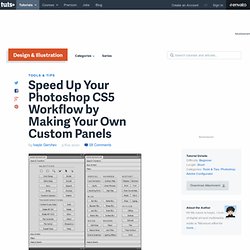
In today’s tutorial, we will turn multi-stepped commands and tasks into one-click solutions. No programming skills needed. Let’s get started! Step 1 First go to the Adobe Configurator download page and under the section Configurator 2.0 Installer click the link Download Configurator 2.0. Step 2 To start, click the big Create Panel button on the Welcome page or choose File > New Panel from the menu on the upper left corner. Step 3 In the Object palette on the left side click Containers to expand it and drag and drop Accordion container onto the panel.
Step 4 Go to Widgets and add Simple Text to the panel. Step 5 Click on Tools to expand it and add the following tools: Rectangular Marquee Tool, Elliptical Marquee Tool, Magic Wand Tool, Quick Selection Tool, Path Selection Tool and Direct Selection Tool. Step 6 Step 7 In this step we just repeat the same process.
Step 8 Step 9 Step 10 Step 11 Step 12 Step 13.