
Read wii nunchuck data into arduino. With a little hacking, data can be read from a wii nunchuck directly into an Arduino, using TWI (aka I2C).
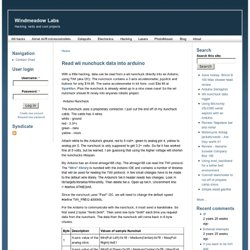
The nunchuck contains a 3 axis accelerometer, joystick and buttons for only $19.95. The same accelerometer in kit form, cost $34.95 at Sparkfun. Plus the nunchuck is already wired up in a nice clean case! So the wii nunchuck should fit nicely into anyones robotic project. The nunchuck uses a proprietary connector. Attach white to the Arduino's ground, red to 5 volt+, green to analog pin 4, yellow to analog pin 5. My Arduino has an Atmel atmega168 chip. Since the nunchuck uses "Fast" I2C, we will need to change the default speed: #define TWI_FREQ 400000L. For the Arduino to communicate with the nunchuck, it must send a handshake. See wiili.org Here is a simple program to read data from the nunchuck. Update: I updated the code some to slow down the serial data transmit and TWI requests.
Update I just tried running my code under Arduino 10. The Haunt at Hellizondo. Whew!

After weeks of hard work designing, building, and putting together the Confession House, we can finally say that it is DONE! Overall, it wouldn’t have taken that long to complete, but we’ve been bouncing back and forth between various projects, so it just seemed to take a long time. It’s been really fun to have it assembled in our backyard, and we’ve been playing around with the scares by yelling, “Confess! You’re a witch!” Which surely has been perplexing to our neighbors. The final piece to be completed for the house is to fabricate plexiglass windows that we can bang on from the outside for a scare. Here are some pictures of the construction and final product: Completed and assembled (roof was not on yet) Side view, scare windows Placement of Sign Happy to be finished! Here’s a close-up of the sign. Craig stained the outside of the house using a paint sprayer (we chose the stain color “Early American,” which seemed very appropriate).
Bionic Arduino – Introduction to Microcontrollers with Arduino. Bionic Arduino is a set of four 3-hour classes in November 2007 hosted by Machine Project and taught by Tod E.

Kurt. It is an introduction to microcontroller programming and interfacing with the real world using the Arduino physical computing platform. It focuses on building new physical senses and making motion with the building blocks of robotics, using Arduino as a platform. In the class, participants are shown and experiment with the Arduino’s capabilities and learn the basics of common microcontroller interfacing, such as: digital output to control lights and LEDs, digital input to read switches and buttons, analog output to control motor position or LED brightness, and analog input to read sensor inputs. The class assumes no previous electronics knowledge, though it does assume a little programming knowledge. Class description at Machine Project Class Notes Arduino Sketches Used in Class Processing Sketches Used in Class Parts Suppliers, New. Electronic circuits diagrams schematics hobby projects diy projects. Audio-servo.
Circuit Description From the output of your audio source, the center conductor goes to "Audio In", the outer shield goes to ground.
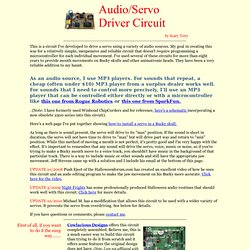
The signal is amplified by U1a whose gain is controlled by R3. You should be able to use audio sources from a line level to a "reasonable" speaker level source and adjust the gain using R3. U1b compares the audio from U1a to a reference voltage set by R6 and sends a switched output voltage through diode D1 to CMOS switch, U2. R6 should be adjusted so that with no signal, LED D2 just turns off. Once a signal is present, R6 can be used to fine tune the servo action. U2 is simply used as a switch. The circuitry surrounding U3 is the servo driver. This circuit, without a servo attached, only draws about 2 ma, but actively driving a servo, draws around 600 ma. My favorite place to purchase servos is ServoCity. I've had a report of one guy driving seven servos off the one circuit and it worked fine.
Just like to say nice design. Arduino.
Arduino. Arduino Shops.