
Open-source XMPP server comparison chart. Note: This page is an archived copy of the page formerly located at www.jabber.org; if you would like to become the maintainer of this page, please contact Peter Saint-Andre.
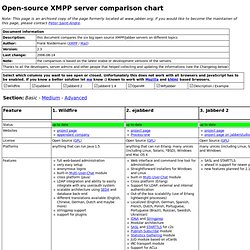
Section: Basic - Medium - Advanced Section: Basic - Medium - Advanced Section: Basic - Medium - Advanced Ideas: Sander Devrieze: intro page where people can select the servers they want to compare with each other (an alphabetic ordered ul-list with checkboxes e.g.); the generate page with all selected servers on itStephen Marquard: Basically I think the features should be compared consistently. The Best Search Links on the Net. Getting started. Frame, Text, Scrollbar, Scale < Widgets 2 < Perl/Tk Tutorial < Perl. Frame A frame is a simple widget. Its primary purpose is to act as a spacer or container for complex window layouts.
The only features of a frame are its background color and an optional 3-D border to make the frame appear raised or sunken. Frame can be created just like any other widget - my $frm = $mw -> Frame(); To place other widgets in this frame, you should use the frame widget variable as its parent. Normally the parent is '$mw' or the MainWindow. Some OptionsExample #! Getting Started. A First Application: "Hello, World" As is traditional, we are first going to write a Small "Hello, world" application. Here is the code: Toggle line numbers 1 2 import wx 3 4 app = wx.App(False) 5 frame = wx.Frame(None, wx.ID_ANY, "Hello World") 6 frame.Show(True) 7 app.MainLoop() Explanations: Note: You almost always want to use wx.ID_ANY or another standard ID (v2.8) provided by wxWidgets. Run the program and you should see a window like this one: Windows or Frames? When people talk about GUIs, they usually speak of windows, menus and icons.
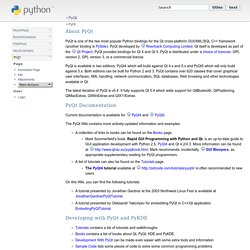
Building a simple text editor. PyQt. About PyQt PyQt is one of the two most popular Python bindings for the Qt cross-platform GUI/XML/SQL C++ framework (another binding is PySide).
PyQT Tutorial. Tutorial: Creating GUI Applications in Python with QTby Alex Fedosov Python is a great language with many awesome features, but its default GUI package (TkInter) is rather ugly.
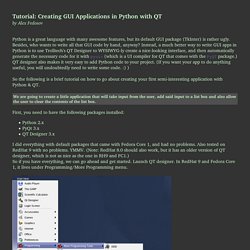
Besides, who wants to write all that GUI code by hand, anyway? Instead, a much better way to write GUI apps in Python is to use Trolltech's QT Designer to WYSIWYG-ly create a nice-looking interface, and then automatically generate the necessary code for it with pyuic (which is a UI compiler for QT that comes with the PyQT package.) QT designer also makes it very easy to add Python code to your project. (If you want your app to do anything useful, you will undoubtedly need to write some code. :) ) So the following is a brief tutorial on how to go about creating your first semi-interesting application with Python & QT.
First, you need to have the following packages installed: Learning to program. Constraints. HomeContents In this part of the SQLite tutorial, we will work with constraints.
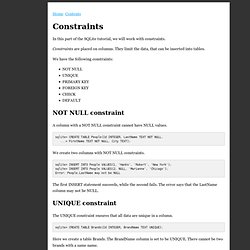
Constraints are placed on columns. They limit the data, that can be inserted into tables. We have the following constraints: NOT NULL constraint A column with a NOT NULL constraint cannot have NULL values. sqlite> CREATE TABLE People(Id INTEGER, LastName TEXT NOT NULL, ... > FirstName TEXT NOT NULL, City TEXT); We create two columns with NOT NULL constraints. sqlite> INSERT INTO People VALUES(1, 'Hanks', 'Robert', 'New York'); sqlite> INSERT INTO People VALUES(2, NULL, 'Marianne', 'Chicago'); Error: People.LastName may not be NULL The first INSERT statement succeeds, while the second fails. UNIQUE constraint. The Node Beginner Book » A comprehensive Node.js tutorial. Understanding JavaScript Closures. In JavaScript, a closure is a function to which the variables of the surrounding context are bound by reference.
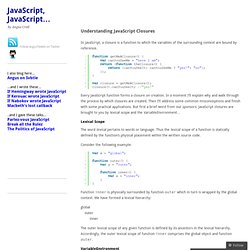
Every JavaScript function forms a closure on creation. In a moment I’ll explain why and walk through the process by which closures are created. Then I’ll address some common misconceptions and finish with some practical applications. But first a brief word from our sponsors: JavaScript closures are brought to you by lexical scope and the VariableEnvironment… Lexical Scope The word lexical pertains to words or language. Consider the following example: Function inner is physically surrounded by function outer which in turn is wrapped by the global context. Global outer inner The outer lexical scope of any given function is defined by its ancestors in the lexical hierarchy.
VariableEnvironment The global object has an associated execution context. We could represent the VariableEnvironment with pseudo-code… However, it turns out this is only part of the picture. The [[scope]] property. Regular Expressions Cheat Sheet by DaveChild. A quick reference guide for regular expressions (regex), including symbols, ranges, grouping, assertions and some sample patterns to get you started.
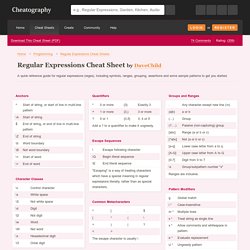
Development regex regular expressions programming Download the Regular Expressions Cheat Sheet 1 Page Your Download Will Begin Automatically in 5 Seconds.Close.