
Tutorial: Pimp your filing cabinet with fabric hanging folders. As part of Operation: Save Our Collective Lives it's an ongoing concern of mine to get this house and family into order.
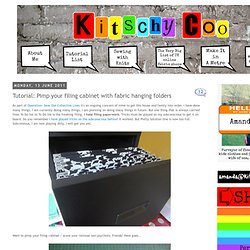
I have done many things, I am currently doing many things, I am planning on doing many things in future. But one thing that is always carried from To Do list to To Do list is the freaking filing. I hate filing paperwork. Tricks must be played on my subconscious to get it on board. Do you remember I have played tricks on the subconscious before? Want to pimp your filing cabinet / scare your rational non-psychotic friends? Start with a hanging file that already fits your filing cabinet.
Cut off the metal bits at the top. Trace around the paper file you cut off, adding 1cm to both the left and right sides and 3cm to the top. Cut your fabric on the fold. Edge finish all four edges. Press the 1cm allowances (of the long edges) to the wrong side with your iron. Sew them down close to the edge. Press the 3cm allowances (of the short edges) to the wrong side with your iron. Positively Splendid: Let's Make Something Together - Lined Canvas Bins (from Diaper Boxes!)
There are times when I finish a project and I am absolutely giddy to share it with you here.
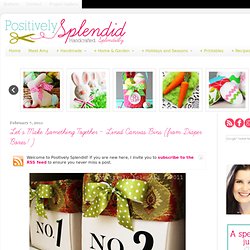
This was one of those! The idea for these bins came about as I was brainstorming projects for the Upcycling challenge at So You Think You’re Crafty a couple of weeks ago. I have been in dire need of some new containers for the built-in shelves in our living room to hold things like DVD’s and remotes, but I wasn’t wanting to spend a fortune on them. It occurred to me that a diaper box had precisely the dimensions I was looking for, so I determined myself to figure out a way to gussy them up to suit my needs!
In case you missed it, here is the blurb from SYTYC… Over the years, my household has acquired an abundance of two things in particular: 1) little items that need to be stored away in some semblance of order; and 2) diaper boxes. What began as three diaper boxes became in just a couple of hours a chic collection of lined, numbered canvas bins. Mail organizer tutorial. To kick off Spice up your Kitchen, I figured I should start things off with a tutorial to help you get organized.
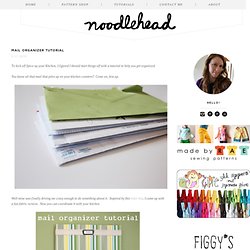
You know all that mail that piles up on your kitchen counters? Come on, fess up. Well mine was finally driving me crazy enough to do something about it. Inspired by this letter bin, I came up with a fun fabric version. Now you can coordinate it with your kitchen. Here's what you'll need: I used Elmer's spray glue and a piece of fabric cut about 4" bigger on all sides. Lay the fabric squarely on top and smooth and wrap around sides. Make the mail slots: For both mail slots: Use your pattern piece and cut out two pieces of exterior and two pieces of lining, putting the pattern piece on the fold as indicated on the template.
Sew the exterior and lining piece RIGHT sides together using a 1/2" seam allowance at the top of what will be the mail slot. Repeat for other mail slot pieces. Align the twill tape about an inch below the top of each mail slot. Denim Do-it-All Bins. By Betz White Repurposing with denim is a natural.
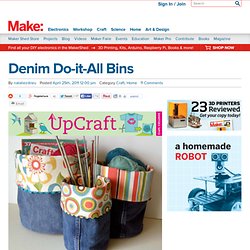
Who doesn’t have an extra pair of jeans lying around that are outgrown, out of fashion or worn out in some way? Put that denim to good use by making up a few Denim Do-it-All Bins. They’re great for organizing your yarn stash, magazines, or craft supplies. Materials (for large bin)One pair of jeans, any adult size or large kid size 1/2 yd lining fabric – lightweight cottons*, or mid-weight twill, canvas, etc. 1/2 yd interfacing, *needed for lighter-weight lining fabrics only1/2 yd quilt batting 1 yd rickrack, ball fringe or other trimming Heavy-duty sewing machine needle for denimFabric marking tool Ruler Fabric shears IronFinished Measurements: Feel free to change the dimensions to suit your needs!
Directions Step 1: Begin with a pair of legs from a pair of unwanted jeans. Step 2: Examine the seams. Step 3: Place a straight edge across the bottom of the flat leg piece, perpendicular to the seam running up the center. Related.