
DIY Braided Bead Bracelet. It’s been awhile since our last bracelet DIY.

I don’t know about you, but our wrists have been begging for another colorful addition for months now. So after playing with some materials that were already on hand, we’ve created a tutorial for a braided bead bracelet, which is a not so distant cousin of the hex nut and wrap bracelet. Because honestly, you can never have too many . . . You’ll need: Cut the waxed linen cord into a 26″ and 19″ piece. Tie a knot about half an inch down from the loops. DIY Spike Comb. We first fell in love with Jennifer Behr‘s dinosaur headbands after seeing them on the runway at Fendi.
Then, we crushed hard on this Maison Michel metal spiked hair comb spotted on Elena Perminova in Paris. Perhaps we can blame our attraction on our stegosaurus obsession (yes, this is true). Or it could simply be because these spiked hair accessories are so badass and bananas (also true). Either way, a DIY was definitely in order. You’ll need: Start by adding a small amount of liquid super glue to one end of the comb. Glue another spike to the other end of the comb.
Continue glueing each spike, alternating from one side to another. Stick the spiked comb in a bed of teased and tousled hair! (top image via Style.com; rest of images by HonestlyWTF) DIY Braided Hex Nut Bracelet. We’re nuts for nuts.

Is there a more versatile and inexpensive DIY component than a hex nut from the hardware store? You can imagine our excitement when we first discovered Philip Crangi’s Giles & Brother Hex Collection. Honestly, nuts braided into jewelry is WTF genius! With a few items that we always seem to have lying around, we tackled the technique and made our own spine-like braided hex nut wrap bracelet. You’ll need:3 strands of cotton butcher’s twine cut into one yard pieces18 small brass hex nutsa bit of dexterity!
Gather the 3 strands of twine and tie a knot at the top, leaving about 2 inches of slack. Keep your thumb at the base of the braid, holding the nut in its place. Repeat the steps, by threading the rest of the nuts to the outer pieces of twine before they are crossed over. The bracelet should wrap around your wrist at least two or three times. Good luck!! (top image from here, rest of images by Honestly…WTF) DIY Wrap Bracelet. You should all know by now that we are all about stacking bracelets on our wrists.

The more, the better. In fact . . . the most, the best! With that being said, we’ll show you how to master a version of the ever so popular wrap bracelet. It’s so simple and addicting, you’ll soon be churning out these wristlets with your eyes closed. Clearly this arm party train isn’t stopping and it’s about time you get on board!
You’ll need (for a double wrapped bracelet) :* Lengths will vary depending on the size of your wrist (see comments for suggestions). Fold the length of leather cording in half to form a loop. Place the ball chain along the leather cording with the end of the chain meeting the end of the wrap. Continue wrapping while checking it for fit around the wrist. DIY Woven Chain Bracelet. Chain link bracelets, with colorful threads woven through them, have been popping up here and there.
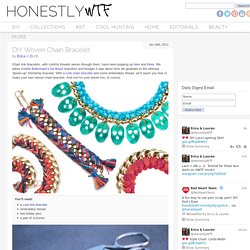
We adore Aurèlie Bidermann‘s Do Brazil bracelets and thought it was about time we graduate to the ultimate “grown-up” friendship bracelet. With a curb chain bracelet and some embroidery thread, we’ll teach you how to make your own woven chain bracelet. And one for your bestie too, of course. You’ll need:a curb link braceletembroidery threadtwo bobby pinsa pair of scissors Cut 2 sets of 15 strands of embroidery thread, with each strand measuring four times the length of the bracelet.
Lay the second color (blue) over the first color (coral).