
7 DIY Bags You Could Do Using Plain Tshirts! Sometimes a DIY a day can keep the doctor away!

Seriously – have you tried the magic of Do-it-yourself? DIY Cat Eye Mask For A Comfortable Sleep - Shelterness. An eye mask provides comfortable and calm sleep anywhere, at any time of the day, and you’ll need it especially if you want to have a nap during the day.

A cat is a very graceful animal, that’s why a cat eye mask is perfect for a girl! The supplies are some black fleece, black elastic, black and white thread, black string, off-white felt and a checkered fabric for the ear and nose pieces. First, cut out your two fleece sides. To make the nose and ear pieces, cut the shapes out of the off-white felt and then a large piece out of the checkered fabric. Stitch the checkered fabric with its ends folded under to the off-white felt using black thread. {scissor variations}: 30 Minute How To: Vintage Accordion Folder. Vintage Accordion Folder © J.Rusnak +Papier Valise 2009 {for personal use only} These folders are a great way to organize receipts, ticket stubs or use as a reference folder You will need: 1 pre-folded metal tab folder 6 - 9 x 12” catalogue style envelopes ( we used Envirotech recycled envelopes) Glue Stick Bone Folder Paper Cutter Optional: Tabs for labeling pockets.

Dig Deeper Newsletter, August 2011 — Timber Press Talks. DIY garden project: concrete stepping stones Working with concrete in the garden is both simple and affordable!
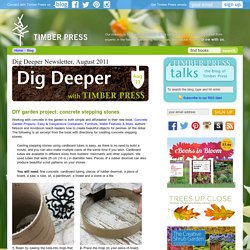
In their new book, Concrete Garden Projects: Easy & Inexpensive Containers, Furniture, Water Features & More, authors Nilsson and Arvidsson teach readers how to create beautiful objects for pennies on the dollar. The following is an excerpt from the book with directions for creating concrete stepping stones: Casting stepping stones using cardboard tubes is easy, as there is no need to build a mould, and you can also make multiple casts at the same time if you wish.
Cardboard tubes are available in different sizes from builders’ merchants and other suppliers. Untitled. Homemade Mod Podge! Today I wanted to make a crafter's basic necessity, Mod Podge or decoupage glue.

Plus it couldn't be better timed, we ate spaghetti last night, and you need an empty jar (with a lid) for this project! *If you'd like to learn more about this conncoction, and how it holds up against the real deal, check out this review, Homemade Mod Podge vs. Real Mod Podge. -1 1/2 Cup Flour -1/4 Cup of Granulated Sugar -1 Tsp Oil (any kind) -1 1/4 Cup Water. Make rolled paper 'wicker' baskets. Make rolled paper 'wicker' baskets I discovered this post on a Russian website and the instructions don't quite make sense, so I started putting together my own paper weave basket using newspaper that I normally keep for cleaning windows and messy projects.

If you have never done basket weaving before, try starting out with this simple basket weaving project, and then work your way up to this basket chandelier. 1. You need to cut long strips of newspaper to about 10cm wide. Fold the newspaper horizontally in half and then half again, and use a sharp knife to cut into sections. 2. 3. 4. 1. 2. 3. 4. Make rolled paper 'wicker' baskets. Put Up Your Dukes: braided scarf tutorial. I have a tutorial that is forty thrillionty times easier and better than my previous (ahem, first ever...give me some grace!)
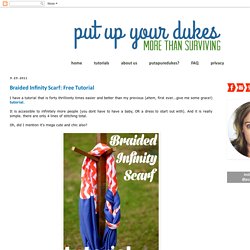
Tutorial. It is accessible to infinitely more people (you dont have to have a baby, OR a dress to start out with). And it is really simple. there are only 4 lines of stitching total. Oh, did I mention it's mega cute and chic also? 5 weeks ago I saw this scarf on pinterest. it was pinned by a VERY popular pinner that I follow under her DIY board.
LOVE these colors. must make a yellow and gray one for me. source The more I thought about it, the more I wanted this, and wanted it CHEAP. Then I got busy. the hardest part was figuring out the knot/braid, but Jesse jumped down and took charge like a freaking Eagle Scout. High on our success and planning the tutorial that would certainly be "my big break," I tweeted the following: Echeveria « Kwiaty doniczkowe. Echeveria Opis Rodzina: Crassulaceae – gruboszowate.

Z uwagi na prawie identyczne wymagania uprawowe wszystkich gatunków postanowiłam załatwić to w jednym opisie. Uzupełniając z czasem ten artykuł o poszczególne gatunki skupię się wówczas na ewentualnych różnicach. Wszelkie dane jakie tu podam będą się odnosiły do roślin gatunkowych jako że dane te nie muszą być prawdziwe dla hybryd. Untitled. Untitled. Prezent. Untitled. Untitled. Zwykłe pnie pomalowane farbą fluorescencyjną. Untitled. DIY Light Bulb Pear DIY Projects | UsefulDIY.com. Untitled. Untitled. DOMOWY SAMOOPALACZ -przepis Polecam na delikatną opaleniznę: 4 torebki herbaty zaparzamy w 0,5 wrzątku lub w szklance. zostawić do zaparzenia na ok 15 min. W miedzyczasie wziaść prysznic, na osuszoną już skorę za pomoca gabki lub za pomoca butelki ze spreyem nanosimy ją na ciało. Jeśli kolor jest za jasny należy czynność powtórzyć do uzyskania koloru jaki chcemy.
Trzeba poczekać az herbata całkowicie sie wchłonie bo może brudzić ubrania. Untitled. Untitled. Untitled. Słoik z pomysłami do wykonania w wolnym czasie. Untitled. Untitled. Untitled. Lampion z patyczków na Stylowi. Odkrywaj, kolekcjonuj, inspiruj. Pomysłowa kuchnia na Stylowi. Pomysłowa kuchnia. Odkrywaj, kolekcjonuj, inspiruj. Odkrywaj, kolekcjonuj, inspiruj. DIY Yarn Serce Box DIY Projekty. Mąka, cukier, woda i biały ocet = lepsze, tańsze Podge… na Stylowi. Odkrywaj, kolekcjonuj, inspiruj. Wieszak na Stylowi.