
News - Dossiers - Tutoriels ] Tutoriel Linear Workflow Maya - Ptiteloutre.fr - [ News - Dossiers - Tutoriels ] 03 oct 2013 Color Management,Composite,EXR,HDR,Linear sRGB,Linear workflow,Maya,mental-ray,sRGB,tutoriel.
![News - Dossiers - Tutoriels ] Tutoriel Linear Workflow Maya - Ptiteloutre.fr - [ News - Dossiers - Tutoriels ]](http://cdn.pearltrees.com/s/pic/th/ptiteloutre-dossiers-tutoriels-117647301)
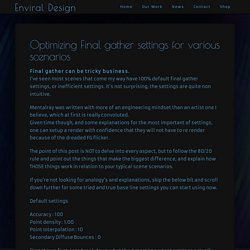
Maya/Mental Ray: Portal Lights. Understanding Final Gather. September 18, 2015 4:00 am Mark Masters Final Gather can be found in just about all of the most common render engines and is an essential step in creating realistic renders that closely mimic how light interacts with objects in the real-world.
With that in mind, let’s go over Final Gather, how it works and where it […] Lightmap Workflow, Part 2: Architectural Lighting. The above is an in-game screenshot demonstrating externally baked linear space lightmaps rendered in Unity Previous article: Lightmap Workflow, Part 1: UV Generation Background RedFrame is meant to be a highly atmospheric and immersive experience.

To create this atmosphere, it was important for us to focus on lighting. Many games have compelling lighting, however they tend to be outdoor environments lit by a single directional source representing the sun. I struggled for many months to achieve a look that I really liked. This is a workflow for Maya and Mental Ray, but the concepts are universal. Correct falloff / Gamma CorrectionPhysically accurate soft shadowsDistribution / PhotometryColor temperatureIndirect light Once you understand these concepts, you will have a non-software specific checklist to use in creating your interior setup.
Optimizing Final gather settings for various scenarios. Final gather can be tricky business.
I’ve seen most scenes that come my way have 100% default final gather settings, or inefficient settings. It’s not surprising, the settings are quite non intuitive. Mentalray was written with more of an engineering mindset than an artist one I believe, which at first is really convoluted. Given time though, and some explanations for the most important of settings, one can setup a render with confidence that they will not have to re render because of the dreaded FG flicker. The point of this post is NOT to delve into every aspect, but to follow the 80/20 rule and point out the things that make the biggest difference, and explain how THOSE things work in relation to your typical scene scenarios. Introducing mental ray for Maya 2016 Render Settings. This is the first in a series of posts on mental ray for Maya 2016 Render Settings Introduction We significantly changed the mental ray for Maya 2016 Render Settings User Interface (UI) in order to reduce time spent adjusting renders.
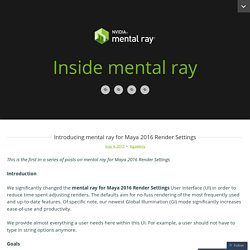
The defaults aim for no-fuss rendering of the most frequently used and up-to-date features. Of specific note, our newest Global Illumination (GI) mode significantly increases ease-of-use and productivity. We provide almost everything a user needs here within this UI. Goals Members of both NVIDIA ARC and Autodesk, including UI designers and developers, collaborated to make this change significant. Enable complete rendering without requirement to adjust or enable most settings.
We also want to retain the flexibility of mental ray for production users. 42 mighty Maya tutorials to try today. Autodesk Maya is one of the go-to packages for serious 3D artists, with its advanced tools and high-end plugins, this software is capable of creating some incredible impressive 3D art to add to your design portfolio.
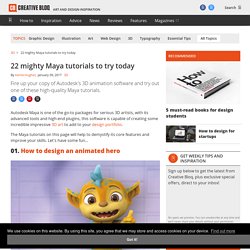
The Maya tutorials on this page will help to demystify its core features and improve your skills. Let's have some fun... 01. How to design an animated hero. Afficher le sujet - Linear Workflow. Hop voici mon explication que je mettrais à jour plus tard car là tout n'est pas en bon français et puis manque des trucs ...
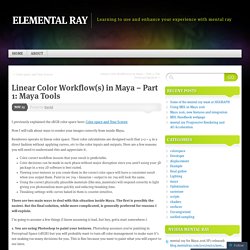
Je pense créer un tit pdf par la suite avec d'autres trucs sur les portal light dont je ne parle pas par exemple mais également d'autres trucs qui peuvent être intéressant Sources ... art-i. La théorie Avant de voir comment faire un workflow linéaire, il me semble d’abord important de comprendre ce que c’est et à quoi ça sert. Je vais faire des raccourcis mais cela me semble utile. Le principe c’est qu’un ordinateur fonctionne de manière linéaire, c'est-à-dire de manière mathématique (2*100 = 200). On voit bien que la version de gauche qui est dans un espace linéaire rend plus 3d et non naturel que la version de droite qui elle est en standard RGB.
La Pratique Maintenant que nous savons la raison et l’utilité de ce workflow linéaire, on peut passer à la pratique afin de comprendre comment le mettre en place dans maya. Linear Color Workflow(s) in Maya – Part 1: Maya Tools. I previously explained the sRGB color space here: Color space and Your Screen Now I will talk about ways to render your images correctly from inside Maya.
Renderers operate in linear color space. Their color calculations are designed such that 2+2 = 4 in a direct fashion without applying curves, etc to the color inputs and outputs. Here are a few reasons you will need to understand this and appreciate it. Color correct workflow insures that your result is predictable.Color decisions can be made in each phase without major disruption since you aren’t using your 3D package in a way 2D software is best suited.Viewing your textures as you create them in the correct color space will have a consistent result when you output them. There are two main ways to deal with this situation inside Maya. I’m going to assume a few things (I know assuming is bad, but hey, gotta start somewhere.)
Easy Linear Workflow in Maya Tutorial. Zap's mental ray tips.