
MintViz - The definitive resource for digital designers. Assembly/Disassembly with Particle Flow in 3Ds Max. 3ds max & Thinking Particles tutorial : blurp. Thinking Particles - Thinking Particles Tutorials. POCKET WATCH TUTORIAL IN 3DSMAX. V-Ray DMC Sampler. Introduction In this tutorial I will focuse on giving you the basic technical background of DMC sampler, but before we go into any technical details about DMC sampler, we will go over alternative sampler integrated in VRay, Adaptive Subdivision sampler.
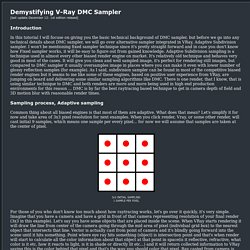
I won't be mentioning fixed sampler technique since it's pretty straight forward and in case you don't know how Fixed sampler works, it will be easy to figure out from gained knowledge. Adaptive Subdivision sampling is a technique used in almost every other biased render engine on market. It's relatively old technique and behaves very good in most of the cases. It will give you clean and well sampled image, it's perfect for rendering still images, but compared to DMC sampler it usually oversamples image in places where you can make it even with lower number of glossy reflection samples (for example). Sampling process, Adaptive sampling Common thing about all biased engines is that most of them are adaptive. Surreal Structures Blog » Blog Archive » Making A Throw Pillow With Cloth Simulation in 3ds Max.
Here is the pillow tutorial that I’ve been promising for a long time.
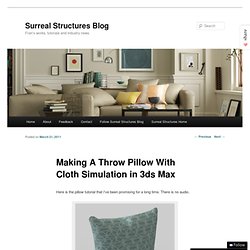
There is no audio. Rendered pillow Watch the video: Pillow Tutorial (48 MB Quicktime MOV) You can go further with your pillow model by doing another Cloth simulation using the Pressure parameter in the cloth properties, and using a couch or chair as a collision object in your simulation. I’ve attached a textual script that explains some of the finer points for you to follow while you watch the video below. Creating A Throw Pillow with 3ds Max Garment Maker and Cloth Modifiers Approximate modeling time: 20 minutes Part I: Make the pillow form: Create a Box primative 12″x12″x3″Length and Width segments: 3 Height segments: 1Name the box “pillow form“.Convert pillow form to an Editable Poly.In Vertex mode, select the top, bottom and side vertices, except for the corner vertices. Part II: Make the pillow case: Part III: The Cloth Simulation: Part IV: The UV Mapping. 3DSpeedy.
Activate and set up the render elements you’ll need for compositing. Next, activate the “ VRay FRAME BUFFER ”. Inside the VFB rollout, check the “SAVE SEPARATE RENDER CHANNELS” check box and click “BROWSE” to save your frames. When you click render, Max will prompt you with an alert about “saving a sequence with no output”, click “OK” to ignore. Now VRay will save out all your render elements in the specified folder. Each frame will have the element name suffixed to the original file name. Quickly create Bitmap maps in the Slate or Compact material editor by dragging your file from any explorer window to the editor. If you’ve ever been working inside an Edit-Poly modifier and needed to move vertices along a non-ortho edge, you’ve realized it can be difficult. When saving out an LDR format, remember that your 2.2 gamma is only “previewed” in the VFB window.
If you want more precision while drawing lines, go into PREFERENCES / VIEWPORTS and toggle the Zoom About Mouse Point options on. CG and 3D tutorials from beginner to advanced. TP video tutorial – simple setup for breaking-up variation – Hristo Velev. Karabakalov - MAXScript Tutorials. PEN Productions Inc. Business Space/Commercial Establishments 3D Models Free Download 3D Model Download,Free 3D Models Download. Texturing « Polygon Blog – 3ds Max Tutorials. 24 Sep 2010 This is the third tutorial in my four part series dealing with character animation.
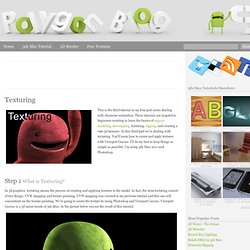
These tutorials are targeted to beginners wanting to learn the basics of organic modeling, unwrapping, texturing, rigging, and creating a cute 3d monster. In this third part we’re dealing with texturing. You’ll learn how to create and apply textures with Viewport Canvas. I’ll do my best to keep things as simple as possible. Step 1 What is Texturing? In 3d graphics, texturing means the process of creating and applying textures to the model.
Step 2 Mental Ray Renderer We’re going to render the scene with Mental Ray. Step 3 Prepare the Model for Texturing We continue from the unwrapping tutorial. Open Material Editor ( ).Select a new (empty) material slot.Click “Get Material” button and select ( doubleclick ) ‘Arch & Design (mi)’ from the list ( ).Assign the new material to the monster ( ). Step 4 Texturing with Viewport Canvas Viewport Canvas is a new feature in 3ds Max. Step 6 Saving the Texture. Hdlect's Channel. Tutorials. Translate.