
Gaetben - photo. Photographie feux d artifice. Tutos Photoshop. Stop motion. How to Create Portraits that Captivate and Intrigue. A Post By: Darren Rowse Yesterday as I wrote about an old professional photographer friend taught me about using a zoom lens as a compositional tool I was reminded of another influence that he had upon me – that of always considering the background and surrounds of your portrait subject.

Image by Blazej Mrozinski I remember looking through one of his portfolios one afternoon and marveling at the way he was able to create shots that were just so…. interesting. He was the type of photographer who produced portrait images that you just couldn’t glance at – you were captivated by them, really drawn into the image. I remember trying to pick his brain as to how he did it and after a few moment of thinking he replied:
Digital Diversity » Blog Archive » Basic exposure blending in Photoshop. Location objectif canon à paris - Louer objectif canon à paris. Complete portrait retouching - 26 July 2010 - Poetry, Writings, Art, Design. After and before retouching: 1.

Duplicate your pic twice to get layer 1 and layer 1 copy. I will soften skin on layer 1. I will tell you why i prefer to soften the skin before removing blemishes while other people do in opposite way. Because after softening, we just need to work on less blemishes skin. Get rid of it otherwise it will ruin your photo.Here i choose Surface blur with radius =4, threshold = 12Then Choose Layer-Layer mask-Hide all. Layer 1 copy is used to make your pic sharper to look more natural. Choose correct value for your pic. Lower opacity to 50%.Result after doing this step: 2. 2008, the year in photographs (part 3 of 3) Les meilleurs logiciels de conversion audio/vidéo/photo... : WinLAME. How to Make Time-lapse Video - Ultimate Guide. Time-lapse photography is an interesting technique that records a scene or objects that has a slow state-of-change and turns it into a video that plays back in high speed.
The easiest way to do it is to have your camera stationary on something that changes slowly (e.g. clouds, plants growing, etc) and start taking series of photo for hours or even days. Hours and hour’s worth of photos are compressed into a video with merely few minutes playtime, thus creating a time lapsing effect. In another word, it allows us to see the progress faster without having to wait along the actual time. Spotting sun’s movement from sunrise to sunset takes about 12 hours; it’s boring and you probably won’t notice the changes.
But seeing it rise and set in 10 seconds, that’s pretty interesting! In this article, we’ll show you how to create your own Time-lapse video. Ready? 1. We’ll start by understanding some fundamental rules. France - La photographie en automne. 5 astuces clés pour réussir ses photos en noir et blanc. Si vous avez déjà touché un appareil photo, vous avez sans doute déjà essayé la photographie en . Pour des tas de raisons, le noir et blanc attire. Une dose de , d’intemporalité, de magie : vous êtes , surtout en voyant certaines images qui sortent du lot. Mais quand vous vous y essayez, vous n’obtenez pas forcément le résultat que vous attendiez. Découvrez les 5 clés pour vos photos en noir et blanc. Et oui, réussir son noir et blanc n’est pas aussi facile que ça en a l’air, et on a vite fait de se retrouver avec des images grisâtres sans trop d’intérêt.
15 (+10) Great Photography Links from Around the Web. France - Photographier La Lumière. Faux Photoshop: 15 Incredible Images That Look Altered but Aren't. Faux Photoshop: 15 Surreal Images Look Altered but Aren’t Article by Steph, filed under Photography & Video in the Art category.

Photoshop has revolutionized design, photography and illustration to the point where any image that manages to capture something really amazing is quickly dismissed as fake. But, it is still possible to create jaw-dropping images without the help of a computer. Each of these 15 images may have you screaming “Photoshopped!” Ressources / tuts. Invisible Man. Une série « Camouflage » par le jeune et très talentueux artiste Liu Bolin.
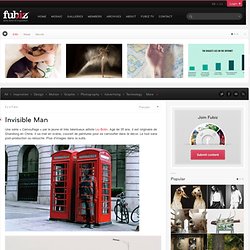
Agé de 35 ans, il est originaire de Shandong en Chine. Il se met en scène, couvert de peintures pour se camoufler dans le décor. Le tout sans post-production ou retouche. Plus d’images dans la suite. 40 Examples of Panning Shots in Photography. Panning is a technique in photography that is used to capture a moving object in action.The subject of the photo is clearly caught on camera; however, the rest remains a blur in the background.

Panning suggests speed and velocity to an image. To date, more and more people are into enhancing their panning skills. Below are 40 Examples of Panning Shots in Photography that was shot by skilled and aspiring photographers as they explore and use the panning technique. These photos were mostly taken with the use of a Digital Single Lens Reflex camera. Feel free to browse through these images and be motivated! Source Source Source. PhotoFace. Digital Picture Zone. Posted on Sep 06, 2008 | Comments 175 21.1K Flares21.1K Flares × Applied carefully, High Dynamic Range-technique (HDR) can create incredibly stunning pictures which blur our sense of the difference between reality and illusion.

“In computer graphics and photography, high dynamic range imaging (HDRI) is a set of techniques that allows a greater dynamic range of exposures (the range of values between light and dark areas) than normal digital imaging techniques. Galerie de klados25. 10 réglages pour réussir vos photos : Réussir ses photo en 10 étapes. Le monde de la Photo. Labo.